> ## Documentation Index
> Fetch the complete documentation index at: https://docs.superoffice.com/llms.txt
> Use this file to discover all available pages before exploring further.
# Create new document
> Create a new document directly in SuperOffice CRM or upload existing ones, to make sure you and your colleagues always have access to the latest documents and versions. This how-to guide will show you how to do both.
Already have the document? See [Upload documents](#upload).
Follow the instructions below, depending on how documents are managed in your SuperOffice installation.
## How do I know if I am using SharePoint, SuperOffice WebTools, or not?
SharePoint: Create a new document. If it opens in Microsoft Office Online, you are using SharePoint.
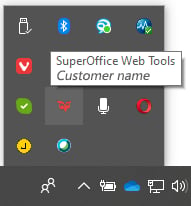
SuperOffice WebTools: Open the system tray in the lower right corner of your desktop and look for the SuperOffice icon .
 ## Steps
With SuperOffice CRM, you can log in from any PC using a browser, but your documents will then be saved on the central server. Downloading and uploading of documents are handled automatically by SuperOffice WebTools.
1. Click **New** on the top bar and select **Document**.
2. [Enter the required information in the fields.](#fields)
3. Click the **Create** button to create a new document based on the selected [document template][5]. The **Document** dialog closes automatically, and the document opens in your default text-editing application.
4. Type in the content of your document.
5. Save it and close the text-editing application. The document is saved.
**This feature requires a license.**
1. Click **New** on the top bar and select **Document**.
2. [Enter the required information in the fields.](#fields)
3. Click the **Create** button to create a new document based on the selected [document template][5]. The document is created in SharePoint and opened in a new tab with the online text-editing application (Office Online).
To use your desktop editing program, you can choose **Open in Desktop App** from Office Online.
4. Type in the contents of the document.
5. Close the tab or your desktop app. The document is automatically saved to SharePoint.
If you have not installed SuperOffice WebTools, you must manually download documents to edit them. Afterwards, you must upload the edited documents to the central server.
This procedure describes how to create new documents if you are using a desktop text-editing application. The actual process may be slightly different if you use an online text-editing tool (like Microsoft 365) and a document library (like SharePoint).
1. Click **New** on the top bar and select **Document**.
2. [Enter the required information in the fields.](#fields)
3. Click the **Create** button to create a new document based on the selected [document template][5]. The document is created on the server.
4. Click **Open** and **Edit**.
5. In the **File download** dialog, select one of the following buttons:
* **Open:** When you click **Open**, the document is opened in the text editing application. Type in the contents of the document and select **File** > **Save As** to save it in the desired location on your PC.
* **Save:** When you click **Save**, the **Save As** dialog appears. Specify where on the PC you want to save the file, and then click **Save** to start the download. Click **Close** when the download is finished. Open Windows Explorer and browse to the document you have just saved. Open the document, enter the required text and save the document.
Changes to the document are not saved in SuperOffice automatically. If you want such behavior, we recommend [installing SuperOffice WebTools][7].
6. Close the text-editing program.
7. Go to the **Document** dialog.
If **Completed** is checked, the upload options are disabled. In that case, remove the checkmark.
8. Click the link to upload the document or drag and drop the document from Windows Explorer to the **Document** dialog.
9. Close the **Document** dialog by clicking **Save**.
## Steps
With SuperOffice CRM, you can log in from any PC using a browser, but your documents will then be saved on the central server. Downloading and uploading of documents are handled automatically by SuperOffice WebTools.
1. Click **New** on the top bar and select **Document**.
2. [Enter the required information in the fields.](#fields)
3. Click the **Create** button to create a new document based on the selected [document template][5]. The **Document** dialog closes automatically, and the document opens in your default text-editing application.
4. Type in the content of your document.
5. Save it and close the text-editing application. The document is saved.
**This feature requires a license.**
1. Click **New** on the top bar and select **Document**.
2. [Enter the required information in the fields.](#fields)
3. Click the **Create** button to create a new document based on the selected [document template][5]. The document is created in SharePoint and opened in a new tab with the online text-editing application (Office Online).
To use your desktop editing program, you can choose **Open in Desktop App** from Office Online.
4. Type in the contents of the document.
5. Close the tab or your desktop app. The document is automatically saved to SharePoint.
If you have not installed SuperOffice WebTools, you must manually download documents to edit them. Afterwards, you must upload the edited documents to the central server.
This procedure describes how to create new documents if you are using a desktop text-editing application. The actual process may be slightly different if you use an online text-editing tool (like Microsoft 365) and a document library (like SharePoint).
1. Click **New** on the top bar and select **Document**.
2. [Enter the required information in the fields.](#fields)
3. Click the **Create** button to create a new document based on the selected [document template][5]. The document is created on the server.
4. Click **Open** and **Edit**.
5. In the **File download** dialog, select one of the following buttons:
* **Open:** When you click **Open**, the document is opened in the text editing application. Type in the contents of the document and select **File** > **Save As** to save it in the desired location on your PC.
* **Save:** When you click **Save**, the **Save As** dialog appears. Specify where on the PC you want to save the file, and then click **Save** to start the download. Click **Close** when the download is finished. Open Windows Explorer and browse to the document you have just saved. Open the document, enter the required text and save the document.
Changes to the document are not saved in SuperOffice automatically. If you want such behavior, we recommend [installing SuperOffice WebTools][7].
6. Close the text-editing program.
7. Go to the **Document** dialog.
If **Completed** is checked, the upload options are disabled. In that case, remove the checkmark.
8. Click the link to upload the document or drag and drop the document from Windows Explorer to the **Document** dialog.
9. Close the **Document** dialog by clicking **Save**.
How to enter information
Many fields have a list of predefined values you can choose from. Click to expand the list. Then select a value for that field. Alternatively, start typing in the field to search for a specific value, such as a company name.
![Create document from template (new) -screenshot][img4]
**Steps:**
1. Choose a [document template][5]. Select a language for the template. This option is only available if the selected template includes translated versions.
2. Optionally, select a company or contact the document pertains to.
3. Optionally, select a project and/or sale to link it to the document. You can choose any project/sale regardless of which company you chose earlier.
4. Enter a document title in the **Subject** field. This text is shown in section tabs and in other lists of document.
5. Today's **date** is set by default. Optionally, change the creation date (click to open the date picker).
You cannot change this date after clicking the **Create** button (the field becomes read-only).
6. Enter references:
* **Our ref:** Enter your own reference. The default entry for each template is defined in Settings and maintenance, but you can also edit the content of this field.
* **Your ref:** Enter the addressee's reference from their communication.
### Other settings (optional)
* In the the **Details** tab, enter a description of the document (or keywords) to aid free-text searching.
* In the **Links** tab, click **Add link** to [link the document to other activities][9].
* In the **More** tab, set any [user-defined fields][10] configured in Settings and maintenance.
Upload document
1. Click **New** on the top bar and select **Document**.
2. Drag and drop the document from Windows Explorer to the **Document** dialog.
3. (optional): Select the checkbox in the footer to mark the document as completed.
4. [Complete the fields with the required information](#fields).
5. Click the **Create** button to create the new document in SuperOffice CRM. The document is added to the **Activities** section tab.
[5]: ../templates/learn/index
[7]: /integrations/webtools/install
[9]: ../../learn/basics/links
[10]: ../../custom-objects/learn/udef
[img4]: /media/loc/en/document/create-document.png
## Related topics
- [Edit documents](/en/document/learn/edit.md)
- [Check in/out documents](/en/document/learn/lock.md)
- [Save email attachment to SuperOffice](/integrations/mail-link/archive.md)
- [Send email attachments from SuperOffice](/en/document/learn/send-as-email.md)
- [Manage document templates in Settings and maintenance](/en/document/templates/admin/link-template.md)