

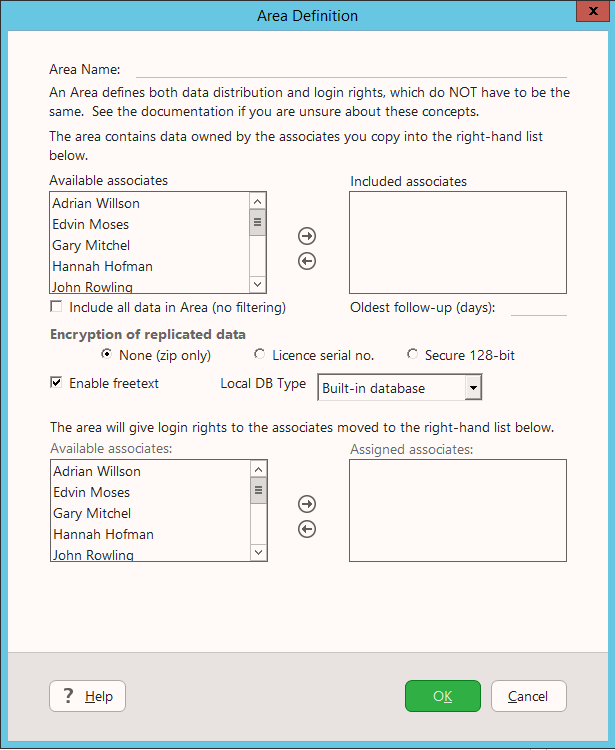
There are 2 lists called Available associates. The top one is used when assigning users to an area. The bottom one is used when setting access rights.
- When you assign a user to an area, they are moved from the top Available associates list to the Included associates list.
- When you assign access rights to that user, they move from the bottom Available associates list to the Assigned associates list.
Pre-requisites
Before you begin the area definition, you should:- Decide which areas you want to divide the database into
- Decide which employees’ data should be included in each area
- Decide which user or users have sign-on access rights to an area
Area Management is accessible from the Replication panel in SOAdmin. You need the General administrator functional right to access the Area Management menu.
Steps
- Select Define Areas on the Replication panel in SOAdmin.
- In the Area Management dialog, click New.
- In the Area Definition dialog, enter a descriptive name for the area into the Area Name field.
- Highlight the user and click the right arrows to move them to the desired list. Use the top lists to assign users to an area. Use the bottom lists to set access rights.
- Click OK to save. You return to the Area Management dialog where the new area now is listed in Defined Areas.
You must generate an Update Prototype for each area defined before a user can perform the Local Update.
Scenarios
Area A with only user A’s data
- In the Area Definition dialog, enter area A into the Area Name field.
- Highlight User A in the top Available associates list and click the right arrow next to the list. User A is now listed as an included associate.
- Highlight User A in the bottom Available associates list and click the right arrow next to the list. User A is now listed as an assigned associate.
- Click OK to save. Area A is now listed in the Area Management dialog under Defined Areas.
Area C with records of users A and B also included
- In the Area Definition dialog, enter area C into the Area Name field.
- Highlight User A, User B, and User C and move them to the Included associates list.
- Highlight User C and move them to the Assigned associates list.
- Click OK to save. Areas A, B, and C are now listed in the Area Management dialog under Defined Areas.
2 users including the data belonging to 2 other users
If we use the example with the sales-persons Peter, Paul, Marie, and Lynne as a starting point, we will now define an area for Peter and Paul including Peter’s, Paul’s, Marie’s, and Lynne’s data.- In the Area Definition dialog, enter Customer Group California into the Area Name field.
- Highlight Peter, Paul, Marie, and Lynne, and move them to the Included associates list.
- Highlight Peter and Paul and move them to the Assigned associates list.
- Click OK to save. Area Customer Group California is now listed in the Area Management dialog under Defined Areas.
Edit an Area
Sometimes it may be necessary to edit an area, for example, if a new employee should be added to an area.- From the File menu, select Travel and then select Area Management.
- In the Area Management dialog, highlight the area to edit and click Edit.
- Make the desired changes to the area. Click OK when done.
Delete an Area
An area can be deleted if no longer needed.Make sure that the area is not in use by any users before deleting.
- From the File menu, select Travel and then select Area Management.
- In the Area Management dialog, highlight the area to delete and click Delete.
- In the Delete Area dialog, click OK.