

Summary of highlights
SuperOffice 12 - a new main version of SuperOffice CRM where we focus on AI to become part of how you work every day. From this version, all feature updates are available to SuperOffice Online customers only. Onsite installations will receive security updates only.Features released in Version 12
Features released in Version 12
- Version 12.5
- Navigation - Recent navigation
- Follow-ups - Automatic complete of attendees’ follow-ups when owner completes
- Follow-ups - Administrative cleanup of externally owned follow-ups
- Forms - Message when a form is too large to save
- Requests - Oldest request becomes the primary request when merging
- System design - Extra fields - URLs shown as clickable links - Settings and maintenance
- Licences - See your available apps in App store - Settings and maintenance
- Version 12.4
- Requests - Reply to requests directly from the preview
- Forms - Conditional fields in Forms
- Forms - Default checked state for the Custom checkbox field
- Forms - AI styling of form
- Flows - Expanded trigger conditions for custom fields
- Version 12.3
- Multiple DKIM for Mailgun - Settings and maintenance
- Version 12.2
- Dashboard - Measure sale cycles
- Email and Document - Download the email or document file
- Mailing - View numbers with two decimal in Summary
- Version 12.1
- System design - Webhooks management panel - Settings and maintenance
- Version 12.0
- Spam classification on requests
Feature updates
Navigation - Recent navigation
Get back to any record or view you’ve worked with, in one click. Moving between companies, contacts, sales, projects, requests, and the Diary is part of everyday CRM work, and retracing your steps takes time.You’ll find the Back and Forward buttons and the Recent navigation button, shown as a clock icon, on the left side of the top bar.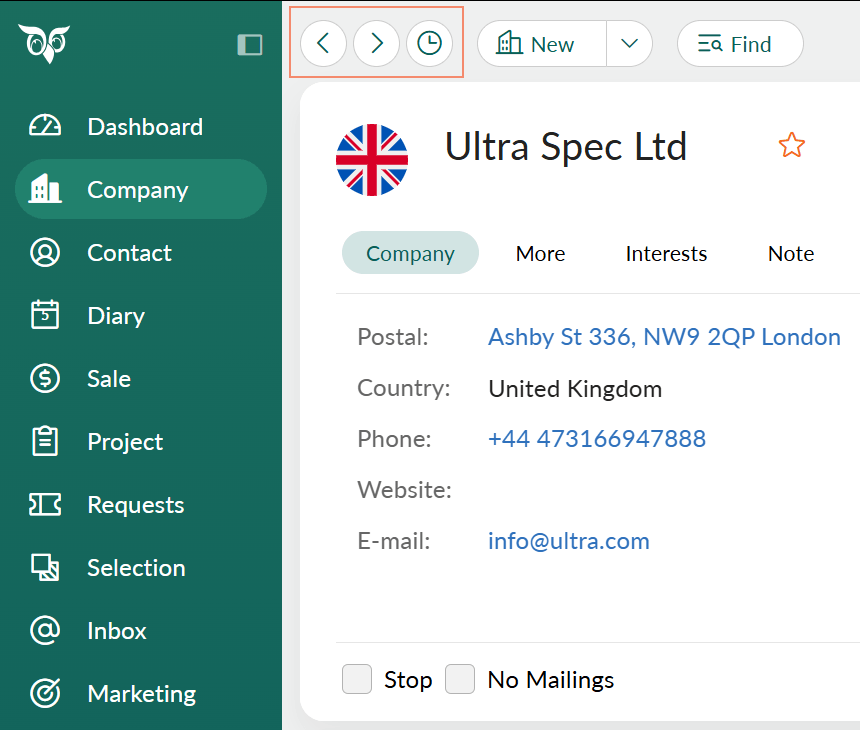 Select the clock icon () to see the places you’ve visited, with the most recent at the top. Select an entry and you’re taken straight there, with the tabs, side panel, and list or board view restored as you left them. Each place appears only once, so revisiting a company moves it to the top instead of adding a duplicate. (Back) and (Forward) step through your visits in order, and the browser’s own Back and Forward buttons work the same way.
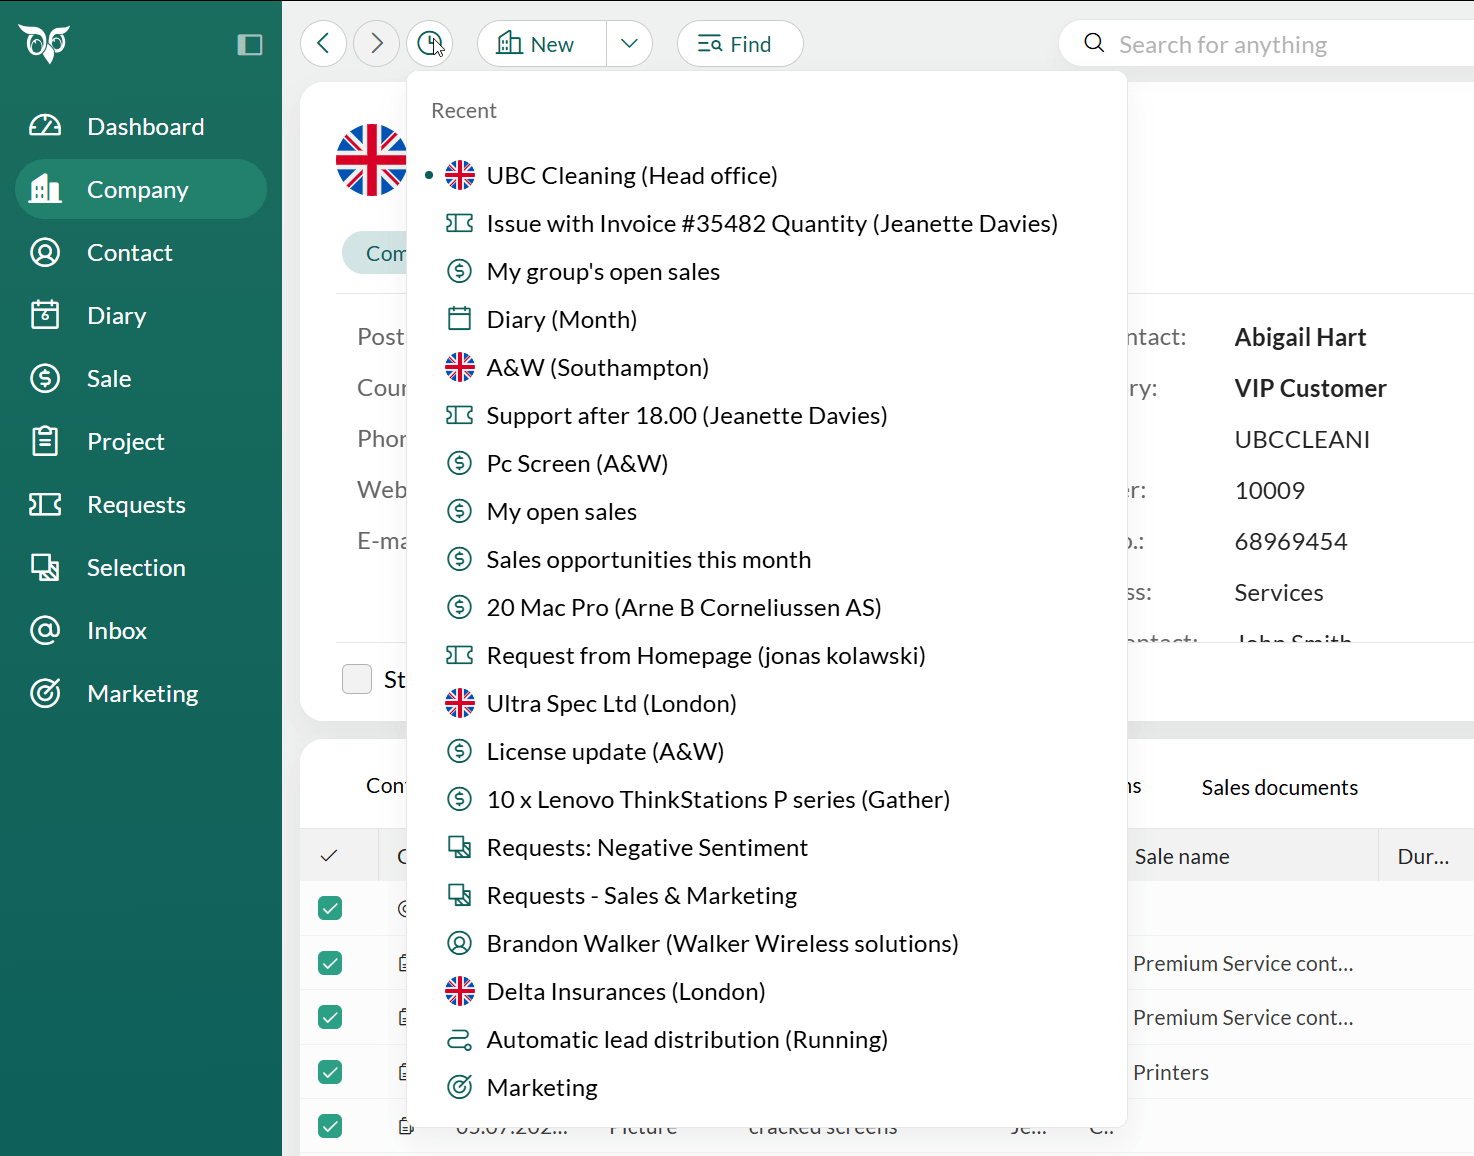 For example, you review a company, open one of its sales, then check your diary. Select the clock icon (), choose the company, and you’re back on the same tab with the same side panel open. You decide how many places the list keeps with the Recent navigation list size preference.
Follow-ups - Automatic complete of attendees’ follow-ups when owner completes
Keeping your Todo list clean is a task that is easily forgotten. Many of your meetings are invitations from colleagues, and when the owner marks the meeting as completed, your follow-up, and those of any other attendees, are completed as well.This means that when the owner of a follow-up completes it, all linked follow-ups are marked as completed too. That is less work for everyone, and you only need to remember to complete the follow-ups where you have invited others. Your Todo list is found in the Diary, either at the bottom or as a section tab at the top.Follow-ups - Administrative cleanup of externally owned follow-ups
Administrators can remove orphaned, duplicate, or obsolete follow-ups that come from an external calendar, without database intervention. Follow-ups synchronized from an external calendar are read-only in SuperOffice, so they can’t be cleaned up when the source calendar no longer manages them, for example after a migration or a synchronization issue.Assign the functional right Delete externally owned follow-ups to the roles that need it. Users with the right can delete these follow-ups with the standard Delete action, and the deletion is logged like any other. The right doesn’t allow editing, so externally owned follow-ups remain read-only. The external calendar remains the source of truth: if the original item still exists and is within the synchronization scope, the follow-up is recreated at the next synchronization. This works for all supported external calendar systems.Forms - Message when a form is too large to save Marketing
Be sure every submission from your visitors reaches SuperOffice. A form that grows beyond the size the system can process, usually because of large images, can’t register submissions, and without a warning you would not know until responses were missing.To check if the form is too large, go to Marketing > Forms, open your form in the form builder, and select Save. The form size is checked against the maximum allowed, which is 10 MB for the whole form. If the form is too large, saving stops with the message File is too large. Swap, for example, a high-resolution photo on the thank-you page for a smaller version, and save again.Learn more about forms - Thank you page.Requests - Oldest request becomes the primary request when merging Service
The request with the earliest Registered date is automatically chosen as the primary request, and the others are merged into it.Customers and colleagues refer to the original request number, so it matters which request survives a merge. Choosing the primary request by click order would force agents to correct the result by hand.Mark two or more requests in a request list and select Merge. The Merge requests window opens. Use the arrow icon in the window to reverse the direction, so the newest request becomes the primary request.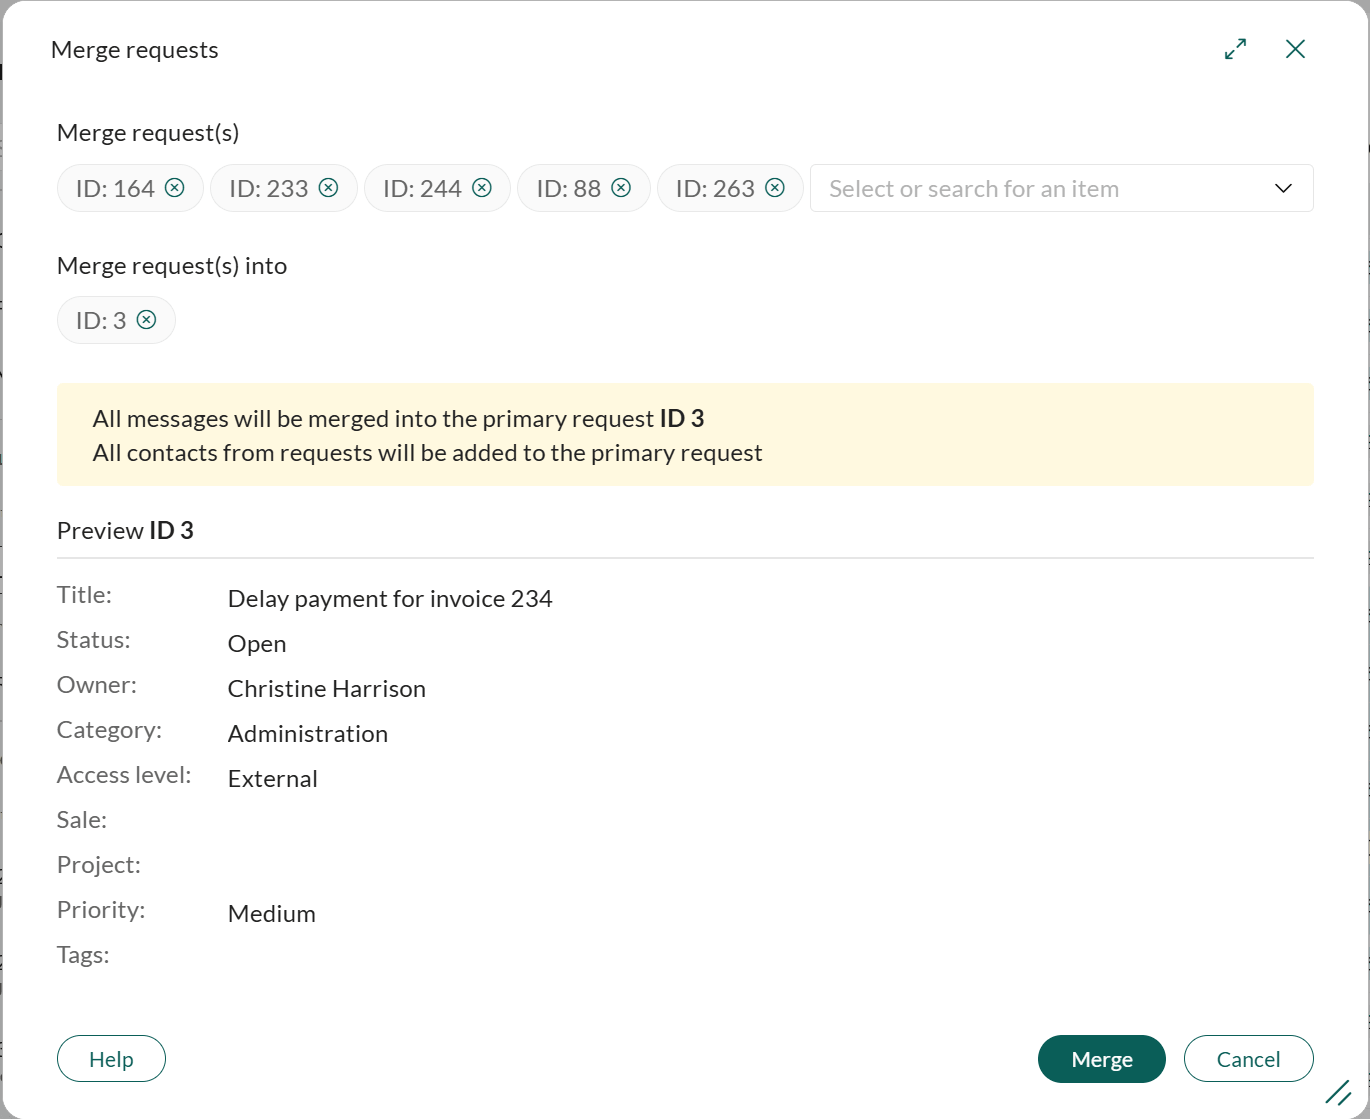 The behavior is controlled by the preference Use the oldest request as the main request when merging, which is enabled by default.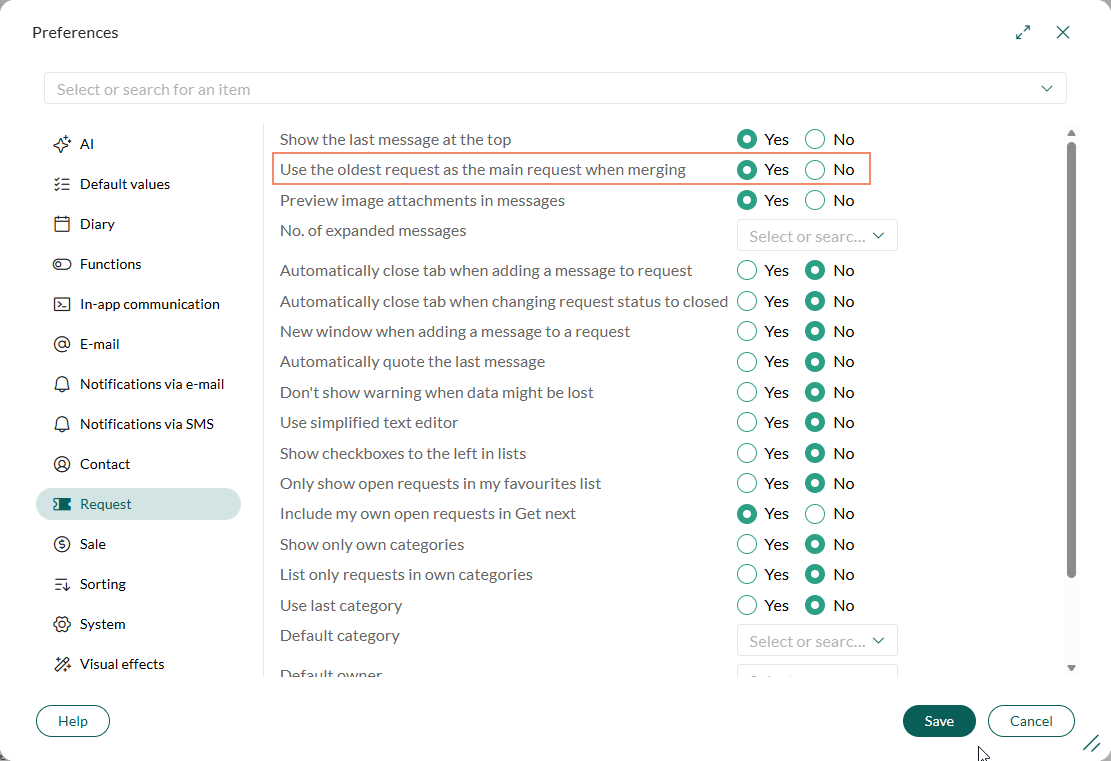
System design - Extra fields - URLs in extra fields are shown as clickable links Settings and maintenance
URLs stored in extra fields are displayed as clickable links in read mode, so it’s easy to open a record in an external system with one click, straight from the request, message, or custom object card. Customers and partners often store a unique URL for each record, such as an order or case in another system, in a text extra field, and the Screen Designer link function only covers a fixed URL plus a variable, not a different link for each record.The links are available in Short text and Long text extra fields on requests, messages, and custom object cards. Only Extra fields created in System design can be used: the user-defined fields on Company, Contact, Project, and Sale cannot be used for links.Type or paste a URL that starts withwww. or http(s):// into the field and save. In read mode, the URL is displayed as a clickable link that opens in a new tab. In edit mode, the field is a normal text field. For example, an extra field named Order link containing https://erp.example.com/orders/48213 opens that order in your ERP system.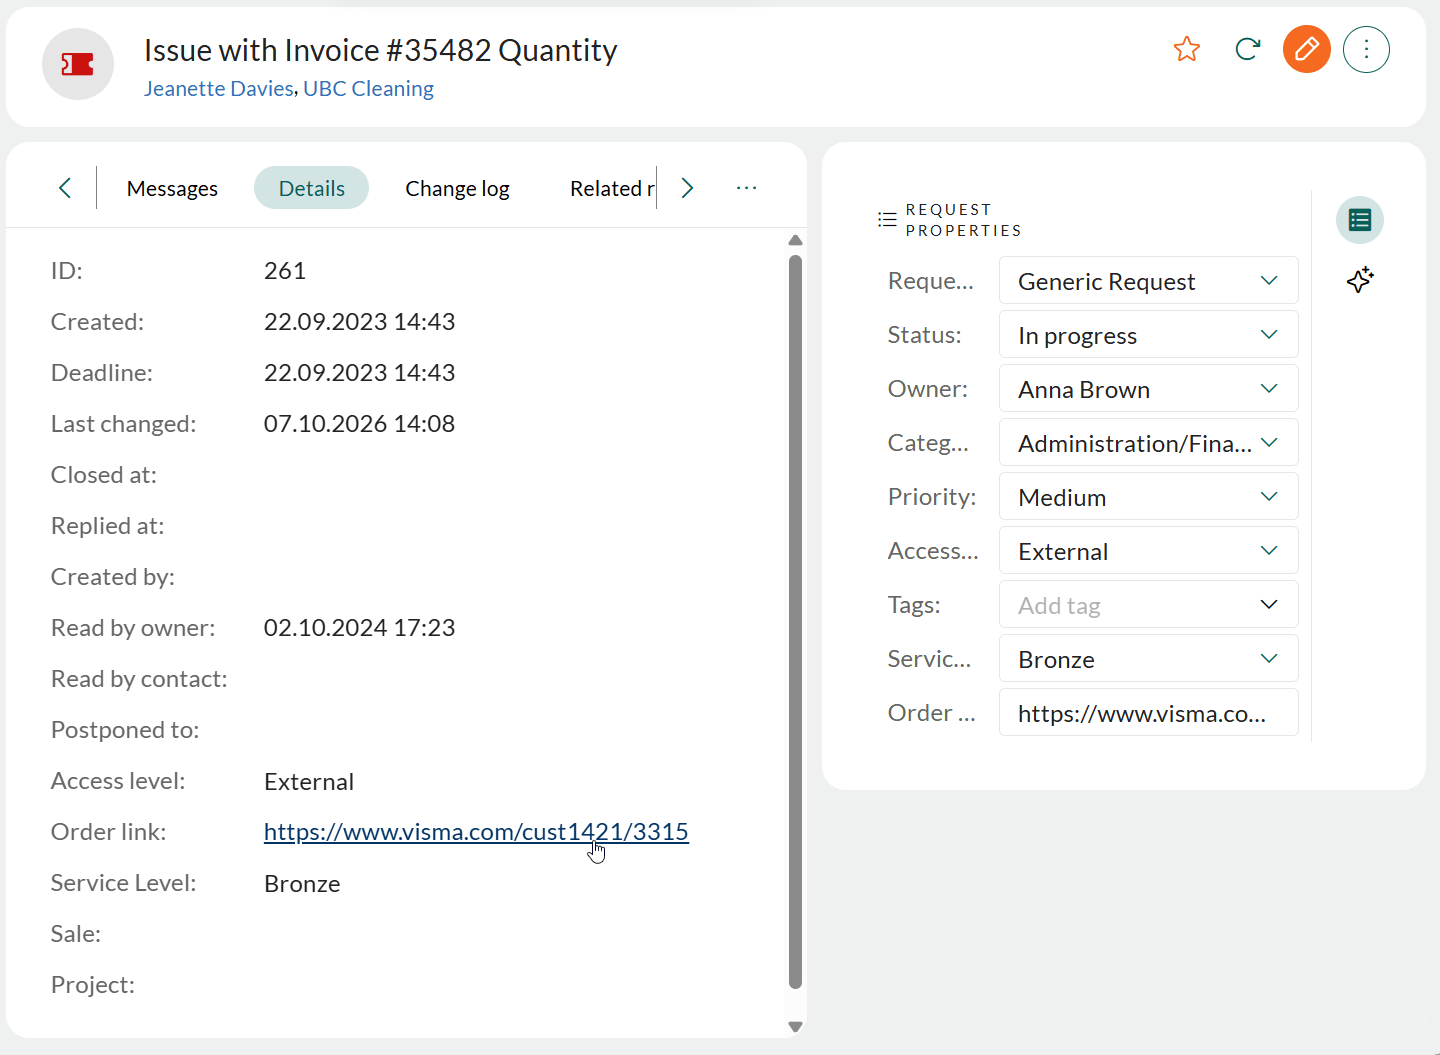
Licences - See your available apps in App store Settings and maintenance
See all the apps available for your CRM Suite license in one overview. Select My Apps on the Licences screen in Settings and maintenance to open SuperOffice App Store, where you can also compare your installed apps with what is available for your SuperOffice installation.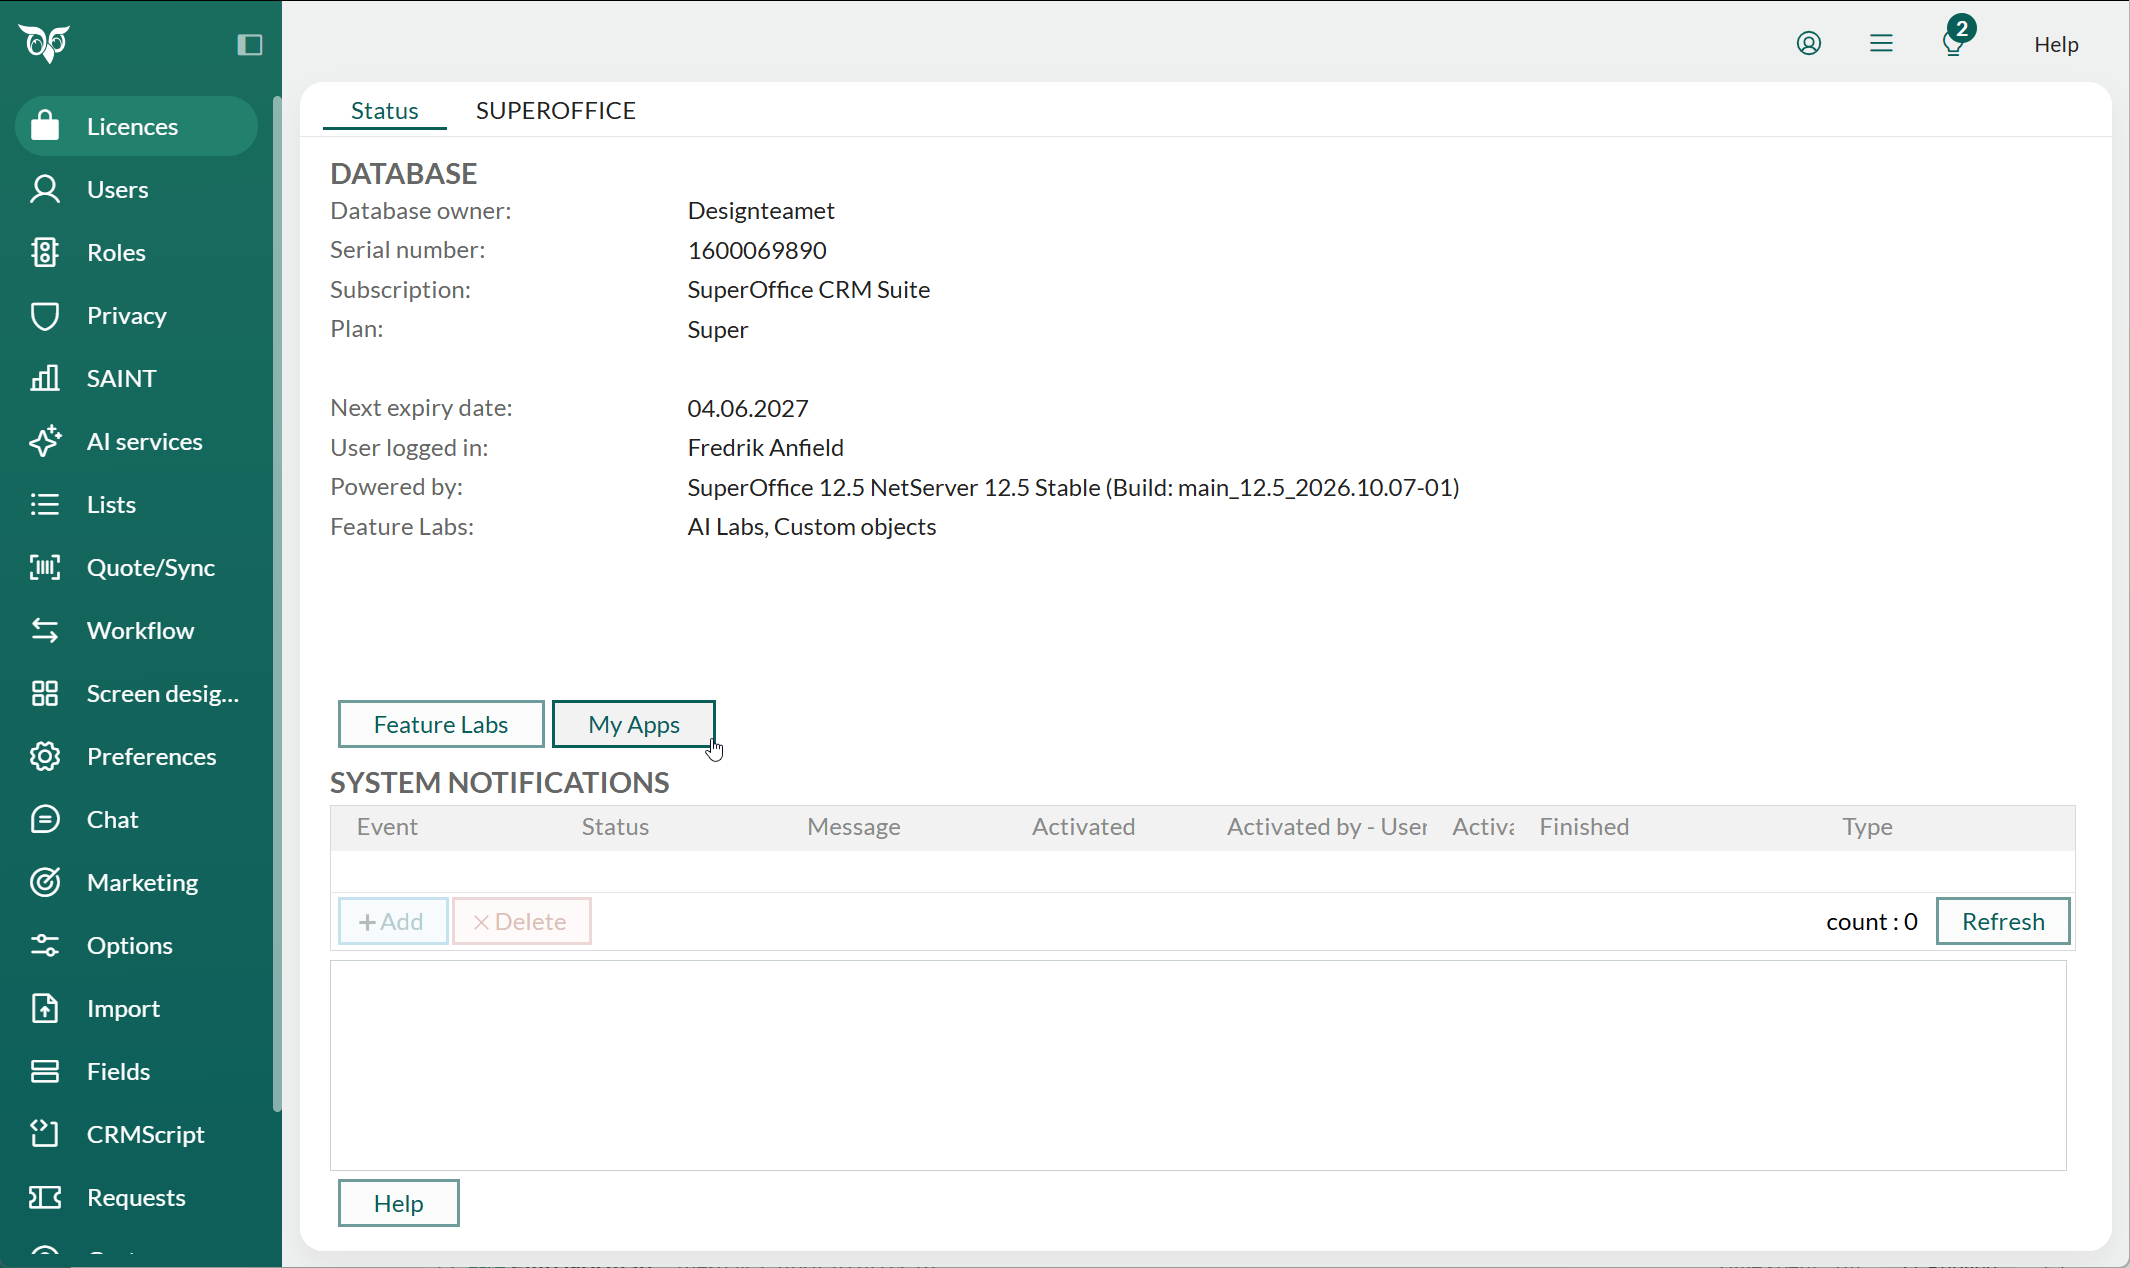
Requests - Reply to requests directly from the preview Service
Answering a request from a busy queue doesn’t have to mean leaving the list to do it. The Quick reply buttons in the preview panel let you write and send your answer without opening the full request, so you keep your place in the queue.Without quick reply, responding to a request means opening the request in full screen, losing your position in the list, and finding your way back to it afterward.You’ll find Quick reply whenever you preview a request from a request list or in split view. Selecting it opens a compact reply editor in place, and any reply you send this way registers on the request just as one sent from the full request view does, including status updates, with the list refreshing automatically.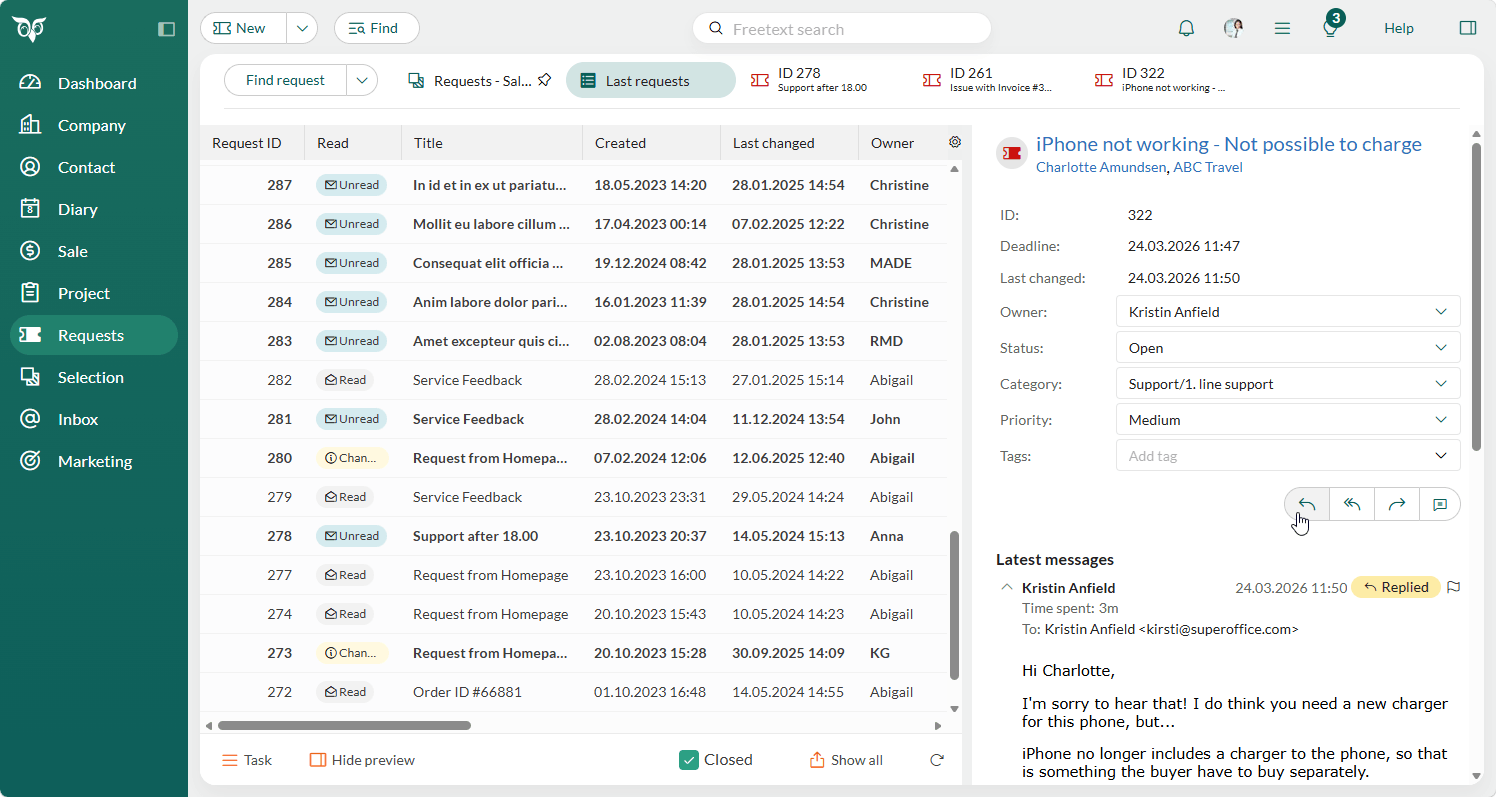
- If you cancel or move to another request with unsent text, you’re asked before it’s discarded.
- Quick reply isn’t shown on requests marked as spam, deleted, or merged, so you’re only ever offered an action that applies.
Mailings - AI features in email editor are being temporarily removed Marketing
The current AI features for generating images and text will be temporarily removed. These capabilities are based on older technology and will be replaced over time with more modern AI solution. We will share more information as these improvements become available.Forms - Conditional fields in Forms Marketing
Show visitors only the questions that apply to them in your forms. Conditional fields let a form reveal a question only when an earlier answer makes it relevant, so each visitor sees just what matters to them while the form still captures the detail needed from everyone else.Long forms with fields that don’t apply to every visitor feel overwhelming and hurt completion.Go to Marketing > Forms > form builder, and on an eligible field’s option or value, choose Add related field. Eligible field types carry a Conditional badge when you add a new element, so you don’t have to add a field first to find out. This works on dropdowns (including standard list fields), radio buttons, checkboxes, rating fields (stars, smileys, dice, or thumbs), extra fields of the dropdown or Boolean type, and Interests fields.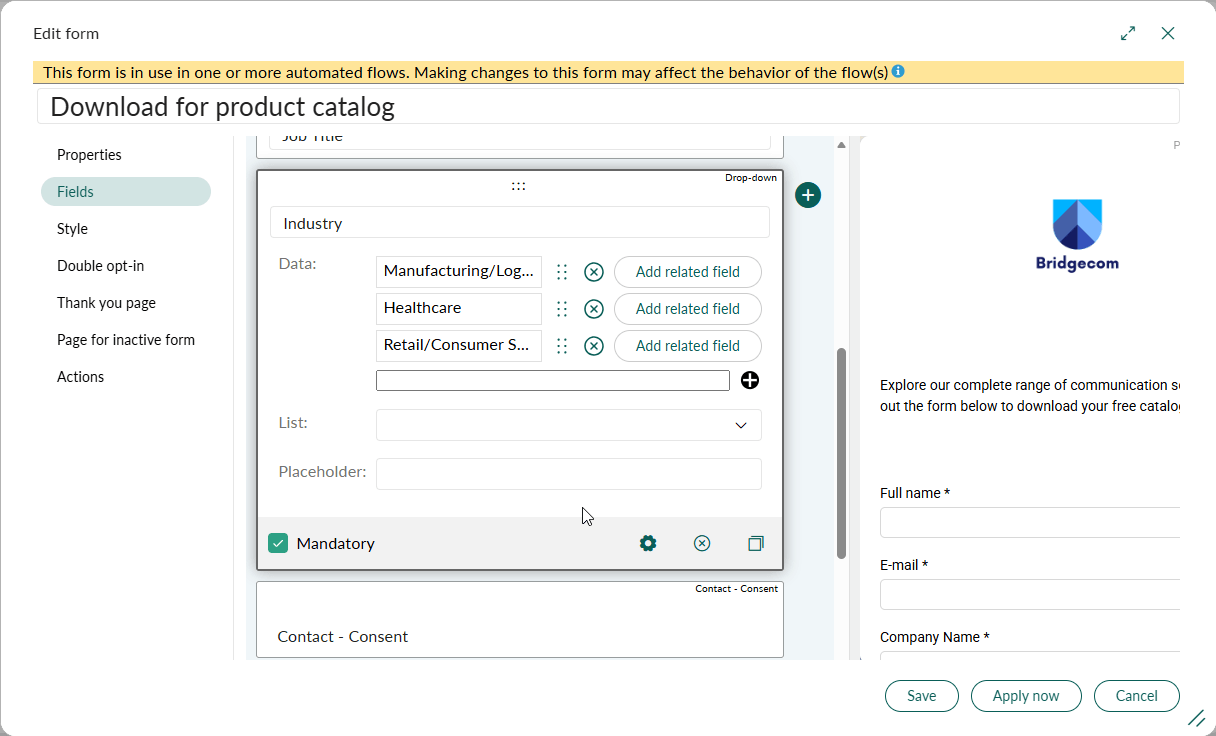 A related field appears indented below its parent, with a plain-language condition banner (for example, “This field shows when 11–50 employees is selected”). Multiple trigger values join with “or”; rating fields use a range instead of a single value. Fields can be chained several levels deep (a question can trigger a follow-up, which can trigger a deeper follow-up), though each related field is controlled by exactly one condition on one field.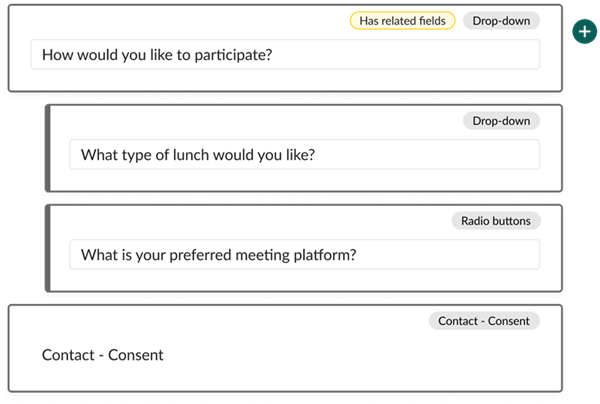
A related field is hidden by default for the visitor, appears instantly on the triggering answer, and disappears and clears if the answer changes. A hidden field is never required, even if marked mandatory, and hidden answers aren’t included in the submission.
Forms - Default checked state for the Custom checkbox field Marketing
Set a Custom checkbox field to match the answer most visitors would give. Custom Checkbox fields (the Boolean-type extra field, Yes/No only) can be set to start checked or unchecked, so the field, and any related field attached to its condition, reflects the intended state as soon as the form loads.A checkbox that opens unchecked when most visitors would answer “Yes” adds an unnecessary click for every visitor who fills in the form.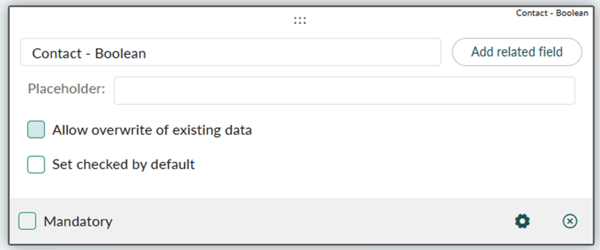 Find Set checked by default in a checkbox-type custom field’s settings, in the form builder under Marketing > Forms. It defaults to unchecked unless you turn it on. If the field has a related field attached via a condition, Default checked is treated as if the visitor had set it themselves, so the related field shows or stays hidden on load accordingly, and the editor’s preview updates live as you change the setting.Learn more in field options.
Forms - AI styling of form Marketing
Match a form’s styling to your website without hand-picking colors. Give Custom styling a website URL, and AI suggests colors, borders, and rounded corners to match, so you can align a form to your site without trial-and-error tweaking of each property.Manually matching a form’s colors, borders, and corner radius to a website takes guesswork and repeated adjustment.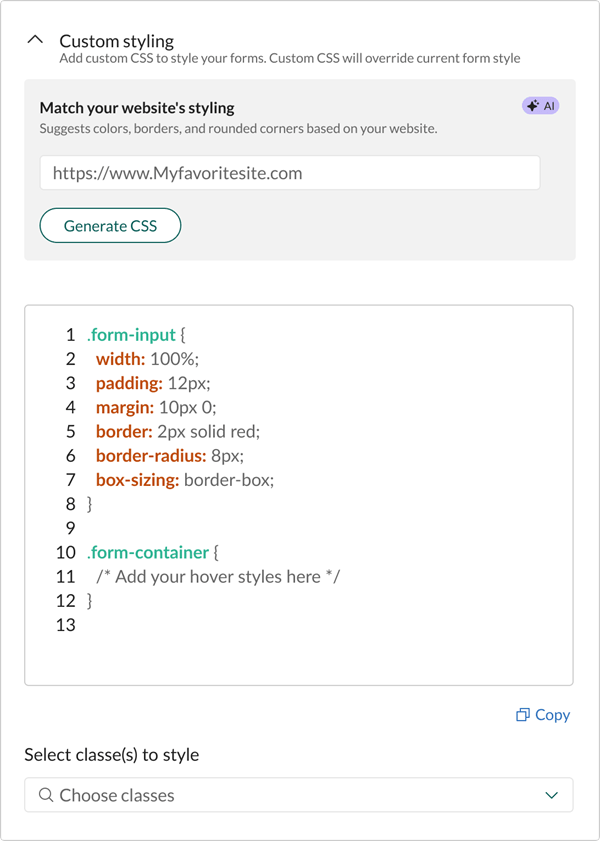 Go to Marketing > Forms > edit a form > Style tab > Custom styling, enter a website URL, and select Generate CSS. The AI analyses the site and proposes Cascading Style Sheets (CSS) code, which you can preview before applying. Selecting Apply now overrides the form’s default styling with the result: it changes only colors, borders, and rounded corners, while other styling, such as font or layout (width, height, and so on), is set in the basic styling section or added as additional CSS properties.Learn more about custom styling with AI.
Flows - Expanded trigger conditions for custom fields Marketing
Build flow logic on more of your form data. Extra fields of the dropdown type can be used as a trigger condition on a Form submission, so you can filter or branch a flow based on the answer given.A form’s built-in fields don’t always capture the detail you need to route a flow correctly.Select a dropdown-type extra field as a condition on a Form-submission trigger, in Flows. Its list values populate automatically, so you can filter or branch on the answer given.Multiple DKIM for Mailgun Settings and maintenance
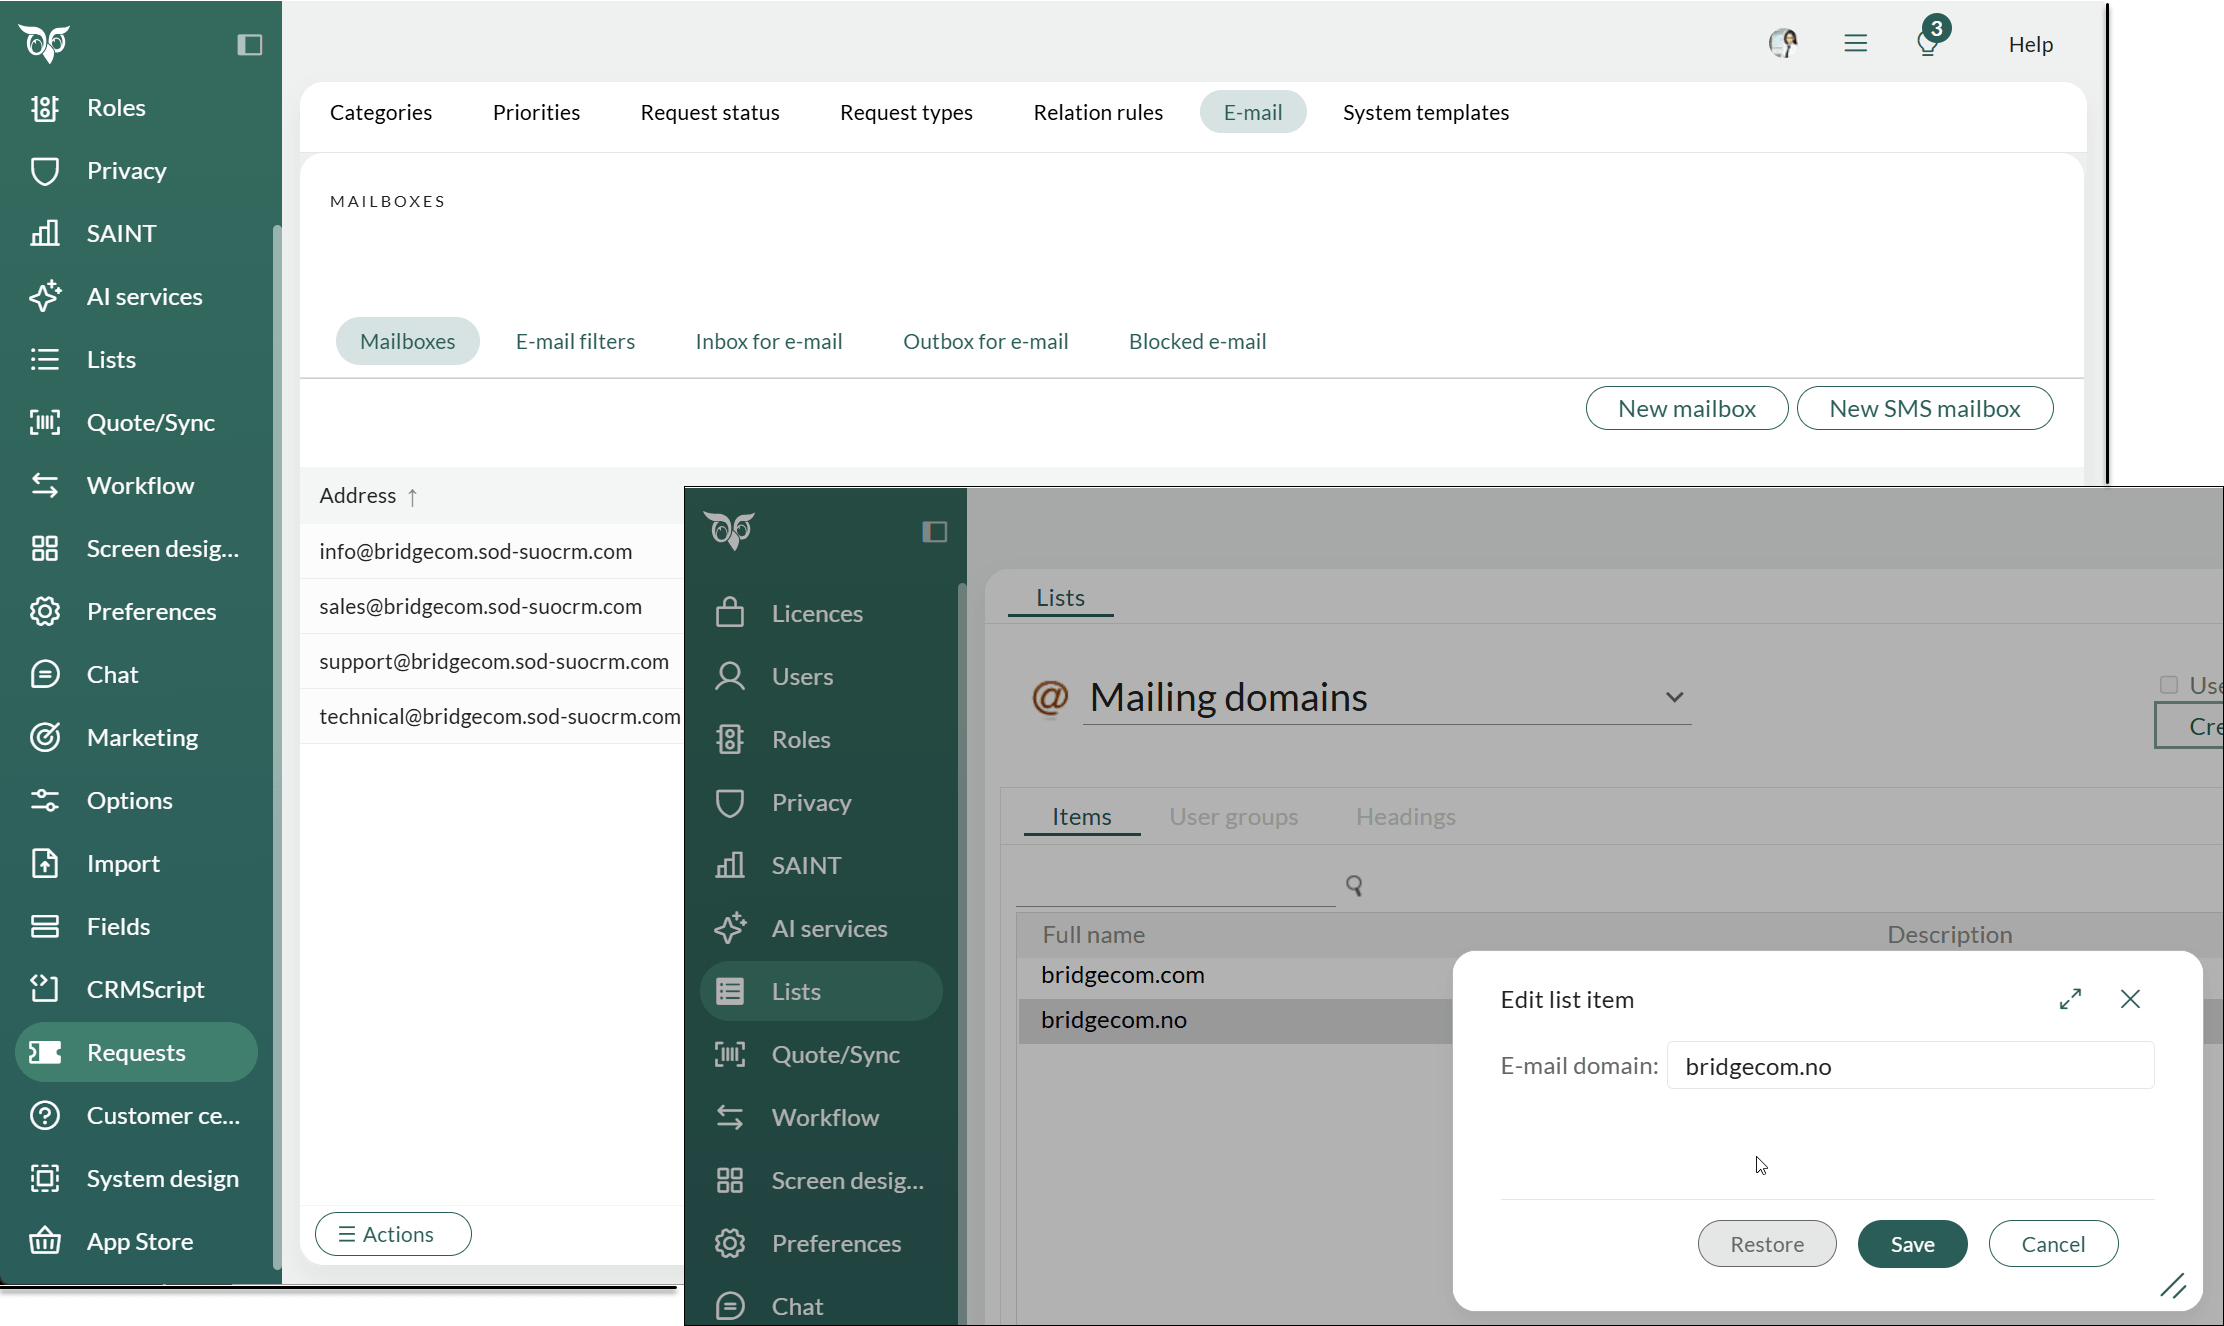
Send outgoing mail in Service and Marketing from several domains - such as separate brands or country-specific addresses - with each domain signed by its own DKIM key, instead of sharing one key across your SuperOffice environment.Without multiple DKIM, all outgoing mail is signed with a single domain’s DKIM key, even when it is sent from a different brand or country-specific address. This weakens DKIM and DMARC verification for any domain other than the one the key belongs to, which can affect deliverability.To set this up, request a DKIM setup for each sending domain using the Order DKIM key form, listing the domains involved - for example brand1.com, brand2.com, and brand3.no. SuperOffice Operations will create the domains in Mailgun, generate a DKIM key for each one, and send you the DNS records to add. Your DNS administrator adds these records following the DKIM and SPF setup guides. Once SuperOffice Operations confirms the records are valid, the domain is ready to use.Remember to add the different domains in Settings and maintenance > Lists > Mailing domains, and add your different mailboxes in Settings and maintenance > Requests > E-mail.
 Learn more about multiple DKIM records.
Dashboard - Measure sale cycles Sales
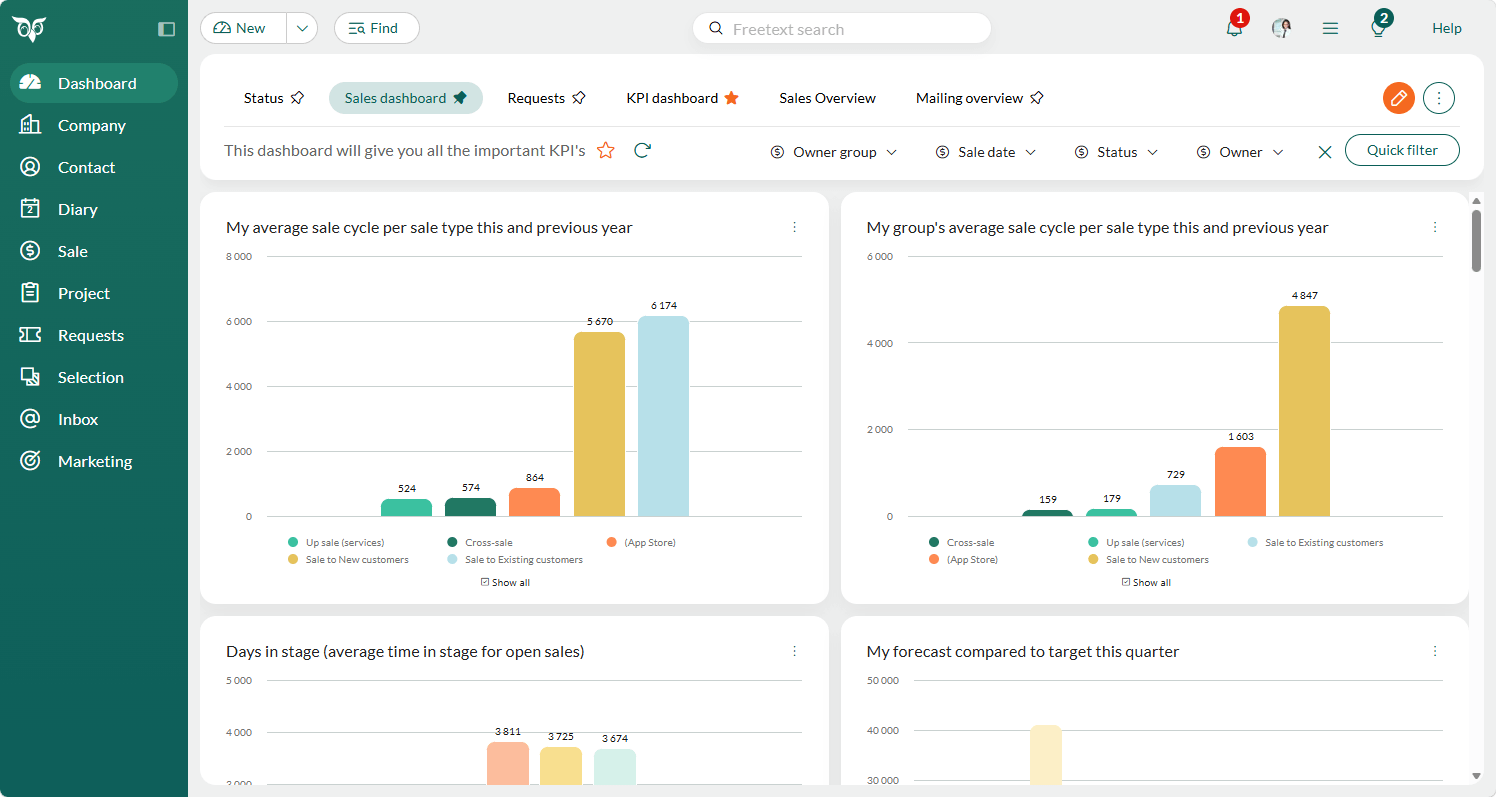
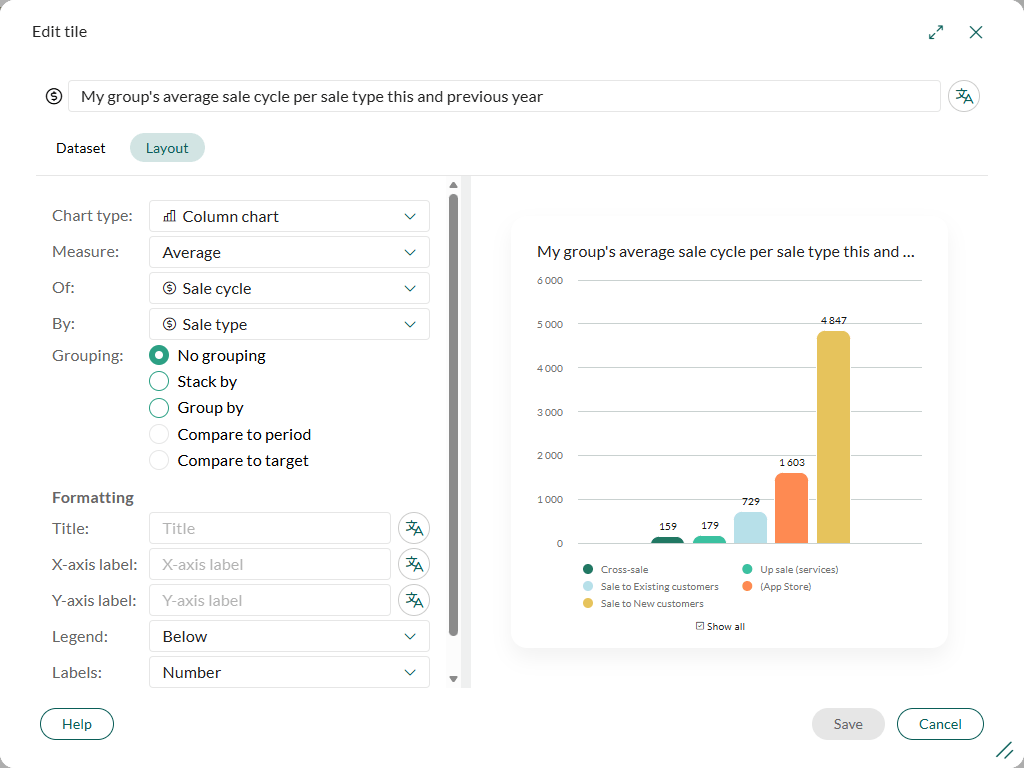
Understanding how long deals take to close helps you spot what’s working and where deals stall. The Sale cycle field shows the number of days from when a sale is created until it’s set to Sold or Lost - the count appears once the sale reaches one of these statuses, rather than running while it’s still open. For open sales, use the Days in stage field instead.Without this, tracking cycle length across reps, teams, and segments means piecing information together by hand. The Sale cycle field puts this on the dashboard, so the pattern is visible at a glance rather than something you have to dig for.You’ll find it in the Dashboard module, as a filter in Find, and as a column in archives.Two ready-made tile templates in the Library make it easy to get started:- My average sale cycle per sale type this and previous year
- My group’s average sale cycle per sale type this and previous year
Find - Sale cycle as criteria and column
The Sale cycle criteria and column let you see how long a sale has been open. Because the field shows a number of days, you can search between, above, or below any figure you choose.Adding Sale cycle as a column in your sale selections gives you a quick view of how long each sale has been in progress, right alongside the rest of your results.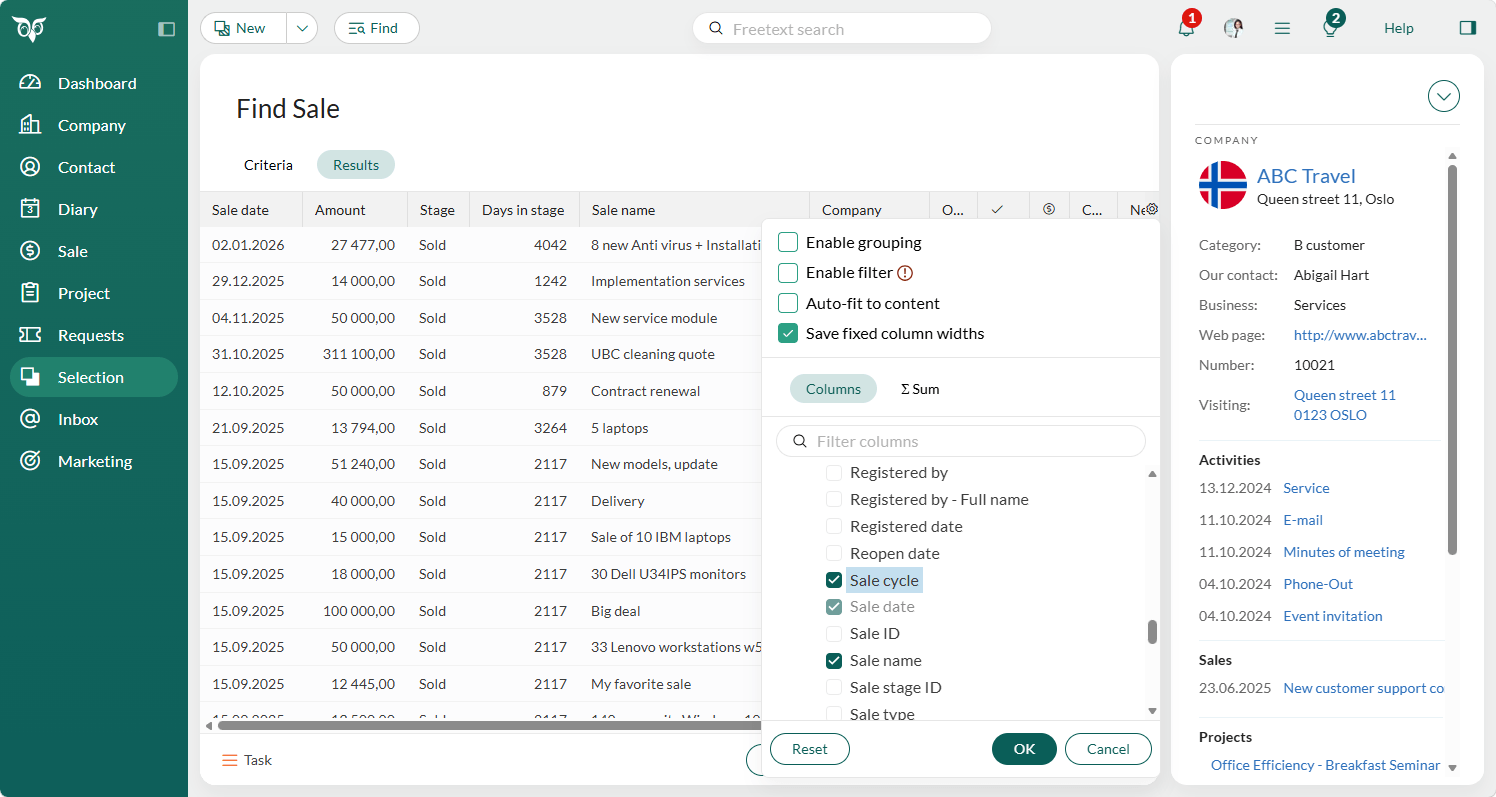
The Sale cycle shows 0 days until the sale is set to Sold or Lost. For open sales, use the Days in stage field instead.
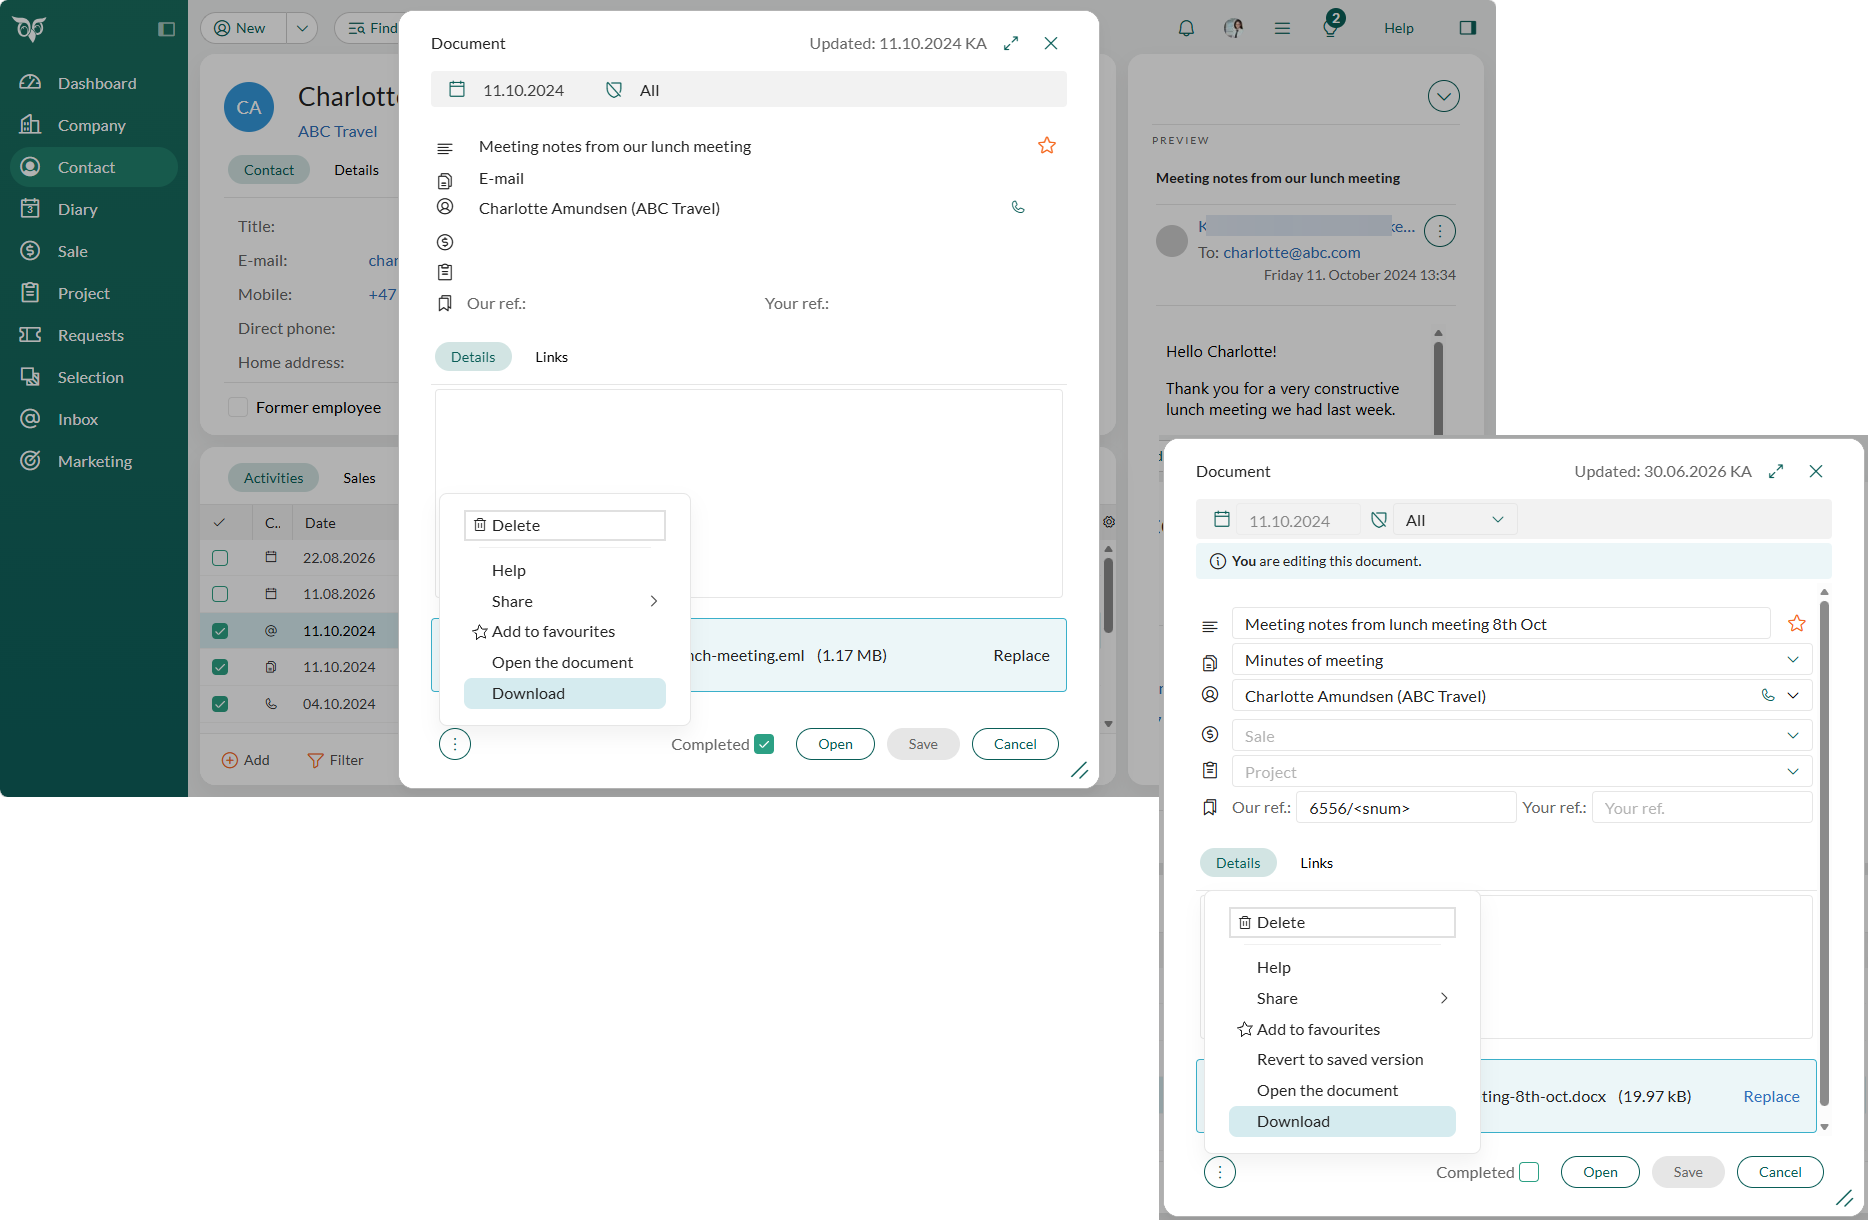
Email and Document - Download the email or document file
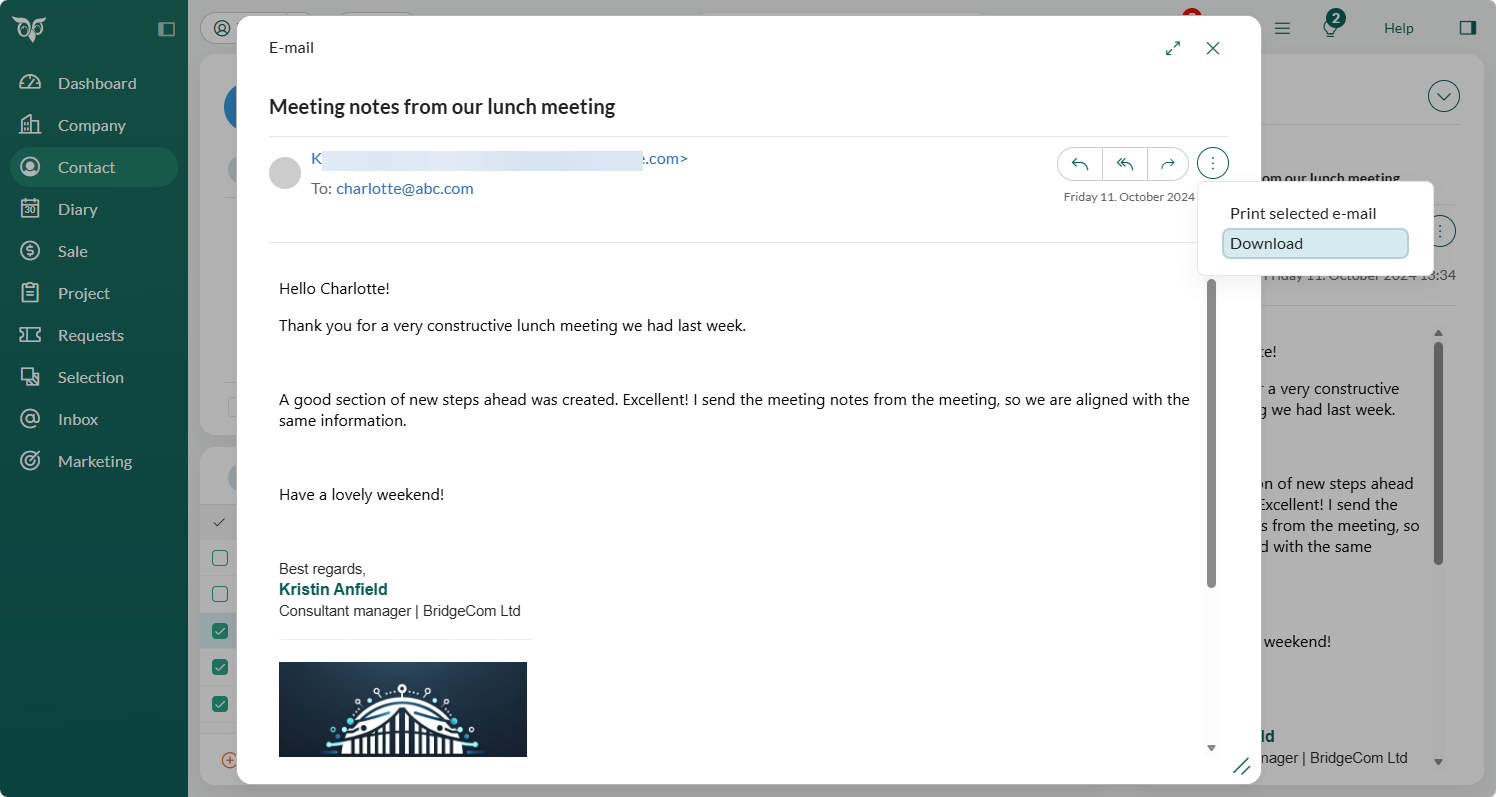
Sometimes you need a copy of an email or document outside SuperOffice - to forward it another way, archive it locally, or open it in a different tool. You can now download the email or document file from any archive where you see it, and from the document dialog.Downloading an email lets you open the stored message in your local email client. As Outlook Mail Link (OML) is phased out, this gives you a straightforward way to keep working with emails in your local Outlook installation.In any archive that shows documents and emails, the context menu includes a Download option. Multi-select isn’t supported.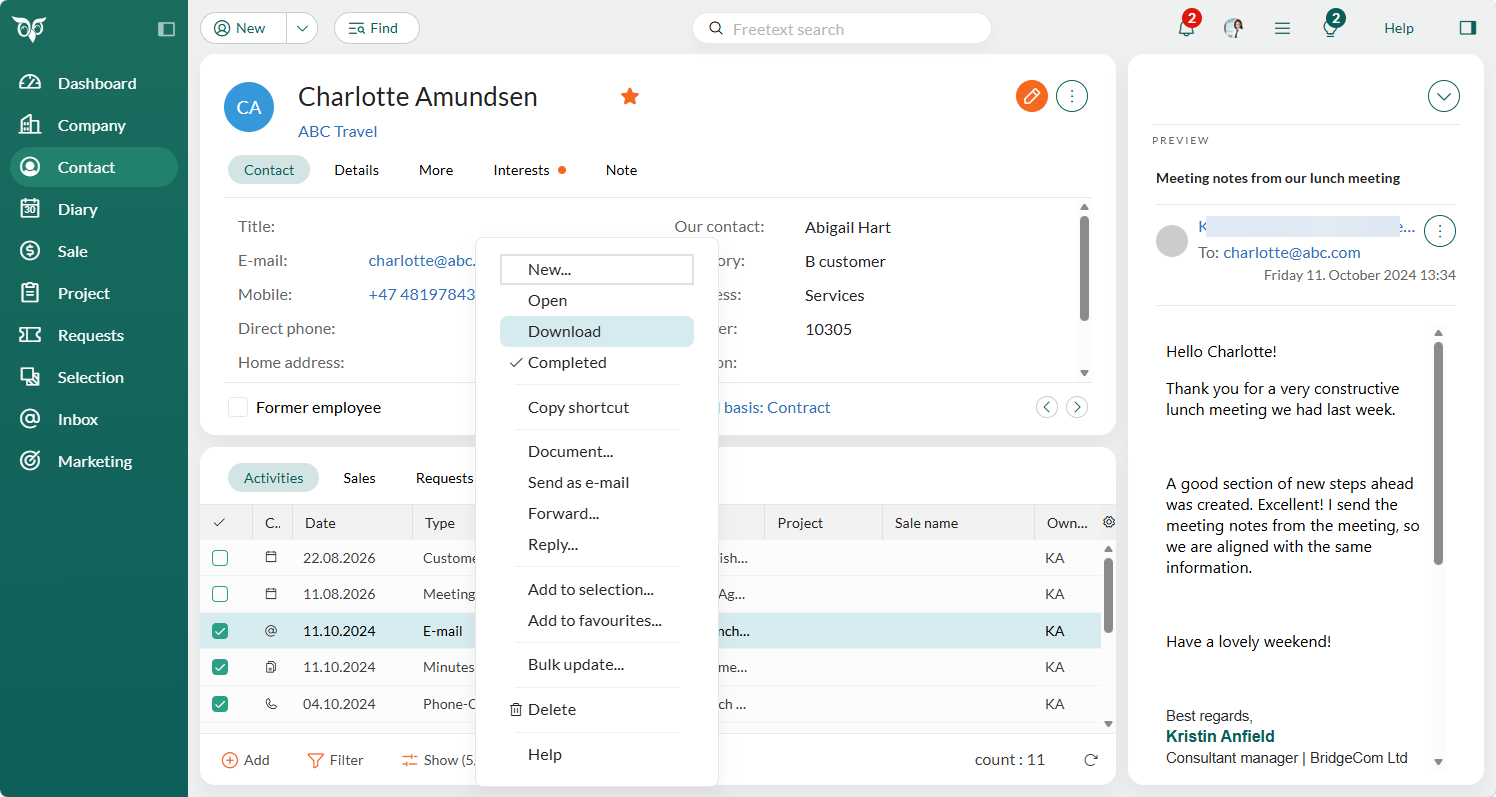 Opening an email inside SuperOffice shows the Download option in the Task menu.
 An email in the Inbox also has the Download option in the Task menu.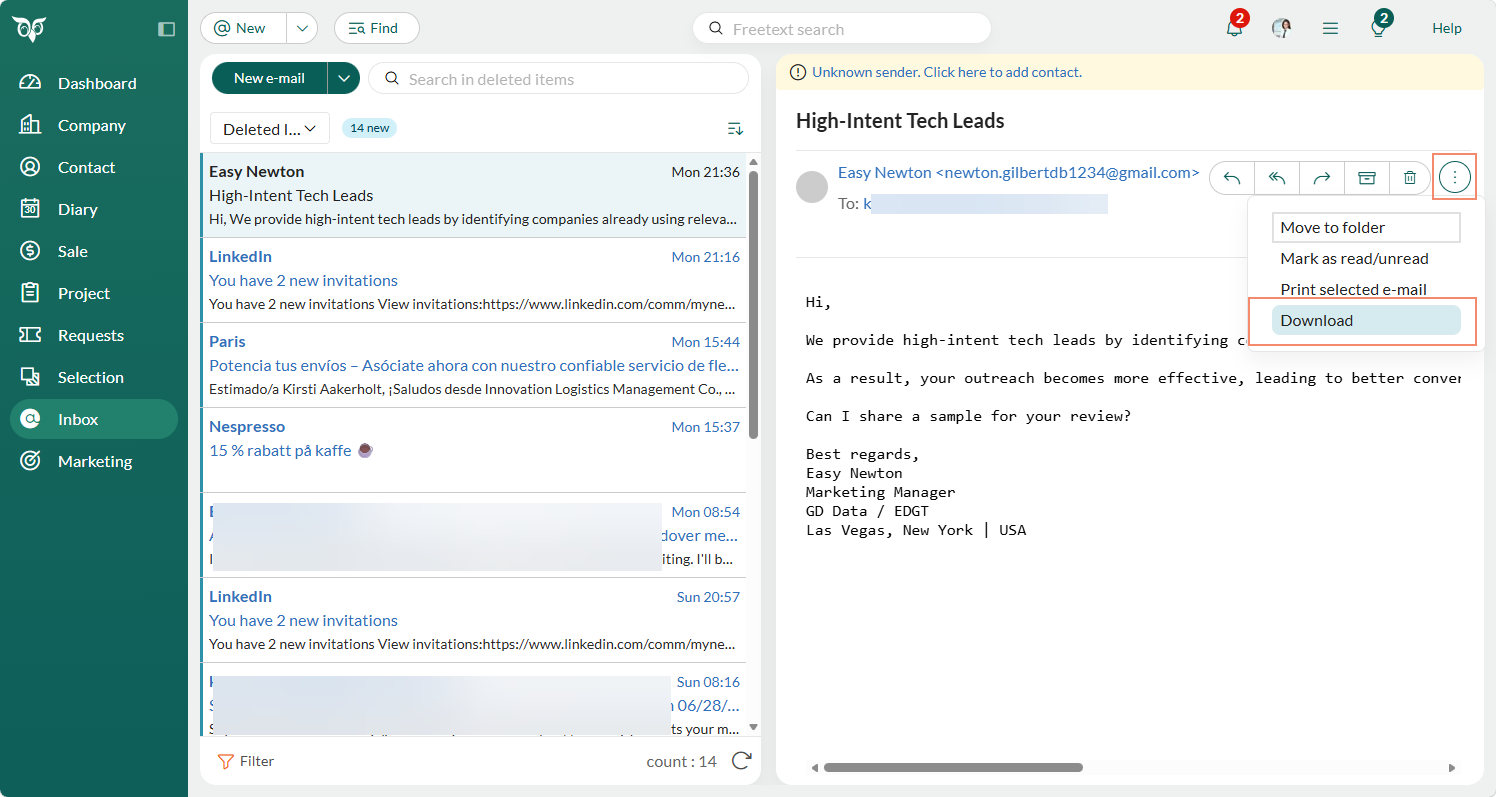
Mailing - View numbers with two decimal in Summary Marketing
A mailing’s Open rate and Click-through rate are shown to two decimal places, giving an exact read on how recipients responded rather than a rounded approximation.Rounding these rates to the nearest whole percentage can hide real differences in performance, especially for smaller mailings where each recipient shifts the percentage by several points. Showing the full two decimal places removes that ambiguity, so the number on screen matches the actual count of opens and clicks.Find these figures on the Summary tab of a mailing, under Marketing > Mailings.Both rates are calculated as a percentage of the number of recipients the mailing was sent to. For a mailing sent to seven recipients, five opens is shown as an Open rate of 71.43%, and two clicks is shown as a Click-through rate of 28.57%.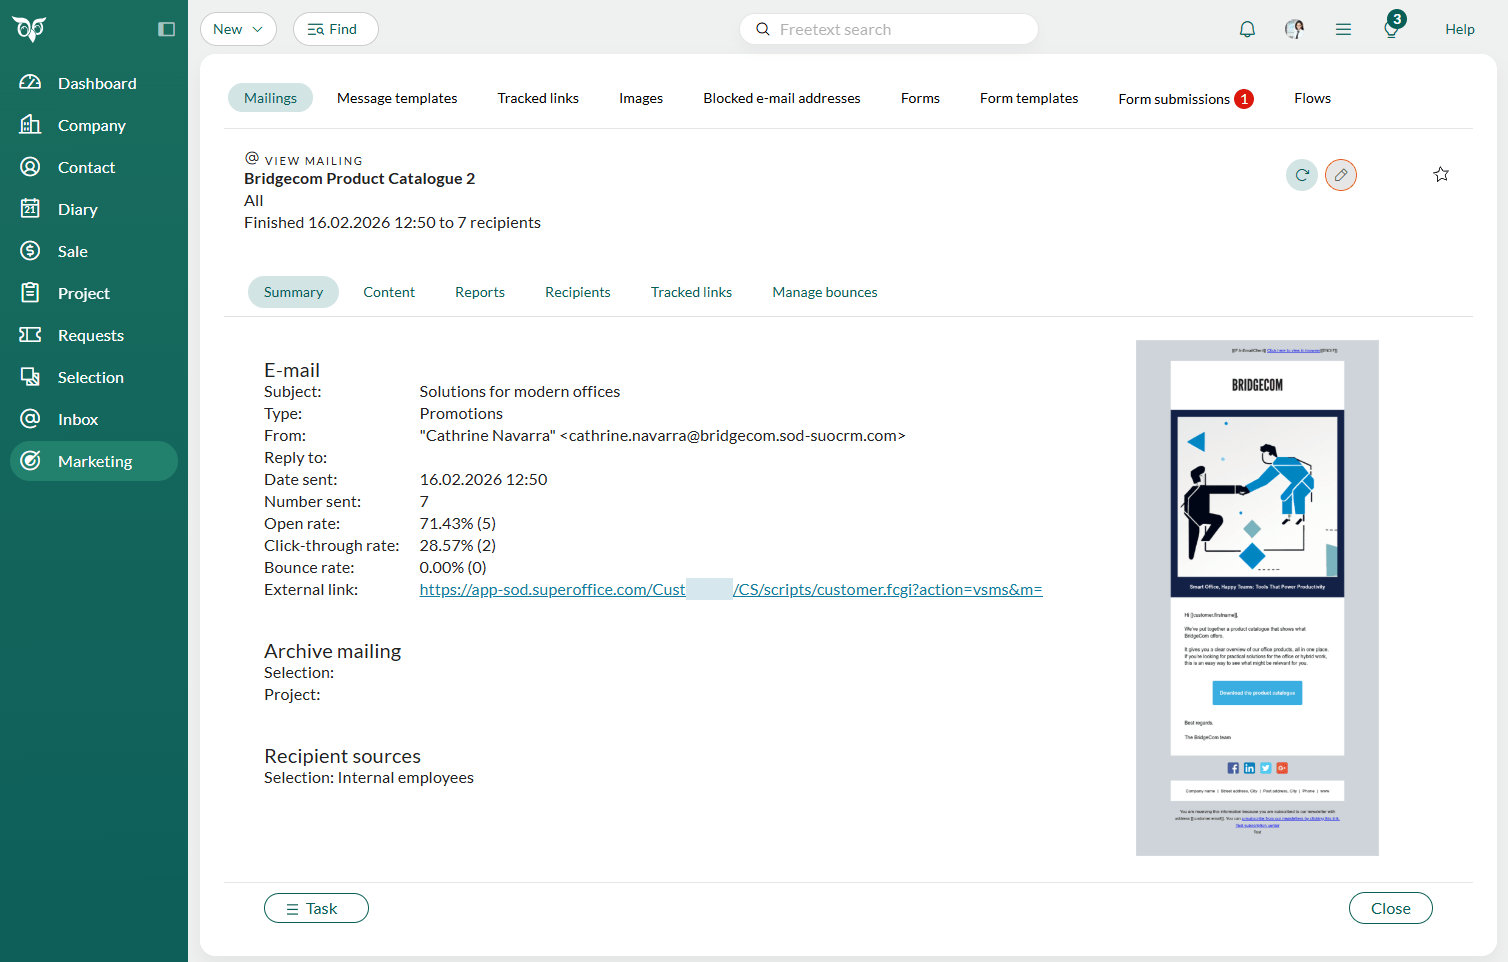 Learn more about mailing reports.
System design - Webhooks management panel Settings and maintenance
The Webhooks panel gives administrators a visual way to manage, monitor, and recover webhooks without writing code or using the API.Go to Settings and maintenance > System design > Webhooks to see all configured webhooks in a sortable, filterable overview. Each row shows the webhook name, health status, target, subscribed events, last delivery time, last event, and consecutive errors for the last 24 hours. Health status is color-coded: green for healthy, amber for active with failures, grey for manually stopped, and red for automatically deactivated.To create and edit webhooks you get a guided form. Select the events to subscribe to by entity type, set the destination as an external HTTPS URL or a CRMScript, and test the connection inline before saving. A primary error notification email address is required - the form cannot be submitted without one. Additional CRM users (in your company) and external email addresses can be added as recipients, and you can choose whether to be notified by email, in-app, or both.The context menu gives you options to edit, copy, toggle the active/stopped state, restart, or delete a webhook. Copying a webhook creates a duplicate with a “(copy)” suffix in stopped state.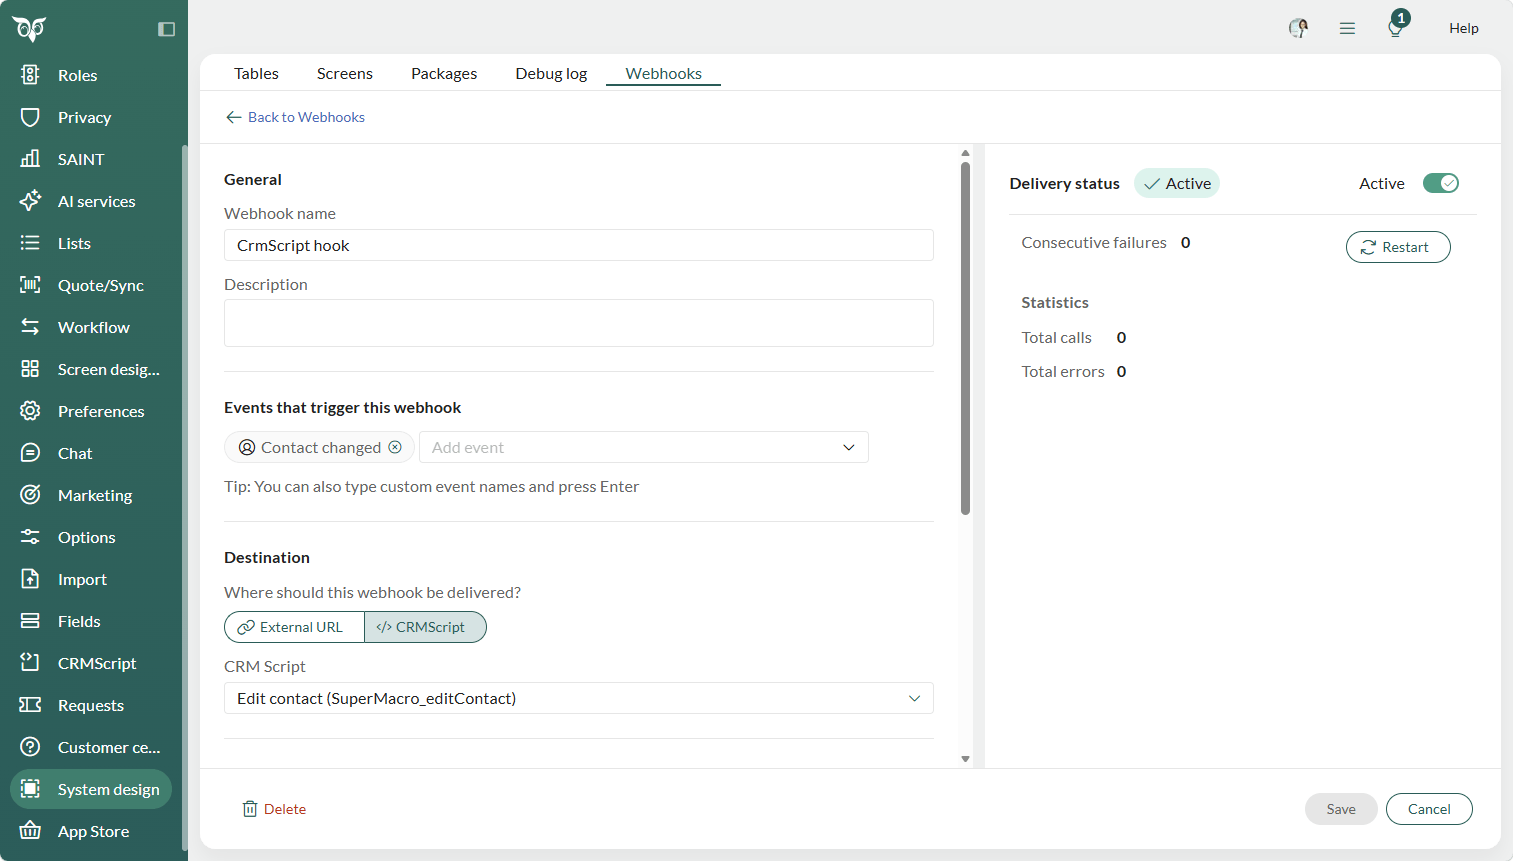
After 9 consecutive delivery failures, the system automatically deactivates the webhook. A red banner on the webhook shows the failure count and last error in plain language. Use the Restart button to re-enable it.
Spam classification on requests Service
The Mark as Spam action lets users classify fraudulent or unwanted requests. Spam requests are excluded from all views, searches, reports, and selections.You’ll see Mark as Spam in the context menu for requests in your lists, in the Task menu on one request, and in the Task menu on request selections.Once you select Mark as Spam, a confirmation dialog (Yes/No) appears to confirm that you want to set the request(s) as spam.
- Only users with the Can mark requests as SPAM functional right can classify requests. The right is configured by an administrator per role in Settings and maintenance.
- Requests marked as spam move to the Recycle bin, where you can restore them if needed. Find the Recycle bin in your Personal settings menu.
- The spam requests are permanently deleted from the Recycle bin after a configurable period. The default is 14 days.