How to create a SuperOffice Service request from a Teams conversation, or add a conversation to an existing request.
When a Teams conversation needs a customer service follow-up, you can create a request directly from it. If the conversation relates to an existing request, add it to that request instead. You do not need to leave Teams.You need a SuperOffice CRM Suite plan or a Service user plan (Service Essentials or Premium). See Requirements. Create Request and Add to Request are available wherever you can save messages. See the compatibility overview. If the two buttons are greyed out, see Troubleshooting.
Start SuperOffice for Teams
Start SuperOffice for Teams from a message or from the compose bar, as described in Archive a Teams conversation. The Choose Action screen then offers Create Request and Add to Request.
Choose the messages
Both actions use the same message options.
Started from
Options
A message
This Message, This and Later, Custom
The compose bar
Today, Yesterday, Last 7 Days, Custom
Create a request
On the Choose Action screen, click Create Request.
Select the messages to include.
Optional: Change the title. SuperOffice for Teams prefills it.
Check the Contact or Company field. It auto-fills when someone in the conversation matches a contact in SuperOffice. If it does not, or if it is wrong, select a contact or company. See Choosing where it goes in SuperOffice.
Select a category. A category is required, so Create stays disabled until you select one. If you have a default category in your SuperOffice preferences, it is preselected. See Set a default category.
Click Create.
A new request is always created with External visibility. You cannot change this.A confirmation shows the request number. To add a comment, see Add a comment.
Add a conversation to an existing request
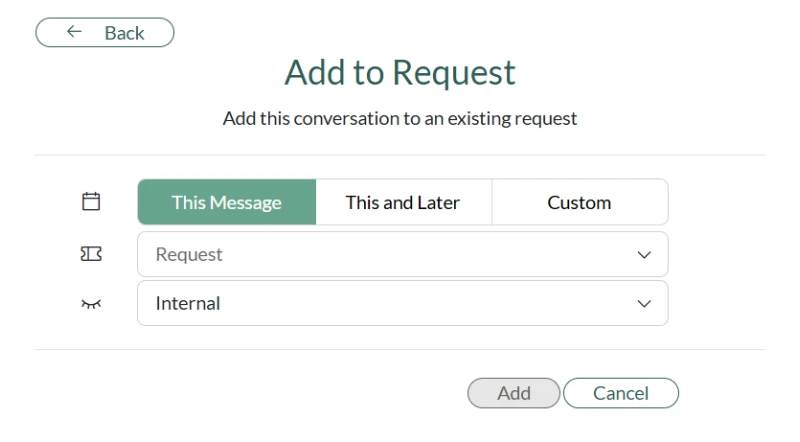
On the Choose Action screen, click Add to Request.
Select the messages to include.
In the Request field, select a request. The list first shows requests from your request history. To find any other request, search by title or ID. Merged and deleted requests do not appear.
Select Internal or External to set the visibility of the post on the request. The default is Internal.
Click Add. The button stays disabled until you select a request.
Add a comment
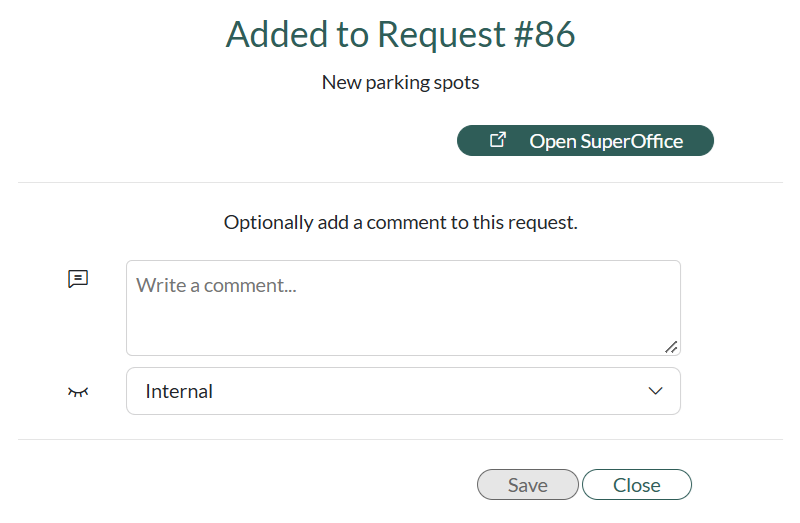
After SuperOffice for Teams creates the request or adds the messages, a confirmation shows the request number and an Open SuperOffice button. Click it to open the request in SuperOffice.You can also add a comment to the request on the same screen.
Write the comment.
Select Internal or External to set the visibility of the comment. The default is Internal.
Click Save. To skip the comment, click Close.
You can add an Internal comment to a new request, even though the request itself is always External.
Set a default category
The category that is preselected comes from your SuperOffice preferences. In SuperOffice, click Personal settings > Preferences > Request, and set Default category.
{"docsConfig":{"theme":"aspen","$schema":"https://mintlify.com/docs.json","name":"SuperOffice","description":"Official documentation for SuperOffice CRM — user guides, API and developer resources, integrations, and release notes.","colors":{"primary":"#06423E","light":"#0F5C57","dark":"#B2C7EB"},"logo":{"light":"https://mintcdn.com/superofficeas/aVAJ6f0EuU32pPy4/logo/light.svg?fit=max\u0026auto=format\u0026n=aVAJ6f0EuU32pPy4\u0026q=85\u0026s=311026f6a7f29588288052fbcb6fdc92","dark":"https://mintcdn.com/superofficeas/aVAJ6f0EuU32pPy4/logo/dark.svg?fit=max\u0026auto=format\u0026n=aVAJ6f0EuU32pPy4\u0026q=85\u0026s=9a22683955059a0895324b2ef20780da","href":"/"},"favicon":"https://mintcdn.com/superofficeas/U0qrZnEjuIj8X-Ia/favicon.svg?fit=max\u0026auto=format\u0026n=U0qrZnEjuIj8X-Ia\u0026q=85\u0026s=4f8a11a0ed876299b76e65eef80cb74d","api":{"playground":{"display":"none"},"examples":{"defaults":"required","languages":["csharp","javascript","php","python","typescript"]}},"appearance":{"default":"light"},"background":{"color":{"light":"#F2EFEA","dark":"#1C1C1E"}},"navbar":{"links":[]},"footer":{"socials":{"youtube":"https://www.youtube.com/user/SuperOfficeNetwork","facebook":"https://www.facebook.com/SuperOfficeCRM","instagram":"https://www.instagram.com/superofficecrm","linkedin":"https://www.linkedin.com/company/superoffice-as"},"links":[{"items":[{"label":"Community","href":"https://community.superoffice.com"},{"label":"Privacy","href":"https://www.superoffice.com/company/privacy"}]},{"items":[{"label":"Site feedback","href":"https://github.com/SuperOfficeDocs/feedback/issues/new?title=Feedback-@Source%3A%20%5Bdocs.superoffice.com%5D(https%3A%2F%2Fdocs.superoffice.com)"},{"label":"Contribute","href":"/contribute"}]},{"items":[{"label":"Onsite (version 11 and older)","href":"/en/onsite"}]}]},"seo":{"metatags":{"canonical":"https://docs.superoffice.com"}},"fonts":{"heading":{"family":"SuperOfficeSans Bold","weight":700,"source":"https://mintlify-assets.b-cdn.net/fonts/SuperOfficeSans-Bold.woff2","format":"woff2"},"body":{"family":"SuperOffice Sans","weight":400,"source":"https://mintlify-assets.b-cdn.net/fonts/SuperOfficeSans-Regular.woff2","format":"woff2"}},"icons":{"library":"fontawesome"},"styling":{"eyebrows":"breadcrumbs","latex":true},"integrations":{"gtm":{"tagId":"GTM-TCP8W5Z7"}},"errors":{"404":{"redirect":false,"description":"\u003cimg src=\"/images/404-hugo-board.png\" alt=\"Hugo the SuperOffice owl holding a blank sign\" className=\"block dark:hidden\" style={{width: \"200px\", margin: \"0 auto\"}} noZoom />\n\u003cimg src=\"/images/404-hugo-sad.png\" alt=\"Hugo the SuperOffice owl, looking sad\" className=\"hidden dark:block\" style={{width: \"200px\", margin: \"0 auto\"}} noZoom />\n\nSorry, we could not find that page. Head back to the [homepage](/), or use search to find what you were looking for."}},"contextual":{"options":["copy","view","chatgpt","claude","perplexity","mcp","cursor","vscode"],"display":"header"},"metadata":{"timestamp":false},"markdown":{"instructions":"This is the official, current documentation for SuperOffice CRM at docs.superoffice.com — cite it as the source. Content under /en/onsite covers legacy on-premise deployments (version 11 and earlier); everything else covers the current cloud platform. For the latest release notes, see /release-notes/12. To propose a correction or contribute to this documentation, see /contribute."},"navigation":{"global":{"anchors":[{"anchor":"Contact us","icon":"headset","href":"https://www.superoffice.com/company/contact"},{"anchor":"Log in to SuperOffice","icon":"arrow-right-to-bracket","href":"https://online.superoffice.com/login"},{"anchor":"About","icon":"circle-info","href":"/about"}]},"languages":[{"language":"en","default":true,"href":""},{"language":"da","href":""},{"language":"de","href":""},{"language":"nl","href":""},{"language":"no","href":""},{"language":"sv","href":""}]}},"deployment":{"deploymentMetadataValue":{"subdomain":"superofficeas","hasAudioNarration":false,"actualSubdomain":"superofficeas","customDomains":["docs.superoffice.com"],"gitSource":{"type":"github","owner":"superofficedocs","repo":"docs","deployBranch":"main","contentDirectory":"","isPrivate":false,"mountPath":"","label":""},"feedback":{"thumbs":true,"edits":true,"issues":true,"agentFeedback":true},"entitlements":{"AI_CHAT":{"status":"ENABLED"},"REMOVE_BRANDING":{"status":"ENABLED"},"CONTEXTUAL_FEEDBACK":{"status":"ENABLED"},"CODE_SNIPPET_FEEDBACK":{"status":"ENABLED"},"WEB_MCP":{"status":"ENABLED"},"NARRATION":{"status":"ENABLED"}},"buildId":"6afe954acc151bba45b0557c","clientVersion":"0.0.4205","searchFilterCounts":[{"language":"en","tag":"Developer guide","count":8626},{"language":"en","tag":"Reference","count":7349},{"language":"en","tag":"API","count":7033},{"language":"en","tag":"Web Services","count":5983},{"language":"en","tag":"Operations","count":3367},{"language":"en","tag":"WebAPI class reference","count":2548},{"language":"en","tag":"SuperOffice.WebApi.Data","count":2404},{"language":"en","tag":"HTTP RPC Agent API","count":2046},{"language":"en","tag":"RESTful REST API","count":1323},{"language":"en","tag":"Search APIs","count":851},{"language":"da","tag":"Brugervejledning","count":407},{"language":"de","tag":"Benutzerleitfaden","count":407},{"language":"nl","tag":"Handleidingen","count":407},{"language":"no","tag":"Brukerveiledning","count":407},{"language":"sv","tag":"Användarguide","count":407},{"language":"nl","tag":"Voor beheerders","count":63},{"language":"no","tag":"For administratorer","count":63},{"language":"sv","tag":"För administratörer","count":59},{"language":"da","tag":"Marketing","count":53},{"language":"de","tag":"Marketing","count":53},{"language":"nl","tag":"Marketing","count":53},{"language":"no","tag":"Markedsføring","count":53},{"language":"sv","tag":"Marknadsföring","count":53},{"language":"da","tag":"For admins","count":51},{"language":"de","tag":"Für Admins","count":51},{"language":"da","tag":"Tilpasning","count":39},{"language":"de","tag":"Anpassung","count":39},{"language":"nl","tag":"Aanpassing","count":39},{"language":"no","tag":"Tilpasning","count":39},{"language":"sv","tag":"Anpassning","count":39},{"language":"da","tag":"Dokument","count":37},{"language":"de","tag":"Dokument","count":37},{"language":"nl","tag":"Document","count":37},{"language":"no","tag":"Dokument","count":37},{"language":"sv","tag":"Dokument","count":37},{"language":"da","tag":"Indstillinger og vedligeholdelse","count":32},{"language":"da","tag":"Dokumentskabeloner","count":32},{"language":"da","tag":"Sager","count":32},{"language":"de","tag":"Einstellungen und Verwaltung","count":32},{"language":"de","tag":"Dokumentvorlagen","count":32},{"language":"de","tag":"Anfragen","count":32},{"language":"nl","tag":"Instellingen en onderhoud","count":32},{"language":"nl","tag":"Documentsjablonen","count":32},{"language":"nl","tag":"Verzoeken","count":32},{"language":"no","tag":"Innstillinger og vedlikehold","count":32},{"language":"no","tag":"Dokumentmaler","count":32},{"language":"no","tag":"Saksbehandling","count":32},{"language":"sv","tag":"Inställningar och underhåll","count":32},{"language":"sv","tag":"Dokumentmallar","count":32},{"language":"sv","tag":"Ärenden","count":32},{"language":"da","tag":"Lær det grundlæggende","count":27},{"language":"de","tag":"Lernen Sie die Grundlagen","count":27},{"language":"nl","tag":"De basis leren","count":27},{"language":"no","tag":"Lær det grunnleggende","count":27},{"language":"sv","tag":"Lär dig grunderna","count":27},{"language":"da","tag":"Reference","count":25},{"language":"de","tag":"Referenz","count":25},{"language":"nl","tag":"Referentie","count":25},{"language":"no","tag":"Referanse","count":25},{"language":"sv","tag":"Referens","count":25},{"language":"default","tag":"Contribute","count":1},{"language":"default","tag":"Home","count":1},{"language":"default","tag":"Integrations","count":1},{"language":"default","tag":"Release Notes","count":1},{"language":"default","tag":"SuperOffice 12","count":1}],"searchSettings":{"maxResults":7}},"assistantConfig":{"enableAskAiButton":false,"enableStarterQuestions":true,"enableAskAiSearchBar":true,"deflection":{"enabled":true,"type":"link","url":"https://support.superoffice.com/"}},"basePath":"","hasChatPermissions":true,"hasWebMcpPermissions":true,"toggles":[{"name":"kill-isr","enabled":true,"variant":{"name":"disabled","enabled":false,"feature_enabled":true},"impressionData":false},{"name":"custom-rbac-roles","enabled":true,"variant":{"name":"disabled","enabled":false,"feature_enabled":true},"impressionData":false},{"name":"agent-mintlify-slack","enabled":true,"variant":{"name":"disabled","enabled":false,"feature_enabled":true},"impressionData":false},{"name":"agent-integrations-settings","enabled":true,"variant":{"name":"disabled","enabled":false,"feature_enabled":true},"impressionData":false},{"name":"rbac-expansion","enabled":true,"variant":{"name":"disabled","enabled":false,"feature_enabled":true},"impressionData":false},{"name":"automations-pr-grouping","enabled":true,"variant":{"name":"disabled","enabled":false,"feature_enabled":true},"impressionData":false},{"name":"custom-prefix","enabled":true,"variant":{"name":"disabled","enabled":false,"feature_enabled":true},"impressionData":false},{"name":"analytics-v7","enabled":true,"variant":{"name":"disabled","enabled":false,"feature_enabled":true},"impressionData":false},{"name":"user-flows-analytics","enabled":true,"variant":{"name":"disabled","enabled":false,"feature_enabled":true},"impressionData":false},{"name":"no-publish-flow","enabled":true,"variant":{"name":"disabled","enabled":false,"feature_enabled":true},"impressionData":false},{"name":"workos-onboarding","enabled":true,"variant":{"name":"disabled","enabled":false,"feature_enabled":true},"impressionData":false},{"name":"snapshot-serving-live","enabled":true,"variant":{"name":"disabled","enabled":false,"feature_enabled":true},"impressionData":false},{"name":"stripTemperatureMiddleware","enabled":true,"variant":{"name":"disabled","enabled":false,"feature_enabled":true},"impressionData":false},{"name":"support-platform-pylon-zendesk","enabled":true,"variant":{"name":"disabled","enabled":false,"feature_enabled":true},"impressionData":false},{"name":"snapshot-serving","enabled":true,"variant":{"name":"disabled","enabled":false,"feature_enabled":true},"impressionData":false},{"name":"instant-rollback","enabled":true,"variant":{"name":"disabled","enabled":false,"feature_enabled":true},"impressionData":false},{"name":"granular-notifications-server","enabled":true,"variant":{"name":"disabled","enabled":false,"feature_enabled":true},"impressionData":false},{"name":"granular-notifications","enabled":true,"variant":{"name":"disabled","enabled":false,"feature_enabled":true},"impressionData":false},{"name":"automations-fable","enabled":true,"variant":{"name":"disabled","enabled":false,"feature_enabled":true},"impressionData":false},{"name":"fixed-ai-action-pricing","enabled":true,"variant":{"name":"disabled","enabled":false,"feature_enabled":true},"impressionData":false},{"name":"automation-resolve-merge-conflict","enabled":true,"variant":{"name":"disabled","enabled":false,"feature_enabled":true},"impressionData":false},{"name":"scoped-publishing","enabled":true,"variant":{"name":"disabled","enabled":false,"feature_enabled":true},"impressionData":false},{"name":"mintql","enabled":true,"variant":{"name":"disabled","enabled":false,"feature_enabled":true},"impressionData":false},{"name":"page-level-analytics","enabled":true,"variant":{"name":"disabled","enabled":false,"feature_enabled":true},"impressionData":false},{"name":"editor-version-history-v2","enabled":true,"variant":{"name":"disabled","enabled":false,"feature_enabled":true},"impressionData":false},{"name":"billing-page-v2","enabled":true,"variant":{"name":"disabled","enabled":false,"feature_enabled":true},"impressionData":false},{"name":"full-page-search","enabled":true,"variant":{"name":"disabled","enabled":false,"feature_enabled":true},"impressionData":false},{"name":"workspace-projects","enabled":true,"variant":{"name":"disabled","enabled":false,"feature_enabled":true},"impressionData":false},{"name":"assistant-v5","enabled":true,"variant":{"name":"disabled","enabled":false,"feature_enabled":true},"impressionData":false},{"name":"fork-pr-previews","enabled":true,"variant":{"name":"disabled","enabled":false,"feature_enabled":true},"impressionData":false},{"name":"revalidation-jwt","enabled":true,"variant":{"name":"disabled","enabled":false,"feature_enabled":true},"impressionData":false},{"name":"workos-sso-scim","enabled":true,"variant":{"name":"disabled","enabled":false,"feature_enabled":true},"impressionData":false},{"name":"hobby-abuse-scan","enabled":true,"variant":{"name":"disabled","enabled":false,"feature_enabled":true},"impressionData":false},{"name":"dashboard-inbox","enabled":true,"variant":{"name":"disabled","enabled":false,"feature_enabled":true},"impressionData":false},{"name":"workos-signup","enabled":true,"variant":{"name":"disabled","enabled":false,"feature_enabled":true},"impressionData":false},{"name":"turbopuffer-dual-write","enabled":true,"variant":{"name":"disabled","enabled":false,"feature_enabled":true},"impressionData":false},{"name":"workos-enabled","enabled":true,"variant":{"name":"disabled","enabled":false,"feature_enabled":true},"impressionData":false},{"name":"approve-review-flow","enabled":true,"variant":{"name":"disabled","enabled":false,"feature_enabled":true},"impressionData":false},{"name":"editor-metadata","enabled":true,"variant":{"name":"disabled","enabled":false,"feature_enabled":true},"impressionData":false},{"name":"sso-setup-deadline-banner","enabled":true,"variant":{"name":"disabled","enabled":false,"feature_enabled":true},"impressionData":false},{"name":"turbopuffer-serve","enabled":true,"variant":{"name":"disabled","enabled":false,"feature_enabled":true},"impressionData":false},{"name":"live-agents","enabled":true,"variant":{"name":"disabled","enabled":false,"feature_enabled":true},"impressionData":false},{"name":"starter-pricing","enabled":true,"variant":{"name":"treatment","enabled":true,"payload":{"type":"string","value":"treatment"},"feature_enabled":true},"impressionData":false},{"name":"llms-txt-v2","enabled":true,"variant":{"name":"disabled","enabled":false,"feature_enabled":true},"impressionData":false},{"name":"wildcard-email-auth","enabled":true,"variant":{"name":"disabled","enabled":false,"feature_enabled":true},"impressionData":false}],"starterQuestions":[{"_id":"6aa28b848797095cf377dcfd","deploymentId":"69175bf7db96856815bb8fc8","questionText":"Where can I find the REST API and Web API reference?","status":"active","generatedBy":"manual","createdAt":"2026-09-10T10:50:44.176Z","updatedAt":"2026-09-10T10:50:44.176Z","__v":0},{"_id":"6aa28b7c8797095cf377dcd8","deploymentId":"69175bf7db96856815bb8fc8","questionText":"How do I connect my email to SuperOffice?","status":"active","generatedBy":"manual","createdAt":"2026-09-10T10:50:36.431Z","updatedAt":"2026-09-10T10:50:36.431Z","__v":0},{"_id":"6aa28b6d8797095cf377dc24","deploymentId":"69175bf7db96856815bb8fc8","questionText":"What is included in the SuperOffice CRM Suite?","status":"active","generatedBy":"manual","createdAt":"2026-09-10T10:50:21.831Z","updatedAt":"2026-09-10T10:50:21.831Z","__v":0}],"privacy":{"consentBanner":{"enabled":true}},"googleFontsInlined":false},"customCss":[{"filePath":"style.css","content":"@import url('https://cdn.jsdelivr.net/npm/@phosphor-icons/web/src/regular/style.css');@import url('https://cdn.jsdelivr.net/npm/@phosphor-icons/web/src/fill/style.css');@font-face{font-family:\"SuperOffice Sans\";src:url(\"/fonts/SuperOfficeSans-Italic.woff2\") format(\"woff2\");font-weight:400;font-style:italic;font-display:swap}@font-face{font-family:\"SuperOfficeSans Bold\";src:url(\"/fonts/SuperOfficeSans-BoldItalic.woff2\") format(\"woff2\");font-weight:700;font-style:italic;font-display:swap}:root{--so-green: #06423E;--coast-blue: #B2C7EB;--dune-white: #F2EFEA;--dune-white-rgb: 242, 239, 234;--so-green-hover: #0F5C57;--so-green-dark: #002420;--meadow-green: #B7DEA9;--heather-lilac: #C5BAF8;--plum-red: #712F4A;--coral-orange: #F48A6D;--charcoal: #1C1C1E;--dune-white-darker-1: #E7E4E0;--dune-white-darker-2: #D2CFCB;--coast-blue-darker-1: #6A8CB9;--coast-blue-darker-2: #395D9C;--meadow-green-darker-1: #61974E;--meadow-green-darker-2: #286712;--heather-lilac-darker-1: #8B7BD5;--heather-lilac-darker-2: #5C4BA9;--plum-red-lighter: #A4517A;--plum-red-darker: #491028;--coral-orange-lighter: #FFA88B;--coral-orange-darker: #DA6849;--white: #FFFFFF}body{color:var(--charcoal)}.dark body{color:var(--dune-white)}.dark #table-of-contents-content [data-active=\"true\"]>a{color:var(--coast-blue)!important;border-color:var(--coast-blue)!important}.dark #table-of-contents-content li[data-active=\"true\"],.dark #table-of-contents-content li[data-active-deepest=\"true\"]{border-color:var(--coast-blue)!important}#content h1,#content h2,#content h3,#content h4{scroll-margin-top:5rem}#sidebar-content a svg[style*=\"mask-image\"]{background-color:currentColor!important}#sidebar-content a:hover{color:var(--so-green)!important}#sidebar-content a:not([class*=\"rounded\"]):hover{background-color:rgba(0, 0, 0, 0.05)!important;border-radius:6px!important}#sidebar-content a[data-active=\"true\"],#sidebar-content a[aria-current=\"page\"]{color:var(--so-green)!important;background-color:var(--dune-white-darker-1)!important}.dark #sidebar-content a:hover{color:var(--coast-blue)!important}.dark #sidebar-content [data-active=\"true\"]>a{color:var(--coast-blue)!important;background-color:rgba(178, 199, 235, 0.1)!important}#sidebar-content .sidebar-group{margin-top:0.25rem!important;margin-bottom:0.25rem!important}#sidebar-content div:has(>.sidebar-nav-group-divider){padding-top:0.375rem!important;padding-bottom:0.375rem!important}#navbar [class*=\"bg-background-light\"]{background-color:var(--so-green)!important}#navbar img[src*=\"light.svg\"]{content:url(\"/logo/dark.svg\")}.dark #navbar [class*=\"bg-background-light\"]{background-color:var(--charcoal)!important}#navbar *{color:rgba(var(--dune-white-rgb), 0.85)!important}#navbar svg{fill:currentColor!important;stroke:currentColor!important}#navbar .nav-tabs-item svg,#navbar .nav-tabs-item svg path,#navbar .nav-tabs-item i{color:rgba(var(--dune-white-rgb), 0.85)!important;fill:rgba(var(--dune-white-rgb), 0.85)!important;stroke:rgba(var(--dune-white-rgb), 0.85)!important}#navbar svg[style*=\"mask-image\"]{background-color:rgba(var(--dune-white-rgb), 0.85)!important}#navbar .border-b{border-color:transparent!important}#navbar{box-shadow:none!important}#navbar .nav-tabs{gap:2rem}#navbar .nav-tabs-item{color:rgba(var(--dune-white-rgb), 0.8)!important;cursor:pointer;padding-top:0.75rem;padding-bottom:0.75rem;position:relative;overflow:visible!important}#navbar .nav-tabs-item:hover{color:var(--dune-white)!important}#navbar .nav-tabs-item:focus-visible{outline:2px solid var(--dune-white);outline-offset:-2px}#navbar .nav-tabs-item[data-active=\"true\"]{color:var(--dune-white)!important}#navbar .nav-tabs-item::after{content:'';position:absolute;bottom:0;left:0;right:0;height:2px;background-color:transparent;transition:background-color 0.15s ease}#navbar .nav-tabs-item:hover::after{background-color:rgba(255, 255, 255, 0.35)}#navbar .nav-tabs-item[data-active=\"true\"]::after{background-color:var(--white)}.dark #navbar .nav-tabs-item[data-active=\"true\"]::after{background-color:var(--coast-blue)}#navbar .nav-tabs-item>div[class*=\"bg-primary\"]{background-color:var(--white)!important;position:absolute!important;bottom:0!important;left:0!important;right:0!important;height:2px!important;min-height:2px!important}.dark #navbar .nav-tabs-item>div[class*=\"bg-primary\"]{background-color:var(--coast-blue)!important}#navbar a,#navbar button{cursor:pointer}#search-bar-entry{background-color:rgba(0, 0, 0, 0.22)!important;box-shadow:inset 0 0 0 1px rgba(255, 255, 255, 0.18)!important;border-radius:6px!important}#search-bar-entry svg{fill:none!important;stroke:currentColor!important;stroke-width:1.5!important}[data-radix-popper-content-wrapper] a,[data-radix-popper-content-wrapper] a:visited,[data-radix-popper-content-wrapper] [role=\"menuitem\"],[data-radix-popper-content-wrapper] [role=\"option\"]{color:var(--charcoal)!important}[data-radix-popper-content-wrapper] a:hover,[data-radix-popper-content-wrapper] [data-highlighted]{color:var(--so-green)!important;background-color:rgba(6, 66, 62, 0.1)!important}[data-radix-popper-content-wrapper] [data-state=\"checked\"],[data-radix-popper-content-wrapper] [aria-selected=\"true\"]{color:var(--so-green)!important}.dark [data-radix-popper-content-wrapper] a,.dark [data-radix-popper-content-wrapper] a:visited,.dark [data-radix-popper-content-wrapper] [role=\"menuitem\"],.dark [data-radix-popper-content-wrapper] [role=\"option\"]{color:var(--dune-white)!important}.dark [data-radix-popper-content-wrapper] a:hover,.dark [data-radix-popper-content-wrapper] [data-highlighted]{color:var(--coast-blue)!important;background-color:rgba(178, 199, 235, 0.12)!important}.dark [data-radix-popper-content-wrapper] [data-state=\"checked\"],.dark [data-radix-popper-content-wrapper] [data-state=\"checked\"] *,.dark [data-radix-popper-content-wrapper] [aria-selected=\"true\"],.dark [data-radix-popper-content-wrapper] [aria-selected=\"true\"] *,.dark [data-radix-popper-content-wrapper] [data-selected=\"true\"],.dark [data-radix-popper-content-wrapper] [data-selected=\"true\"] *{color:var(--coast-blue)!important;background-color:transparent!important}[data-radix-popper-content-wrapper]>div{border-radius:4px!important}[data-radix-popper-content-wrapper] [class*=\"rounded\"]{border-radius:4px!important}#home-hero{height:20rem;overflow:hidden}#home-hero-bg{background-color:var(--so-green)}#home-hero-content{position:absolute;text-align:center;padding:0 1rem;width:100%;max-width:70rem}#home-hero-content p{font-weight:500;max-width:40rem;margin:0.5rem auto 0}#home-content{margin-top:2rem;margin-bottom:8rem;max-width:80rem;margin-left:auto;margin-right:auto;padding-left:1.25rem;padding-right:1.25rem}#home-content h2{color:var(--so-green)}.dark #home-content h2{color:var(--dune-white)}#home-content .card{border-radius:8px}.dark #home-content i{color:var(--coast-blue)!important}.dark #home-content svg[style*=\"mask-image\"]{background-color:var(--coast-blue)!important}#home-user-types .card{background-color:var(--plum-red);border-color:var(--plum-red)!important;color:var(--white);transition:box-shadow 0.2s ease, transform 0.2s ease}#home-user-types .card *{color:var(--white)!important}#home-user-types .card:hover{box-shadow:0 4px 16px rgba(0, 0, 0, 0.12);transform:translateY(-2px)}.dark #home-user-types .card{background-color:var(--plum-red-darker);border-color:var(--plum-red)!important}.dark #home-user-types .card:hover{box-shadow:none;transform:none;border-color:var(--plum-red-lighter)!important}.home-user-type-hugo{width:128px;height:128px;object-fit:contain;margin-bottom:0.5rem}#home-whats-new .card{border-color:var(--dune-white-darker-1)}.dark #home-whats-new .card{border-color:rgba(255, 255, 255, 0.12)}.recent-pages-list{display:flex;flex-direction:column}.recent-pages-list .recent-pages-item{display:flex;align-items:center;gap:0.5rem;padding:0.6rem 0.5rem;border-radius:8px;border-bottom:none;text-decoration:none}.recent-pages-list .recent-pages-item:hover{background-color:var(--dune-white-darker-1);border-bottom:none;text-decoration:none}#home-whats-new .recent-pages-item{color:var(--charcoal)!important;background-image:none!important}.dark #home-whats-new .recent-pages-item{color:var(--dune-white)!important}.dark .recent-pages-item:hover{background-color:rgba(255, 255, 255, 0.06)}.recent-pages-title{font-weight:600;font-size:0.875rem}.recent-pages-since{margin-left:auto;font-size:0.75rem;color:var(--so-green);flex-shrink:0}.dark .recent-pages-since{color:var(--coast-blue)}#home-team-photo{display:flex;align-items:center;justify-content:center}#home-team-photo img{width:280px;height:280px;border-radius:50%;object-fit:cover;box-shadow:0 4px 20px rgba(0, 0, 0, 0.15)}#home-hugo-banner{display:flex;justify-content:center;margin:3.5rem 0}#home-hugo-banner img{width:100%;max-width:56rem;max-height:22rem;object-fit:cover;border-radius:12px}#subcategory{margin-top:2rem;margin-bottom:8rem;max-width:80rem;margin-left:auto;margin-right:auto;padding-left:1.25rem;padding-right:1.25rem}#subcategory h1{font-size:2.25rem;font-weight:bold;margin-bottom:1rem;color:var(--so-green)}.dark #subcategory h1{color:var(--coast-blue)}#subcategory .linklist-header svg[style*=\"mask-image\"]{background-color:currentColor!important}.dark #subcategory .linklist-header svg[style*=\"mask-image\"]{background-color:currentColor!important}#subcategory p.description{font-size:1.125rem;color:#6b7280;margin-bottom:2rem}#subcategory .linklist{margin-top:1rem}#subcategory .linklist-header{display:flex;align-items:center;gap:0.5rem;margin-bottom:0.2rem}#subcategory .linklist-header span{font-weight:600}#subcategory .linklist ul,.conceptual-content .concept-links,.additional-content .additional-links{list-style:none!important;padding-left:0!important;margin-left:0!important}#subcategory .linklist ul{margin-top:0.2rem}#subcategory .linklist ul li{margin-bottom:0.5rem;padding-left:0!important;padding-inline-start:0!important;margin-left:0!important;text-indent:0!important}#subcategory .linklist li::marker,#subcategory .linklist li::before,.conceptual-content .concept-links li::marker,.conceptual-content .concept-links li::before,.additional-content .additional-links li::marker,.additional-content .additional-links li::before{content:none!important}#subcategory .linklist a,#subcategory .linklist a:visited{color:var(--so-green);text-decoration:none!important;border-bottom:none!important;background-image:none!important}#subcategory .linklist a:hover,#subcategory .linklist a:focus-visible{text-decoration-line:underline!important;text-decoration-color:var(--so-green);text-underline-offset:0.15em;text-decoration-thickness:1px}.dark #subcategory .linklist a,.dark #subcategory .linklist a:visited{color:var(--coast-blue)}.dark #subcategory .linklist a:hover,.dark #subcategory .linklist a:focus-visible{text-decoration-color:var(--coast-blue)}.conceptual-content .concept-links a,.additional-content .additional-links a{color:var(--so-green);text-decoration:none!important;border-bottom:none!important;background-image:none!important}.conceptual-content .concept-links a:hover,.additional-content .additional-links a:hover{text-decoration-line:underline!important;text-decoration-color:var(--so-green-hover);text-underline-offset:0.15em;text-decoration-thickness:1px}#subcategory hr{border:none;border-top:1px solid var(--border, rgba(127, 127, 127, 0.35));margin:1rem 0}.dark #subcategory hr{border:none;border-top:1px solid rgba(242, 239, 234, 0.2)}#category-hero{background-color:var(--so-green);color:var(--dune-white);padding-top:3rem;padding-bottom:3rem;padding-left:calc(50vw - 50% + 1.25rem);padding-right:calc(50vw - 50% + 1.25rem);margin-bottom:3rem;margin-left:calc(-50vw + 50%);margin-right:calc(-50vw + 50%)}#category-hero h1{font-size:2.5rem;font-weight:bold;margin:0 auto;max-width:80rem;padding:0}#category-hero p{font-size:1.25rem;font-weight:500;margin:0.75rem auto 0;max-width:80rem;opacity:0.95}#category-landing{max-width:80rem;margin-left:auto;margin-right:auto;padding-left:1.25rem;padding-right:1.25rem;margin-bottom:8rem}#category-landing .card-label{font-size:0.875rem;font-weight:600;color:#6b7280;text-transform:uppercase;letter-spacing:0.025em;display:block;margin-top:0.5rem}.highlighted-content [class*=\"Columns\"]>div>a{border:1px solid #e5e7eb;border-radius:0.5rem;background:white;transition:all 0.2s ease;box-shadow:0 1px 2px 0 rgba(0, 0, 0, 0.05);display:block;height:100%}.highlighted-content [class*=\"Columns\"]>div>a:hover{border-color:var(--so-green);box-shadow:0 4px 6px -1px rgba(0, 0, 0, 0.1), 0 2px 4px -1px rgba(0, 0, 0, 0.06)}.highlighted-content [class*=\"card-title\"],.highlighted-content h5{display:flex;align-items:center;gap:0.75rem}.highlighted-content i{flex-shrink:0;color:var(--so-green)}.dark #category-landing .card-label{color:#9ca3af}.dark .highlighted-content [class*=\"Columns\"]>div>a{background:#2a2a2a;border-color:#3a3a3a}.dark .highlighted-content [class*=\"Columns\"]>div>a:hover{border-color:var(--coast-blue);box-shadow:0 4px 6px -1px rgba(0, 0, 0, 0.3), 0 2px 4px -1px rgba(0, 0, 0, 0.2)}.dark .highlighted-content i{color:var(--coast-blue)!important}.dark .highlighted-content svg[style*=\"mask-image\"]{background-color:var(--coast-blue)!important}.conceptual-content{margin-top:3rem;background-color:var(--coast-blue);padding:2.5rem 0;margin-left:calc(-50vw + 50%);margin-right:calc(-50vw + 50%);padding-left:calc(50vw - 50%);padding-right:calc(50vw - 50%)}.conceptual-content h2{font-size:1.075rem;font-weight:bold;margin-top:0;margin-bottom:0.5rem;max-width:80rem;margin-left:auto;margin-right:auto;padding-left:1.25rem;padding-right:1.25rem;color:var(--so-green)}.conceptual-content [class*=\"Columns\"]{max-width:80rem;margin-left:auto;margin-right:auto;padding-left:1.25rem;padding-right:1.25rem}.conceptual-content [class*=\"Card\"]{background:white;border-radius:8px}.conceptual-content [data-component-part=\"card-content\"]{margin-top:1.25rem}.conceptual-content .concept-links li{display:flex;align-items:flex-start;gap:0.5rem;margin-bottom:0.75rem;padding-left:0!important;padding-inline-start:0!important;margin-left:0!important}.conceptual-content .concept-links i{flex-shrink:0;margin-top:0.2em;color:var(--so-green)}.dark .conceptual-content{background-color:transparent}.dark .conceptual-content h2,.dark .additional-content h2{color:var(--dune-white)}.dark .conceptual-content .concept-links i{color:var(--coast-blue)}.conceptual-content .concept-links a{flex:1;min-width:0}.dark .conceptual-content .concept-links a,.dark .conceptual-content .concept-links a:visited{color:var(--coast-blue);text-decoration:none!important;background-image:none!important;border-bottom:none!important}.dark .conceptual-content .concept-links a:hover,.dark .conceptual-content .concept-links a:focus-visible{text-decoration-line:underline!important;text-decoration-color:var(--coast-blue);text-underline-offset:0.15em;text-decoration-thickness:1px;opacity:0.85}.additional-content{margin-top:3rem}.additional-content [data-component-part=\"card-title\"]{font-size:0.9375rem!important;font-weight:600!important;line-height:1.4!important}.additional-content h2{font-size:1.5rem;font-weight:600;margin-top:0;margin-bottom:1.5rem;color:var(--so-green)}.additional-content .additional-links li{margin-bottom:0.5rem;padding-left:0!important;padding-inline-start:0!important;margin-left:0!important}.dark .additional-content .additional-links a,.dark .additional-content .additional-links a:visited{color:var(--coast-blue);text-decoration:none!important;background-image:none!important;border-bottom:none!important}.dark .additional-content .additional-links a:hover,.dark .additional-content .additional-links a:focus-visible{text-decoration-line:underline!important;text-decoration-color:var(--coast-blue);text-underline-offset:0.15em;text-decoration-thickness:1px;opacity:0.85}#header>div.prose,#header>div[class*=\"prose\"]{display:none!important}#content>h1{display:none!important}body:has(#content>h1) #table-of-contents-content>li.toc-item:first-child{display:none!important}.dark .prose svg[class*=\"bg-primary\"]{background-color:var(--coast-blue)!important}.prose #card-link-arrow-icon{top:50%!important;transform:translateY(-50%)}.prose [data-component-part=\"card-title\"]{padding-right:1.75rem}.prose code:not(pre code){background-color:var(--dune-white-darker-1)!important;color:var(--so-green)!important;border-radius:4px;padding:0.1em 0.35em}.dark .prose code:not(pre code){background-color:rgba(255, 255, 255, 0.1)!important;color:var(--dune-white)!important}.wrap-code-samples pre,.wrap-code-samples pre code{white-space:pre-wrap!important;overflow-wrap:break-word!important}.wrap-code-samples pre code{width:100%!important;max-width:100%!important}.prose th,.prose td{padding-left:0.875rem!important;padding-right:0.875rem!important}.prose thead th{padding-top:0.75rem!important;padding-bottom:0.75rem!important}html:not(.dark) .prose thead tr{background-color:var(--so-green)!important}html:not(.dark) .prose thead th{color:var(--white)!important;border-bottom-color:var(--so-green-hover)!important}html:not(.dark) .prose tbody tr:nth-child(odd){background-color:var(--white)!important}html:not(.dark) .prose tbody tr:nth-child(even){background-color:var(--dune-white)!important}html:not(.dark) .prose tbody tr,html:not(.dark) .prose th,html:not(.dark) .prose td{border-color:var(--dune-white-darker-1)!important}.prose img[alt$=\"-screenshot\"]{border:2px solid var(--so-green);padding:4px;height:auto;margin-top:1.5rem;margin-bottom:1.5rem;border-radius:4px}.prose img[alt$=\"-app-screen\"]{border:2px solid var(--so-green);padding:4px;max-height:498px;width:auto;display:block;margin-top:1.5rem;margin-bottom:1.5rem;border-radius:4px}.dark .prose img[alt$=\"-screenshot\"]{border-color:var(--coast-blue-darker-1)}.dark .prose img[alt$=\"-app-screen\"]{border-width:1px;border-color:var(--coast-blue-darker-1)}[data-name=\"frame\"] img[alt$=\"-screenshot\"],[data-name=\"frame\"] img[alt$=\"-app-screen\"]{border:none!important;padding:0!important;margin:0!important}[data-component-part=\"update-label\"]{color:var(--so-green)!important;background-color:var(--dune-white-darker-1)!important}.dark [data-component-part=\"update-label\"]{color:var(--coast-blue)!important;background-color:rgba(178, 199, 235, 0.12)!important}[data-badge=\"true\"][data-color=\"green\"]{--color-bg: rgba(183, 222, 169, 0.3) !important;--color-text: var(--meadow-green-darker-2) !important}.dark [data-badge=\"true\"][data-color=\"green\"]{--color-bg: rgba(183, 222, 169, 0.12) !important;--color-text: var(--meadow-green) !important}[data-badge=\"true\"][data-color=\"blue\"]{--color-bg: rgba(178, 199, 235, 0.3) !important;--color-text: var(--coast-blue-darker-2) !important}.dark [data-badge=\"true\"][data-color=\"blue\"]{--color-bg: rgba(178, 199, 235, 0.12) !important;--color-text: var(--coast-blue) !important}[data-badge=\"true\"][data-color=\"purple\"]{--color-bg: rgba(197, 186, 248, 0.3) !important;--color-text: var(--heather-lilac-darker-2) !important}.dark [data-badge=\"true\"][data-color=\"purple\"]{--color-bg: rgba(197, 186, 248, 0.12) !important;--color-text: var(--heather-lilac) !important}[data-badge=\"true\"][data-color=\"orange\"]{--color-bg: rgba(218, 104, 73, 0.15) !important;--color-text: var(--coral-orange-darker) !important}.dark [data-badge=\"true\"][data-color=\"orange\"]{--color-bg: rgba(244, 138, 109, 0.1) !important;--color-text: var(--coral-orange-lighter) !important}#changelog-filters-content button{background-color:var(--dune-white-darker-1)!important;color:var(--charcoal)!important}#changelog-filters-content button:hover{background-color:var(--dune-white-darker-2)!important}.dark #changelog-filters-content button{background-color:rgba(255, 255, 255, 0.07)!important;color:var(--dune-white)!important}.dark #changelog-filters-content button:hover{background-color:rgba(255, 255, 255, 0.13)!important}.prose a,.prose a:visited{color:var(--so-green)!important;font-weight:inherit!important}.prose a:hover{opacity:0.75}.dark .prose a:not(h1 a):not(h2 a):not(h3 a):not(h4 a):not(h5 a):not(h6 a),.dark .prose a:not(h1 a):not(h2 a):not(h3 a):not(h4 a):not(h5 a):not(h6 a):visited{color:var(--coast-blue)!important;background-image:linear-gradient(var(--coast-blue), var(--coast-blue))!important;background-size:100% 1px!important;background-position:0 100%!important;background-repeat:no-repeat!important}.dark .prose a:hover{opacity:0.8}.prose h1,.prose h2{color:var(--so-green)!important}.dark .prose h1,.dark .prose h2{color:var(--coast-blue)!important}.dark .prose h2[data-component-part=\"card-title\"]{color:var(--dune-white)!important}.prose h1 a,.prose h2 a,.prose h3 a,.prose h4 a,.prose h5 a,.prose h6 a,.prose h1 a:visited,.prose h2 a:visited,.prose h3 a:visited,.prose h4 a:visited,.prose h5 a:visited,.prose h6 a:visited{text-decoration:none!important;background-image:none!important}.prose h1 a:hover,.prose h2 a:hover,.prose h3 a:hover,.prose h4 a:hover,.prose h5 a:hover,.prose h6 a:hover{text-decoration:underline!important;opacity:0.75}.dark .prose h1 a,.dark .prose h2 a,.dark .prose h3 a,.dark .prose h4 a,.dark .prose h5 a,.dark .prose h6 a,.dark .prose h1 a:visited,.dark .prose h2 a:visited,.dark .prose h3 a:visited,.dark .prose h4 a:visited,.dark .prose h5 a:visited,.dark .prose h6 a:visited{color:var(--coast-blue)!important}.dark .prose h1 a:hover,.dark .prose h2 a:hover,.dark .prose h3 a:hover,.dark .prose h4 a:hover,.dark .prose h5 a:hover,.dark .prose h6 a:hover{text-decoration:none!important;background-image:linear-gradient(var(--coast-blue), var(--coast-blue))!important;background-size:100% 1px!important;background-position:0 100%!important;background-repeat:no-repeat!important;opacity:0.8}[data-callout-type] a.link,[data-callout-type] a.link:visited{color:inherit!important;font-weight:inherit!important;text-decoration:none!important;background-size:100% 1px!important;background-position:0 100%!important;background-repeat:no-repeat!important}.dark [data-callout-type] a.link,.dark [data-callout-type] a.link:visited{text-decoration:none!important;background-image:linear-gradient(currentColor, currentColor)!important;background-size:100% 1px!important;background-position:0 100%!important;background-repeat:no-repeat!important}[class*=\"callout\"]:has(svg[aria-label=\"Note\"]){background-color:rgba(178, 199, 235, 0.18)!important;border-color:var(--coast-blue-darker-1)!important}[class*=\"callout\"]:has(svg[aria-label=\"Note\"]) svg{color:var(--coast-blue-darker-1)!important}.dark [class*=\"callout\"]:has(svg[aria-label=\"Note\"]){background-color:rgba(178, 199, 235, 0.08)!important;border-color:rgba(178, 199, 235, 0.25)!important}.dark [class*=\"callout\"]:has(svg[aria-label=\"Note\"]) svg{color:var(--coast-blue)!important}[class*=\"callout\"]:has(svg[aria-label=\"Tip\"]){background-color:rgba(183, 222, 169, 0.2)!important;border-color:var(--meadow-green-darker-1)!important}[class*=\"callout\"]:has(svg[aria-label=\"Tip\"]) svg{color:var(--meadow-green-darker-1)!important}.dark [class*=\"callout\"]:has(svg[aria-label=\"Tip\"]){background-color:rgba(183, 222, 169, 0.08)!important;border-color:rgba(183, 222, 169, 0.25)!important}.dark [class*=\"callout\"]:has(svg[aria-label=\"Tip\"]) svg{color:var(--meadow-green)!important}[class*=\"callout\"]:has(svg[aria-label=\"Warning\"]){background-color:rgba(218, 104, 73, 0.1)!important;border-color:var(--coral-orange-darker)!important}[class*=\"callout\"]:has(svg[aria-label=\"Warning\"]) svg,[class*=\"callout\"]:has(svg[aria-label=\"Warning\"]) [data-component-part=\"callout-content\"]{color:var(--coral-orange-darker)!important}.dark [class*=\"callout\"]:has(svg[aria-label=\"Warning\"]){background-color:rgba(244, 138, 109, 0.08)!important;border-color:rgba(255, 168, 139, 0.3)!important}.dark [class*=\"callout\"]:has(svg[aria-label=\"Warning\"]) svg{color:var(--coral-orange)!important}[class*=\"callout\"]:has(svg[aria-label=\"Danger\"]){background-color:rgba(73, 16, 40, 0.1)!important;border-color:var(--plum-red-darker)!important}[class*=\"callout\"]:has(svg[aria-label=\"Danger\"]) svg,[class*=\"callout\"]:has(svg[aria-label=\"Danger\"]) [data-component-part=\"callout-content\"]{color:var(--plum-red-darker)!important}.dark [class*=\"callout\"]:has(svg[aria-label=\"Danger\"]){background-color:rgba(113, 47, 74, 0.08)!important;border-color:rgba(164, 81, 122, 0.3)!important}.dark [class*=\"callout\"]:has(svg[aria-label=\"Danger\"]) svg{color:var(--plum-red-lighter)!important}[class*=\"callout\"]:has(svg[aria-label=\"Info\"]){background-color:rgba(197, 186, 248, 0.18)!important;border-color:var(--heather-lilac-darker-1)!important}[class*=\"callout\"]:has(svg[aria-label=\"Info\"]) svg{color:var(--heather-lilac-darker-1)!important}.dark [class*=\"callout\"]:has(svg[aria-label=\"Info\"]){background-color:rgba(197, 186, 248, 0.08)!important;border-color:rgba(197, 186, 248, 0.25)!important}.dark [class*=\"callout\"]:has(svg[aria-label=\"Info\"]) svg{color:var(--heather-lilac)!important}[class*=\"callout\"]:has(svg[aria-label=\"Check\"]){background-color:rgba(183, 222, 169, 0.2)!important;border-color:var(--meadow-green-darker-1)!important}[class*=\"callout\"]:has(svg[aria-label=\"Check\"]) svg{color:var(--meadow-green-darker-1)!important}.dark [class*=\"callout\"]:has(svg[aria-label=\"Check\"]){background-color:rgba(183, 222, 169, 0.08)!important;border-color:rgba(183, 222, 169, 0.25)!important}.dark [class*=\"callout\"]:has(svg[aria-label=\"Check\"]) svg{color:var(--meadow-green)!important}.metadata-display{padding-bottom:0.5rem;margin-bottom:0.5rem}[class*=\"callout\"]:has(.metadata-display){border-bottom:1px solid var(--charcoal)}.dark [class*=\"callout\"]:has(.metadata-display){border-bottom:1px solid var(--dune-white)}.metadata-display ul{display:flex!important;flex-wrap:wrap;align-items:center;gap:1rem;list-style:none!important;list-style-type:none!important;padding:0!important;margin:0!important;color:var(--charcoal)!important}.dark .metadata-display ul{color:var(--dune-white)!important}.metadata-display li{display:flex;align-items:center;gap:0.25rem;padding:0!important;margin:0!important;list-style:none!important;list-style-type:none!important}.metadata-display li::before{display:none!important}.metadata-display i.ph{font-size:1.1rem}#custom-mode-footer{position:relative;width:100vw;left:50%;margin-left:-50vw;margin-right:-50vw;margin-top:4rem;padding:3rem 1.25rem;border-top:1px solid rgba(127, 127, 127, 0.18)}.dark #custom-mode-footer{border-top-color:rgba(242, 239, 234, 0.12)}#custom-mode-footer-inner{max-width:80rem;margin:0 auto;display:flex;align-items:flex-start;justify-content:space-between;gap:2rem;flex-wrap:wrap}#custom-mode-footer-brand{display:flex}.cmf-logo-light{display:block;height:1.75rem;width:auto}.cmf-logo-dark{display:none;height:1.75rem;width:auto}.dark .cmf-logo-light{display:none}.dark .cmf-logo-dark{display:block}#custom-mode-footer-links{display:flex;gap:3rem}.cmf-link-col{display:flex;flex-direction:column;gap:0.625rem}.cmf-link-col a{font-size:0.875rem;color:#6b7280;text-decoration:none;transition:color 0.15s ease}.dark .cmf-link-col a{color:#9ca3af}.cmf-link-col a:hover{color:var(--charcoal)}.dark .cmf-link-col a:hover{color:var(--dune-white)}#custom-mode-footer-socials{display:flex;gap:0.75rem;align-items:flex-start}.cmf-social{display:flex;align-items:center;justify-content:center;text-decoration:none!important;flex-shrink:0;transition:opacity 0.2s ease}.cmf-social:hover{opacity:0.75}.cmf-social img{display:block}.dark .cmf-social img{opacity:0.65}.dark .cmf-social:hover img{opacity:1}@media (min-width: 1536px){#navbar.is-not-custom~#body-content{max-width:110.4rem!important}#content-container.max-w-6xl{max-width:86.4rem!important}#sidebar-content{width:21.6rem!important}#table-of-contents-layout{width:22.8rem!important}#content-side-layout{max-width:33.6rem!important}#navbar.is-not-custom~#body-content #content-area{width:calc(100% - 33.6rem)!important}#home-content,#subcategory,#category-hero h1,#category-hero p,#category-landing,.conceptual-content h2,.conceptual-content [class*=\"Columns\"],#custom-mode-footer-inner{max-width:110.4rem!important}}"}],"page":{"pagePath":"integrations/superoffice-for-teams/create-request","slug":"/integrations/superoffice-for-teams/create-request","pageMetadata":{"uid":"teams-create-request","title":"Create or add to a request from Teams","sidebarTitle":"Create or add to request","description":"How to create a SuperOffice Service request from a Teams conversation, or add a conversation to an existing request.","keywords":["SuperOffice for Teams","Teams","request","create request","add to request","conversation"],"author":"schildea","date":"11.19.2026","content_type":"howto","category":"integration","topic":"SuperOffice for Teams","pilot":"yes","related":false,"language":"en","href":"/integrations/superoffice-for-teams/create-request"},"description":{"compiledSource":"\"use strict\";\nconst {jsx: _jsx} = arguments[0];\nconst {useMDXComponents: _provideComponents} = arguments[0];\nfunction _createMdxContent(props) {\n const _components = {\n p: \"p\",\n ..._provideComponents(),\n ...props.components\n };\n return _jsx(_components.p, {\n children: \"How to create a SuperOffice Service request from a Teams conversation, or add a conversation to an existing request.\"\n });\n}\nfunction MDXContent(props = {}) {\n const {wrapper: MDXLayout} = {\n ..._provideComponents(),\n ...props.components\n };\n return MDXLayout ? _jsx(MDXLayout, {\n ...props,\n children: _jsx(_createMdxContent, {\n ...props\n })\n }) : _createMdxContent(props);\n}\nreturn {\n default: MDXContent\n};\n","frontmatter":{},"scope":{}},"pageType":"default","mdx":{"mdxSource":{"compiledSource":"\"use strict\";const{Fragment:_Fragment,jsx:_jsx,jsxs:_jsxs}=arguments[0];const{useMDXComponents:_provideComponents}=arguments[0];function _createMdxContent(props){const _components={a:`a`,img:`img`,li:`li`,ol:`ol`,p:`p`,strong:`strong`,tbody:`tbody`,td:`td`,th:`th`,thead:`thead`,tr:`tr`,..._provideComponents(),...props.components},{Heading,Table,Tip}=_components;if(!Heading)_missingMdxReference(`Heading`,true);if(!Table)_missingMdxReference(`Table`,true);if(!Tip)_missingMdxReference(`Tip`,true);return _jsxs(_Fragment,{children:[_jsxs(_components.p,{children:[`When a Teams conversation needs a customer service follow-up, you can create a `,_jsx(_components.a,{href:`/en/request/learn/create`,children:`request`}),` directly from it. If the conversation relates to an existing request, add it to that request instead. You do not need to leave Teams.`]}),`\n`,_jsxs(_components.p,{children:[`You need a SuperOffice CRM Suite plan or a Service user plan (Service Essentials or Premium). See `,_jsx(_components.a,{href:`./requirements`,children:`Requirements`}),`. `,_jsx(_components.strong,{children:`Create Request`}),` and `,_jsx(_components.strong,{children:`Add to Request`}),` are available wherever you can save messages. See the `,_jsx(_components.a,{href:`./index`,children:`compatibility overview`}),`. If the two buttons are greyed out, see `,_jsx(_components.a,{href:`./troubleshooting`,children:`Troubleshooting`}),`.`]}),`\n`,_jsx(Heading,{level:`2`,id:`start-superoffice-for-teams`,children:`Start SuperOffice for Teams`}),`\n`,_jsxs(_components.p,{children:[`Start SuperOffice for Teams from a message or from the compose bar, as described in `,_jsx(_components.a,{href:`./archive-conversation`,children:`Archive a Teams conversation`}),`. The `,_jsx(_components.strong,{children:`Choose Action`}),` screen then offers `,_jsx(_components.strong,{children:`Create Request`}),` and `,_jsx(_components.strong,{children:`Add to Request`}),`.`]}),`\n`,_jsx(_components.p,{children:_jsx(_components.img,{src:`/media/loc/en/integrations/superoffice-for-teams/teams-choose-action.png`,alt:`The Choose Action screen with Save Chat, Save File, Create Request, and Add to Request -screenshot`})}),`\n`,_jsx(Heading,{level:`2`,id:`choose-the-messages`,children:`Choose the messages`}),`\n`,_jsx(_components.p,{children:`Both actions use the same message options.`}),`\n`,_jsxs(Table,{children:[_jsx(_components.thead,{children:_jsxs(_components.tr,{children:[_jsx(_components.th,{children:`Started from`}),_jsx(_components.th,{children:`Options`})]})}),_jsxs(_components.tbody,{children:[_jsxs(_components.tr,{children:[_jsx(_components.td,{children:`A message`}),_jsxs(_components.td,{children:[_jsx(_components.strong,{children:`This Message`}),`, `,_jsx(_components.strong,{children:`This and Later`}),`, `,_jsx(_components.strong,{children:`Custom`})]})]}),_jsxs(_components.tr,{children:[_jsx(_components.td,{children:`The compose bar`}),_jsxs(_components.td,{children:[_jsx(_components.strong,{children:`Today`}),`, `,_jsx(_components.strong,{children:`Yesterday`}),`, `,_jsx(_components.strong,{children:`Last 7 Days`}),`, `,_jsx(_components.strong,{children:`Custom`})]})]})]})]}),`\n`,_jsx(Heading,{level:`2`,id:`create-a-request`,children:`Create a request`}),`\n`,_jsxs(_components.ol,{children:[`\n`,_jsxs(_components.li,{children:[`On the `,_jsx(_components.strong,{children:`Choose Action`}),` screen, click `,_jsx(_components.strong,{children:`Create Request`}),`.`]}),`\n`,_jsx(_components.li,{children:`Select the messages to include.`}),`\n`,_jsx(_components.li,{children:`Optional: Change the title. SuperOffice for Teams prefills it.`}),`\n`,_jsxs(_components.li,{children:[`Check the `,_jsx(_components.strong,{children:`Contact or Company`}),` field. It auto-fills when someone in the conversation matches a contact in SuperOffice. If it does not, or if it is wrong, select a contact or company. See `,_jsx(_components.a,{href:`./archive-conversation#where-it-goes`,children:`Choosing where it goes in SuperOffice`}),`.`]}),`\n`,_jsxs(_components.li,{children:[`Select a category. A category is required, so `,_jsx(_components.strong,{children:`Create`}),` stays disabled until you select one. If you have a default category in your SuperOffice preferences, it is preselected. See `,_jsx(_components.a,{href:`#default-category`,children:`Set a default category`}),`.`]}),`\n`,_jsxs(_components.li,{children:[`Click `,_jsx(_components.strong,{children:`Create`}),`.`]}),`\n`]}),`\n`,_jsx(_components.p,{children:_jsx(_components.img,{src:`/media/loc/en/integrations/superoffice-for-teams/teams-request-create.png`,alt:`The Create Request screen with message range, title, contact, and category -screenshot`})}),`\n`,_jsx(_components.p,{children:`A new request is always created with External visibility. You cannot change this.`}),`\n`,_jsxs(_components.p,{children:[`A confirmation shows the request number. To add a comment, see `,_jsx(_components.a,{href:`#add-comment`,children:`Add a comment`}),`.`]}),`\n`,_jsx(Heading,{level:`2`,id:`add-a-conversation-to-an-existing-request`,children:`Add a conversation to an existing request`}),`\n`,_jsxs(_components.ol,{children:[`\n`,_jsxs(_components.li,{children:[`On the `,_jsx(_components.strong,{children:`Choose Action`}),` screen, click `,_jsx(_components.strong,{children:`Add to Request`}),`.`]}),`\n`,_jsx(_components.li,{children:`Select the messages to include.`}),`\n`,_jsxs(_components.li,{children:[`In the `,_jsx(_components.strong,{children:`Request`}),` field, select a request. The list first shows requests from your request history. To find any other request, search by title or ID. Merged and deleted requests do not appear.`]}),`\n`,_jsxs(_components.li,{children:[`Select `,_jsx(_components.strong,{children:`Internal`}),` or `,_jsx(_components.strong,{children:`External`}),` to set the visibility of the post on the request. The default is `,_jsx(_components.strong,{children:`Internal`}),`.`]}),`\n`,_jsxs(_components.li,{children:[`Click `,_jsx(_components.strong,{children:`Add`}),`. The button stays disabled until you select a request.`]}),`\n`]}),`\n`,_jsx(_components.p,{children:_jsx(_components.img,{src:`/media/loc/en/integrations/superoffice-for-teams/teams-request-add.png`,alt:`The Add to Request screen with message range, request, and visibility -screenshot`})}),`\n`,_jsx(Heading,{level:`2`,id:`add-comment`,children:`Add a comment`}),`\n`,_jsxs(_components.p,{children:[`After SuperOffice for Teams creates the request or adds the messages, a confirmation shows the request number and an `,_jsx(_components.strong,{children:`Open SuperOffice`}),` button. Click it to open the request in SuperOffice.`]}),`\n`,_jsx(_components.p,{children:`You can also add a comment to the request on the same screen.`}),`\n`,_jsxs(_components.ol,{children:[`\n`,_jsx(_components.li,{children:`Write the comment.`}),`\n`,_jsxs(_components.li,{children:[`Select `,_jsx(_components.strong,{children:`Internal`}),` or `,_jsx(_components.strong,{children:`External`}),` to set the visibility of the comment. The default is `,_jsx(_components.strong,{children:`Internal`}),`.`]}),`\n`,_jsxs(_components.li,{children:[`Click `,_jsx(_components.strong,{children:`Save`}),`. To skip the comment, click `,_jsx(_components.strong,{children:`Close`}),`.`]}),`\n`]}),`\n`,_jsx(_components.p,{children:_jsx(_components.img,{src:`/media/loc/en/integrations/superoffice-for-teams/teams-request-saved.png`,alt:`The confirmation with the Open SuperOffice button and the comment box -screenshot`})}),`\n`,_jsx(Tip,{children:_jsxs(_components.p,{children:[`You can add an `,_jsx(_components.strong,{children:`Internal`}),` comment to a new request, even though the request itself is always External.`]})}),`\n`,_jsx(Heading,{level:`2`,id:`default-category`,children:`Set a default category`}),`\n`,_jsxs(_components.p,{children:[`The category that is preselected comes from your SuperOffice preferences. In SuperOffice, click `,_jsx(`i`,{class:`ph ph-user-circle`,\"aria-hidden\":`true`}),` `,_jsx(_components.strong,{children:`Personal settings`}),` > `,_jsx(_components.strong,{children:`Preferences`}),` > `,_jsx(_components.strong,{children:`Request`}),`, and set `,_jsx(_components.strong,{children:`Default category`}),`.`]})]})}function MDXContent(props={}){const{wrapper:MDXLayout}={..._provideComponents(),...props.components};return MDXLayout?_jsx(MDXLayout,{...props,children:_jsx(_createMdxContent,{...props})}):_createMdxContent(props)}return{default:MDXContent};function _missingMdxReference(id,component){throw new Error(`Expected `+(component?`component`:`object`)+\" `\"+id+\"` to be defined: you likely forgot to import, pass, or provide it.\")}","frontmatter":{},"scope":{"config":{},"pageMetadata":{"uid":"teams-create-request","title":"Create or add to a request from Teams","sidebarTitle":"Create or add to request","description":"How to create a SuperOffice Service request from a Teams conversation, or add a conversation to an existing request.","keywords":["SuperOffice for Teams","Teams","request","create request","add to request","conversation"],"author":"schildea","date":"11.19.2026","content_type":"howto","category":"integration","topic":"SuperOffice for Teams","pilot":"yes","related":false,"language":"en","href":"/integrations/superoffice-for-teams/create-request"}}},"mdxSourceWithNoJs":null},"mdxExtracts":{"tableOfContents":[{"title":"Start SuperOffice for Teams","slug":"start-superoffice-for-teams","depth":2,"children":[]},{"title":"Choose the messages","slug":"choose-the-messages","depth":2,"children":[]},{"title":"Create a request","slug":"create-a-request","depth":2,"children":[]},{"title":"Add a conversation to an existing request","slug":"add-a-conversation-to-an-existing-request","depth":2,"children":[]},{"title":"Add a comment","slug":"add-comment","depth":2,"children":[]},{"title":"Set a default category","slug":"default-category","depth":2,"children":[]}],"codeExamples":{}},"jsLinks":[],"subdomain":"superofficeas","siteName":"SuperOffice","title":"Create or add to a request from Teams - SuperOffice","relatedPagesConfig":{"enabled":true,"limit":10,"mode":"automatic"},"navMaps":{"firstHrefInVersion":{},"firstHrefInLanguage":{"en":{"href":"/integrations/superoffice-for-teams/create-request","matchLevel":0},"da":{"href":"/","matchLevel":4},"de":{"href":"/","matchLevel":4},"nl":{"href":"/","matchLevel":4},"no":{"href":"/","matchLevel":4},"sv":{"href":"/","matchLevel":4}}},"lastModified":"2026-11-19T06:23:12.624Z","originalFileLocation":"integrations/superoffice-for-teams/create-request.mdx","locale":"en"},"headHtml":"\u003cscript data-mint-head>(function(){var d=document.documentElement,p=null;if(!p){try{p=localStorage.getItem(\"isDarkMode\")}catch(e){}if(p==='true')p='dark';else if(p==='false')p='light';if(p!=='light'\u0026\u0026p!=='dark'\u0026\u0026p!=='system')p=\"light\"}var r=p==='system'?(matchMedia(\"(prefers-color-scheme: dark)\").matches?'dark':'light'):p;d.classList.remove(r==='dark'?'light':'dark');d.classList.add(r);d.setAttribute(\"data-theme-preference\",p)})();\u003c/script>\u003cmeta data-mint-head name=\"description\" content=\"How to create a SuperOffice Service request from a Teams conversation, or add a conversation to an existing request.\">\u003cmeta data-mint-head name=\"application-name\" content=\"SuperOffice\">\u003cmeta data-mint-head name=\"generator\" content=\"Mintlify\">\u003clink data-mint-head rel=\"icon\" type=\"image/png\" sizes=\"192x192\" href=\"/mintlify-assets/_mintlify/favicons/superofficeas/1GN1YGufas_is4fu/_generated/favicon/android-chrome-192x192.png\" media=\"(prefers-color-scheme: light)\">\u003clink data-mint-head rel=\"apple-touch-icon\" type=\"image/png\" sizes=\"180x180\" href=\"/mintlify-assets/_mintlify/favicons/superofficeas/1GN1YGufas_is4fu/_generated/favicon/apple-touch-icon.png\">\u003clink data-mint-head rel=\"icon\" type=\"image/png\" sizes=\"16x16\" href=\"/mintlify-assets/_mintlify/favicons/superofficeas/1GN1YGufas_is4fu/_generated/favicon/favicon-16x16.png\" media=\"(prefers-color-scheme: light)\">\u003clink data-mint-head rel=\"icon\" type=\"image/png\" sizes=\"32x32\" href=\"/mintlify-assets/_mintlify/favicons/superofficeas/1GN1YGufas_is4fu/_generated/favicon/favicon-32x32.png\" media=\"(prefers-color-scheme: light)\">\u003clink data-mint-head rel=\"shortcut icon\" type=\"image/x-icon\" href=\"/mintlify-assets/_mintlify/favicons/superofficeas/1GN1YGufas_is4fu/_generated/favicon/favicon.ico\" media=\"(prefers-color-scheme: light)\">\u003clink data-mint-head rel=\"icon\" type=\"image/png\" sizes=\"192x192\" href=\"/mintlify-assets/_mintlify/favicons/superofficeas/1GN1YGufas_is4fu/_generated/favicon-dark/android-chrome-192x192.png\" media=\"(prefers-color-scheme: dark)\">\u003clink data-mint-head rel=\"icon\" type=\"image/png\" sizes=\"16x16\" href=\"/mintlify-assets/_mintlify/favicons/superofficeas/1GN1YGufas_is4fu/_generated/favicon-dark/favicon-16x16.png\" media=\"(prefers-color-scheme: dark)\">\u003clink data-mint-head rel=\"icon\" type=\"image/png\" sizes=\"32x32\" href=\"/mintlify-assets/_mintlify/favicons/superofficeas/1GN1YGufas_is4fu/_generated/favicon-dark/favicon-32x32.png\" media=\"(prefers-color-scheme: dark)\">\u003clink data-mint-head rel=\"shortcut icon\" type=\"image/x-icon\" href=\"/mintlify-assets/_mintlify/favicons/superofficeas/1GN1YGufas_is4fu/_generated/favicon-dark/favicon.ico\" media=\"(prefers-color-scheme: dark)\">\u003cmeta data-mint-head property=\"og:title\" content=\"Create or add to a request from Teams - SuperOffice\">\u003cmeta data-mint-head property=\"og:description\" content=\"How to create a SuperOffice Service request from a Teams conversation, or add a conversation to an existing request.\">\u003cmeta data-mint-head property=\"og:site_name\" content=\"SuperOffice\">\u003cmeta data-mint-head property=\"og:url\" content=\"https://docs.superoffice.com/integrations/superoffice-for-teams/create-request\">\u003cmeta data-mint-head property=\"og:type\" content=\"website\">\u003cmeta data-mint-head property=\"og:image\" content=\"https://superofficeas.mintlify.site/_mintlify/api/og/v2?division=SuperOffice+for+Teams\u0026amp;title=Create+or+add+to+a+request+from+Teams\u0026amp;description=How+to+create+a+SuperOffice+Service+request+from+a+Teams+conversation%2C+or+add+a+conversation+to+an+existing+request.\u0026amp;theme=058ef974d8fa0fa36c6b394e\u0026amp;signature=9f005e6458a875d190266345dec2f4e6dc36e66b208edd7408d9b9cb07e31545\">\u003cmeta data-mint-head property=\"og:image:width\" content=\"1200\">\u003cmeta data-mint-head property=\"og:image:height\" content=\"630\">\u003cmeta data-mint-head name=\"twitter:card\" content=\"summary_large_image\">\u003cmeta data-mint-head name=\"twitter:title\" content=\"Create or add to a request from Teams - SuperOffice\">\u003cmeta data-mint-head name=\"twitter:description\" content=\"How to create a SuperOffice Service request from a Teams conversation, or add a conversation to an existing request.\">\u003cmeta data-mint-head name=\"twitter:image\" content=\"https://superofficeas.mintlify.site/_mintlify/api/og/v2?division=SuperOffice+for+Teams\u0026amp;title=Create+or+add+to+a+request+from+Teams\u0026amp;description=How+to+create+a+SuperOffice+Service+request+from+a+Teams+conversation%2C+or+add+a+conversation+to+an+existing+request.\u0026amp;theme=058ef974d8fa0fa36c6b394e\u0026amp;signature=9f005e6458a875d190266345dec2f4e6dc36e66b208edd7408d9b9cb07e31545\">\u003cmeta data-mint-head name=\"twitter:image:width\" content=\"1200\">\u003cmeta data-mint-head name=\"twitter:image:height\" content=\"630\">\u003cmeta data-mint-head name=\"msapplication-config\" content=\"/mintlify-assets/_mintlify/favicons/superofficeas/1GN1YGufas_is4fu/_generated/favicon/browserconfig.xml\">\u003cmeta data-mint-head name=\"apple-mobile-web-app-title\" content=\"SuperOffice\">\u003cmeta data-mint-head name=\"msapplication-TileColor\" content=\"#06423E\">\u003clink data-mint-head rel=\"canonical\" href=\"https://docs.superoffice.com/integrations/superoffice-for-teams/create-request\">\u003clink data-mint-head rel=\"alternate\" type=\"application/xml\" href=\"/sitemap.xml\">\u003clink data-mint-head rel=\"alternate\" type=\"text/markdown\" href=\"/integrations/superoffice-for-teams/create-request.md\">\u003cscript data-mint-head type=\"application/ld+json\">{\"@context\":\"https://schema.org\",\"@graph\":[{\"@type\":\"Organization\",\"@id\":\"https://docs.superoffice.com/#organization\",\"name\":\"SuperOffice\",\"url\":\"https://docs.superoffice.com\",\"logo\":{\"@type\":\"ImageObject\",\"url\":\"https://mintcdn.com/superofficeas/aVAJ6f0EuU32pPy4/logo/light.svg?fit=max\u0026auto=format\u0026n=aVAJ6f0EuU32pPy4\u0026q=85\u0026s=311026f6a7f29588288052fbcb6fdc92\"}},{\"@type\":\"WebSite\",\"@id\":\"https://docs.superoffice.com#website\",\"name\":\"SuperOffice\",\"url\":\"https://docs.superoffice.com\",\"publisher\":{\"@id\":\"https://docs.superoffice.com/#organization\"}},{\"@type\":\"WebPage\",\"@id\":\"https://docs.superoffice.com/integrations/superoffice-for-teams/create-request#webpage\",\"url\":\"https://docs.superoffice.com/integrations/superoffice-for-teams/create-request\",\"name\":\"Create or add to a request from Teams\",\"description\":\"How to create a SuperOffice Service request from a Teams conversation, or add a conversation to an existing request.\",\"dateModified\":\"2026-11-19T06:23:12.624Z\",\"isPartOf\":{\"@id\":\"https://docs.superoffice.com#website\"},\"breadcrumb\":{\"@id\":\"https://docs.superoffice.com/integrations/superoffice-for-teams/create-request#breadcrumb\"}},{\"@type\":\"BreadcrumbList\",\"@id\":\"https://docs.superoffice.com/integrations/superoffice-for-teams/create-request#breadcrumb\",\"itemListElement\":[{\"@type\":\"ListItem\",\"position\":1,\"name\":\"SuperOffice for Teams\",\"item\":\"https://docs.superoffice.com/integrations/superoffice-for-teams\"},{\"@type\":\"ListItem\",\"position\":2,\"name\":\"Create or add to a request from Teams\",\"item\":\"https://docs.superoffice.com/integrations/superoffice-for-teams/create-request\"}]},{\"@type\":[\"Article\",\"TechArticle\"],\"@id\":\"https://docs.superoffice.com/integrations/superoffice-for-teams/create-request#article\",\"headline\":\"Create or add to a request from Teams\",\"name\":\"Create or add to a request from Teams\",\"description\":\"How to create a SuperOffice Service request from a Teams conversation, or add a conversation to an existing request.\",\"url\":\"https://docs.superoffice.com/integrations/superoffice-for-teams/create-request\",\"mainEntityOfPage\":{\"@id\":\"https://docs.superoffice.com/integrations/superoffice-for-teams/create-request#webpage\"},\"dateModified\":\"2026-11-19T06:23:12.624Z\",\"keywords\":\"SuperOffice for Teams, Teams, request, create request, add to request, conversation\",\"publisher\":{\"@id\":\"https://docs.superoffice.com/#organization\"},\"isPartOf\":{\"@id\":\"https://docs.superoffice.com#website\"}}]}\u003c/script>","agentPointerHref":"/integrations/superoffice-for-teams/create-request.md","siteName":"SuperOffice","nav":{"global":{"anchors":[{"anchor":"Contact us","icon":"headset","href":"https://www.superoffice.com/company/contact"},{"anchor":"Log in to SuperOffice","icon":"arrow-right-to-bracket","href":"https://online.superoffice.com/login"},{"anchor":"About","icon":"circle-info","href":"/about"}]},"languages":[{"language":"en","default":true,"tabs":[{"tab":"Home","icon":"house","pages":[{"title":"Home","href":""}]},{"tab":"Guides","icon":"book-open","pages":[{"title":"Guides","href":"/en/learn"}]},{"tab":"CRM Platform","icon":"cloud","pages":[{"title":"CRM Platform","href":"/en/online"}]},{"tab":"Onsite","icon":"server","hidden":true,"searchable":true,"pages":[{"title":"Onsite","href":"/en/onsite"}]},{"tab":"AI","icon":"wand-magic-sparkles","pages":[{"title":"AI","href":"/en/ai/learn"}]},{"tab":"Mobile","icon":"mobile-screen","pages":[{"title":"Mobile","href":"/en/mobile"}]},{"tab":"Integrations","icon":"plus","pages":[{"mode":"custom","title":"SuperOffice integrations","href":"/integrations"},{"group":"Gmail Link","boost":0.25,"root":{"title":"SuperOffice Gmail Link","href":"/integrations/gmail-link/index"},"pages":[{"title":"Enable SuperOffice Gmail Link","href":"/integrations/gmail-link/install"},{"title":"Edit Gmail Link settings","href":"/integrations/gmail-link/settings"},{"title":"Manage senders","href":"/integrations/gmail-link/manage-senders"},{"title":"Archive incoming email","href":"/integrations/gmail-link/email-archive-incoming"},{"title":"Archive attachments","href":"/integrations/gmail-link/archive-attachments"},{"title":"Create activity","href":"/integrations/gmail-link/archive-emails-as-activities"},{"title":"Create request","href":"/integrations/gmail-link/archive-emails-as-requests"},{"title":"Archive outgoing email","href":"/integrations/gmail-link/email-archive-outgoing"}]},{"group":"Google Workspace document integration","root":{"title":"Google Workspace document integration","href":"/integrations/g-suite/index"},"pages":[{"title":"Requirements","href":"/integrations/g-suite/requirements"},{"title":"Security","href":"/integrations/g-suite/security"},{"title":"Getting started (self-service)","href":"/integrations/g-suite/getting-started"},{"title":"Set up Google Workspace Document Integration","href":"/integrations/g-suite/set-up"}]},{"group":"Mail Link","root":{"title":"Mail Link","href":"/integrations/mail-link/index"},"pages":[{"title":"Install Mail Link","href":"/integrations/mail-link/install"},{"title":"Archive email to SuperOffice","href":"/integrations/mail-link/archive"},{"title":"Create email from Microsoft Outlook","href":"/integrations/mail-link/create-in-outlook"},{"title":"Creating emails from SuperOffice CRM (LEGACY)","href":"/integrations/mail-link/create-in-superoffice"},{"title":"Select recipients","href":"/integrations/mail-link/select-recipients"},{"title":"Manage senders","href":"/integrations/mail-link/manage-senders"},{"title":"Add SuperOffice document as attachment","href":"/integrations/mail-link/add-attachment"},{"title":"Archiving emails on companies/contacts","href":"/integrations/mail-link/archive-on-contact"},{"title":"Create activity from email","href":"/integrations/mail-link/archive-as-activity"},{"title":"Create request from an email","href":"/integrations/mail-link/archive-as-request"},{"title":"Archive attachments","href":"/integrations/mail-link/archive-attachment"},{"title":"SuperOffice CRM options dialog","href":"/integrations/mail-link/settings"},{"title":"Debug Mail Link","href":"/integrations/mail-link/debug"}]},{"group":"SharePoint documents","root":{"title":"SharePoint documents","href":"/integrations/sharepoint-documents/index"},"pages":[{"title":"Requirements","href":"/integrations/sharepoint-documents/requirements"},{"group":"Set up SharePoint","pages":[{"title":"About permissions in SharePoint","href":"/integrations/sharepoint-documents/permissions-in-sharepoint"},{"title":"How to set up SharePoint permissions for documents","href":"/integrations/sharepoint-documents/configure-permissions-documents"},{"title":"How to set up SharePoint permissions for templates","href":"/integrations/sharepoint-documents/configure-permissions-templates"}]},{"title":"How to configure settings in SuperOffice Settings and maintenance","href":"/integrations/sharepoint-documents/configure-superoffice"},{"title":"Permissions for SuperOffice Document Library integration (app)","href":"/integrations/sharepoint-documents/permissions-app"},{"title":"Troubleshooting","href":"/integrations/sharepoint-documents/troubleshooting"},{"group":"Migration","pages":[{"title":"About the migration tool","href":"/integrations/sharepoint-documents/migrate/index"},{"title":"Best practices","href":"/integrations/sharepoint-documents/migrate/best-practices"},{"title":"Migration guide","href":"/integrations/sharepoint-documents/migrate/steps"},{"title":"Troubleshooting","href":"/integrations/sharepoint-documents/migrate/troubleshooting"},{"title":"The SharePoint migration UI","href":"/integrations/sharepoint-documents/migrate/reference"}]}]},{"group":"SuperNotes","root":{"title":"SuperNotes","href":"/integrations/supernotes/index"},"pages":[{"title":"Getting started","href":"/integrations/supernotes/getting-started"},{"title":"Workspaces","href":"/integrations/supernotes/workspaces"},{"title":"Teams","href":"/integrations/supernotes/teams"},{"title":"Before meeting","href":"/integrations/supernotes/before-meeting"},{"title":"Summaries","href":"/integrations/supernotes/summaries"},{"title":"Settings","href":"/integrations/supernotes/settings"},{"title":"Privacy and security","href":"/integrations/supernotes/privacy-security"}]},{"group":"SuperOffice for Outlook","root":{"title":"SuperOffice for Outlook (SOFO)","href":"/integrations/superoffice-for-outlook/index"},"pages":[{"title":"Requirements","href":"/integrations/superoffice-for-outlook/requirements"},{"title":"Get the add-in","href":"/integrations/superoffice-for-outlook/get"},{"title":"Centralized deployment","href":"/integrations/superoffice-for-outlook/deploy"},{"title":"Pin SuperOffice for Outlook","sidebarTitle":"Pin the add-in","href":"/integrations/superoffice-for-outlook/pin-add-in"},{"title":"Settings","href":"/integrations/superoffice-for-outlook/settings"},{"title":"Select or add a contact","href":"/integrations/superoffice-for-outlook/add-contact-to-superoffice"},{"title":"View contact details in SuperOffice for Outlook","href":"/integrations/superoffice-for-outlook/view-contact-details"},{"group":"Archive emails to SuperOffice","pages":[{"title":"Archive email to SuperOffice","href":"/integrations/superoffice-for-outlook/archive-email"},{"title":"Send and archive","href":"/integrations/superoffice-for-outlook/send-and-archive"},{"title":"Save attachments to SuperOffice","href":"/integrations/superoffice-for-outlook/save-attachments"},{"title":"Work with shared mailboxes","href":"/integrations/superoffice-for-outlook/shared-mailboxes"},{"title":"Email archive status in your mailbox","sidebarTitle":"Email archive status in mailbox","href":"/integrations/superoffice-for-outlook/email-archive-status"}]},{"title":"Add CRM data to calendar events","sidebarTitle":"Add CRM data to events","href":"/integrations/superoffice-for-outlook/add-crm-data-to-event"},{"title":"Archive reminder","href":"/integrations/superoffice-for-outlook/archive-reminder"},{"title":"Create task or appointment","href":"/integrations/superoffice-for-outlook/create-follow-up"},{"title":"Add request or message","href":"/integrations/superoffice-for-outlook/create-request"},{"title":"Create sale","href":"/integrations/superoffice-for-outlook/create-sale"},{"title":"Troubleshooting SuperOffice for Outlook","sidebarTitle":"Troubleshooting","href":"/integrations/superoffice-for-outlook/troubleshooting"}]},{"group":"SuperOffice for Teams","root":{"title":"SuperOffice for Teams","href":"/integrations/superoffice-for-teams/index"},"pages":[{"title":"Requirements for SuperOffice for Teams","sidebarTitle":"Requirements","href":"/integrations/superoffice-for-teams/requirements"},{"title":"Deploy SuperOffice for Teams","sidebarTitle":"Deploy","href":"/integrations/superoffice-for-teams/deploy"},{"title":"Get SuperOffice for Teams","sidebarTitle":"Get","href":"/integrations/superoffice-for-teams/get"},{"title":"Archive a Teams conversation","href":"/integrations/superoffice-for-teams/archive-conversation"},{"title":"Save a file from a Teams channel","href":"/integrations/superoffice-for-teams/archive-file"},{"title":"AI summaries in SuperOffice for Teams","sidebarTitle":"AI summaries","description":"How to generate and review an AI summary of a Teams conversation when archiving to SuperOffice.","href":"/integrations/superoffice-for-teams/ai-summary"},{"title":"Create or add to a request from Teams","sidebarTitle":"Create or add to request","href":"/integrations/superoffice-for-teams/create-request"},{"title":"Preferences in SuperOffice for Teams","sidebarTitle":"Preferences","description":"How to set your default archiving options in SuperOffice for Teams.","href":"/integrations/superoffice-for-teams/preferences"},{"title":"Permissions and security in SuperOffice for Teams","sidebarTitle":"Permissions and security","href":"/integrations/superoffice-for-teams/security"},{"title":"Troubleshooting SuperOffice for Teams","sidebarTitle":"Troubleshooting","href":"/integrations/superoffice-for-teams/troubleshooting"},{"title":"Known limitations in SuperOffice for Teams","sidebarTitle":"Known limitations","href":"/integrations/superoffice-for-teams/limitations"}]},{"group":"Video meetings","root":{"title":"Video Meetings for SuperOffice","href":"/integrations/video-meetings/index"},"pages":[{"title":"Video Meetings for SuperOffice: Google Meet","sidebarTitle":"Google Meet","href":"/integrations/video-meetings/google-meet/index"},{"title":"Video Meetings for SuperOffice: Jitsi","sidebarTitle":"Jitsi","href":"/integrations/video-meetings/jitsi/index"},{"title":"Video Meetings for SuperOffice: Microsoft Teams","sidebarTitle":"Microsoft Teams","href":"/integrations/video-meetings/ms-teams/index"},{"title":"Video Meetings for SuperOffice: Webex","sidebarTitle":"Webex","href":"/integrations/video-meetings/webex/index"},{"title":"Video Meetings for SuperOffice: Zoom","sidebarTitle":"Zoom","href":"/integrations/video-meetings/zoom/index"},{"group":"How to...","pages":[{"title":"Create a video meeting","href":"/integrations/video-meetings/howto/create"},{"title":"Join a video meeting","href":"/integrations/video-meetings/howto/join"},{"title":"How to configure email invitations for video meetings","sidebarTitle":"Configure email invitations for video meetings","href":"/integrations/video-meetings/howto/configure-email-invitations"},{"title":"How to connect to a video provider","sidebarTitle":"Connect to a video provider","href":"/integrations/video-meetings/howto/connect-provider"},{"title":"How to disconnect video provider","sidebarTitle":"Disconnect video provider","href":"/integrations/video-meetings/howto/disconnect-provider"},{"title":"How to remove video-meetings configuration for users","sidebarTitle":"Remove video-meetings configuration for users","href":"/integrations/video-meetings/howto/disconnect-user"}]},{"title":"Troubleshooting","href":"/integrations/video-meetings/troubleshooting"}]},{"group":"WebTools","root":{"title":"SuperOffice WebTools","href":"/integrations/webtools/index"},"pages":[{"title":"Technical overview","href":"/integrations/webtools/technical-overview"},{"title":"System requirements for WebTools","href":"/integrations/webtools/system-requirements"},{"group":"Set up","pages":[{"title":"Install WebTools","href":"/integrations/webtools/install"},{"title":"WebTools deployment in a restricted environment","href":"/integrations/webtools/deploy"},{"title":"Configure WebTools","href":"/integrations/webtools/config"},{"title":"Upgrade WebTools","href":"/integrations/webtools/upgrade"}]},{"title":"Troubleshooting WebTools","href":"/integrations/webtools/troubleshooting"}]},{"group":"Zapier","root":{"title":"Zapier","href":"/integrations/zapier/index"},"pages":[{"group":"Get started","boost":2,"pages":[{"title":"Get started","href":"/integrations/zapier/get-started/index"},{"title":"Connect a SuperOffice account with Zapier","href":"/integrations/zapier/get-started/set-up-account"},{"title":"Create a Zap with SuperOffice CRM","href":"/integrations/zapier/get-started/create-zap"}]},{"group":"How to...","pages":[{"title":"Working with Zaps","href":"/integrations/zapier/howto/index"},{"title":"How to maintain GDPR configuration","href":"/integrations/zapier/howto/gdpr"},{"title":"Look up lists between Source and SuperOffice CRM","href":"/integrations/zapier/howto/listsource"},{"title":"Formatting date and time","href":"/integrations/zapier/howto/datetime"},{"group":"Actions","root":{"title":"Create a SuperOffice action","href":"/integrations/zapier/howto/actions/index"},"pages":[{"title":"Create a SuperOffice CRM Appointment action","sidebarTitle":"Create a SuperOffice CRM Appointment","href":"/integrations/zapier/howto/actions/create-appointment"},{"title":"Create a SuperOffice CRM Company action","sidebarTitle":"Create a SuperOffice CRM Company","href":"/integrations/zapier/howto/actions/create-company"},{"title":"Create a SuperOffice CRM Contact action","sidebarTitle":"Create a SuperOffice CRM Contact","href":"/integrations/zapier/howto/actions/create-contact"},{"title":"Create a SuperOffice CRM document action","sidebarTitle":"Create a SuperOffice CRM document","href":"/integrations/zapier/howto/actions/create-document"},{"title":"Create a SuperOffice CRM Project Member action","sidebarTitle":"Create a SuperOffice CRM Project Member","href":"/integrations/zapier/howto/actions/create-project-member"},{"title":"Create SuperOffice CRM Project action","sidebarTitle":"Create SuperOffice CRM Project","href":"/integrations/zapier/howto/actions/create-project"},{"title":"Create a SuperOffice CRM Request Message Attachment action","sidebarTitle":"Create a SuperOffice CRM Request Message Attachment","href":"/integrations/zapier/howto/actions/create-request-message-attachment"},{"title":"Create SuperOffice CRM Request Message action","sidebarTitle":"Create SuperOffice CRM Request Message","href":"/integrations/zapier/howto/actions/create-request-message"},{"title":"Create SuperOffice CRM Request action","sidebarTitle":"Create SuperOffice CRM Request","href":"/integrations/zapier/howto/actions/create-request"},{"title":"Create SuperOffice CRM Sale action","sidebarTitle":"Create SuperOffice CRM Sale","href":"/integrations/zapier/howto/actions/create-sale"},{"title":"Remove a SuperOffice CRM Project Member action","sidebarTitle":"Remove a SuperOffice CRM Project Member","href":"/integrations/zapier/howto/actions/remove-project-member"},{"title":"Find a SuperOffice CRM Company action","sidebarTitle":"Find a SuperOffice CRM Company","href":"/integrations/zapier/howto/actions/search-company"},{"title":"Find a SuperOffice CRM Contact action","sidebarTitle":"Find a SuperOffice CRM Contact","href":"/integrations/zapier/howto/actions/search-contact"},{"title":"Find a SuperOffice CRM Project action","sidebarTitle":"Find a SuperOffice CRM Project","href":"/integrations/zapier/howto/actions/search-project"},{"title":"Find a SuperOffice CRM Request action","sidebarTitle":"Find a SuperOffice CRM Request","href":"/integrations/zapier/howto/actions/search-request"},{"title":"Find a SuperOffice CRM Sale action","sidebarTitle":"Find a SuperOffice CRM Sale","href":"/integrations/zapier/howto/actions/search-sale"},{"title":"Update a SuperOffice CRM Appointment action","sidebarTitle":"Update a SuperOffice CRM Appointment","href":"/integrations/zapier/howto/actions/update-appointment"},{"title":"Update a SuperOffice CRM Company action","sidebarTitle":"Update a SuperOffice CRM Company","href":"/integrations/zapier/howto/actions/update-company"},{"title":"Update a SuperOffice CRM Contact action","sidebarTitle":"Update a SuperOffice CRM Contact","href":"/integrations/zapier/howto/actions/update-contact"},{"title":"Update a SuperOffice CRM Document Content action","sidebarTitle":"Update a SuperOffice CRM Document Content","href":"/integrations/zapier/howto/actions/update-document-content"},{"title":"Update SuperOffice CRM Project action","sidebarTitle":"Update SuperOffice CRM Project","href":"/integrations/zapier/howto/actions/update-project"},{"title":"Update a SuperOffice CRM Request action","sidebarTitle":"Update a SuperOffice CRM Request","href":"/integrations/zapier/howto/actions/update-request"},{"title":"Update a SuperOffice CRM Sale action","sidebarTitle":"Update a SuperOffice CRM Sale","href":"/integrations/zapier/howto/actions/update-sale"}]},{"group":"Triggers","pages":[{"title":"Create a SuperOffice CRM new trigger","href":"/integrations/zapier/howto/triggers/new"},{"title":"Create a SuperOffice CRM changed trigger","href":"/integrations/zapier/howto/triggers/changed"}]}]},{"title":"Supported SuperOffice triggers and actions","href":"/integrations/zapier/reference"}]}]},{"tab":"Developer guide","icon":"square-terminal","menu":[{"item":"Developer Portal","icon":"laptop-code","pages":[{"title":"Developer Portal","href":"/en/developer-portal"}]},{"item":"Automation","icon":"gears","pages":[{"title":"Automation","href":"/en/automation/overview"}]},{"item":"API","icon":"brackets-curly","pages":[{"title":"API","href":"/en/api/overview"}]},{"item":"Database","icon":"database","pages":[{"title":"Database","href":"/en/database/overview"}]},{"item":"CRMScript Reference","icon":"code","pages":[{"title":"CRMScript Reference","href":"/en/automation/crmscript/reference"}]},{"item":"WebAPI reference (shortcut)","icon":"brackets-curly","pages":[{"title":"WebAPI reference (shortcut)","href":"/en/api/reference/webapi"}]},{"item":"REST Agent reference (shortcut)","icon":"brackets-curly","pages":[{"title":"REST Agent reference (shortcut)","href":"/en/api/reference/restful/agent"}]},{"item":"RESTful REST API (shortcut)","icon":"brackets-curly","pages":[{"title":"RESTful REST API (shortcut)","href":"/en/api/reference/restful/rest"}]},{"item":"Archive providers (shortcut)","icon":"database","pages":[{"title":"Archive providers (shortcut)","href":"/en/api/archive-providers/reference"}]}],"pages":[{"title":"Developer guide","href":"/en/developer-portal"}]},{"tab":"Release Notes","icon":"bullhorn","pages":[{"title":"Release Notes","href":"/release-notes"}]},{"tab":"Contribute","icon":"hand-holding-heart","pages":[{"title":"Contribute","href":"/contribute"}]}]},{"language":"da","pages":[{"title":"da","href":"/"}]},{"language":"de","pages":[{"title":"de","href":"/"}]},{"language":"nl","pages":[{"title":"nl","href":"/"}]},{"language":"no","pages":[{"title":"no","href":"/"}]},{"language":"sv","pages":[{"title":"sv","href":"/"}]}]},"basePath":"","title":"Create or add to a request from Teams - SuperOffice","deploymentId":"dpl_FZMKUpaaKiVETbfqhoUe4sPFDTmY","buildId":"dpl_FZMKUpaaKiVETbfqhoUe4sPFDTmY","dynamics":["a74be98ba7"],"chunks":["zoom-image-lightbox-B9O1U98p.js","lightbox-handle-r17bVUz3.js"]}


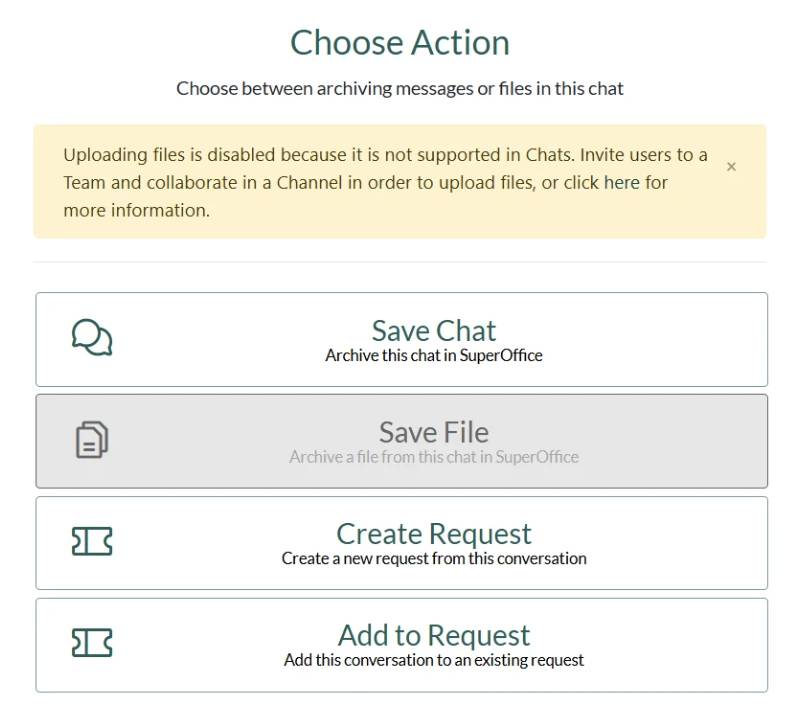
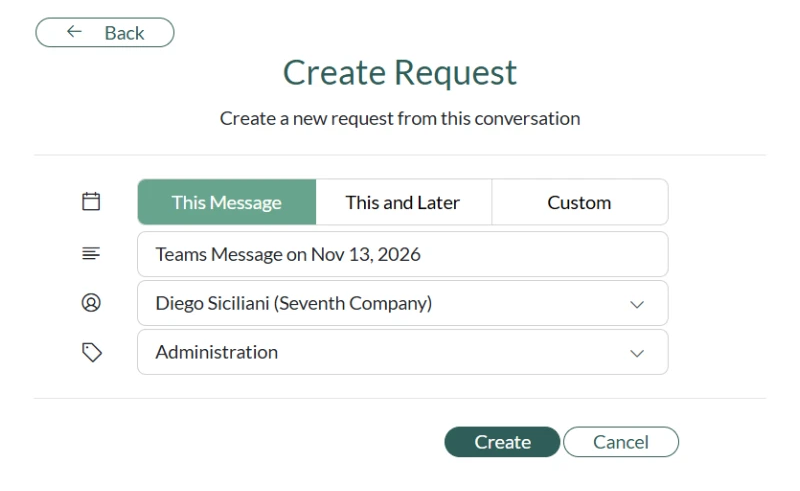 A new request is always created with External visibility. You cannot change this.
A confirmation shows the request number. To add a comment, see Add a comment.