

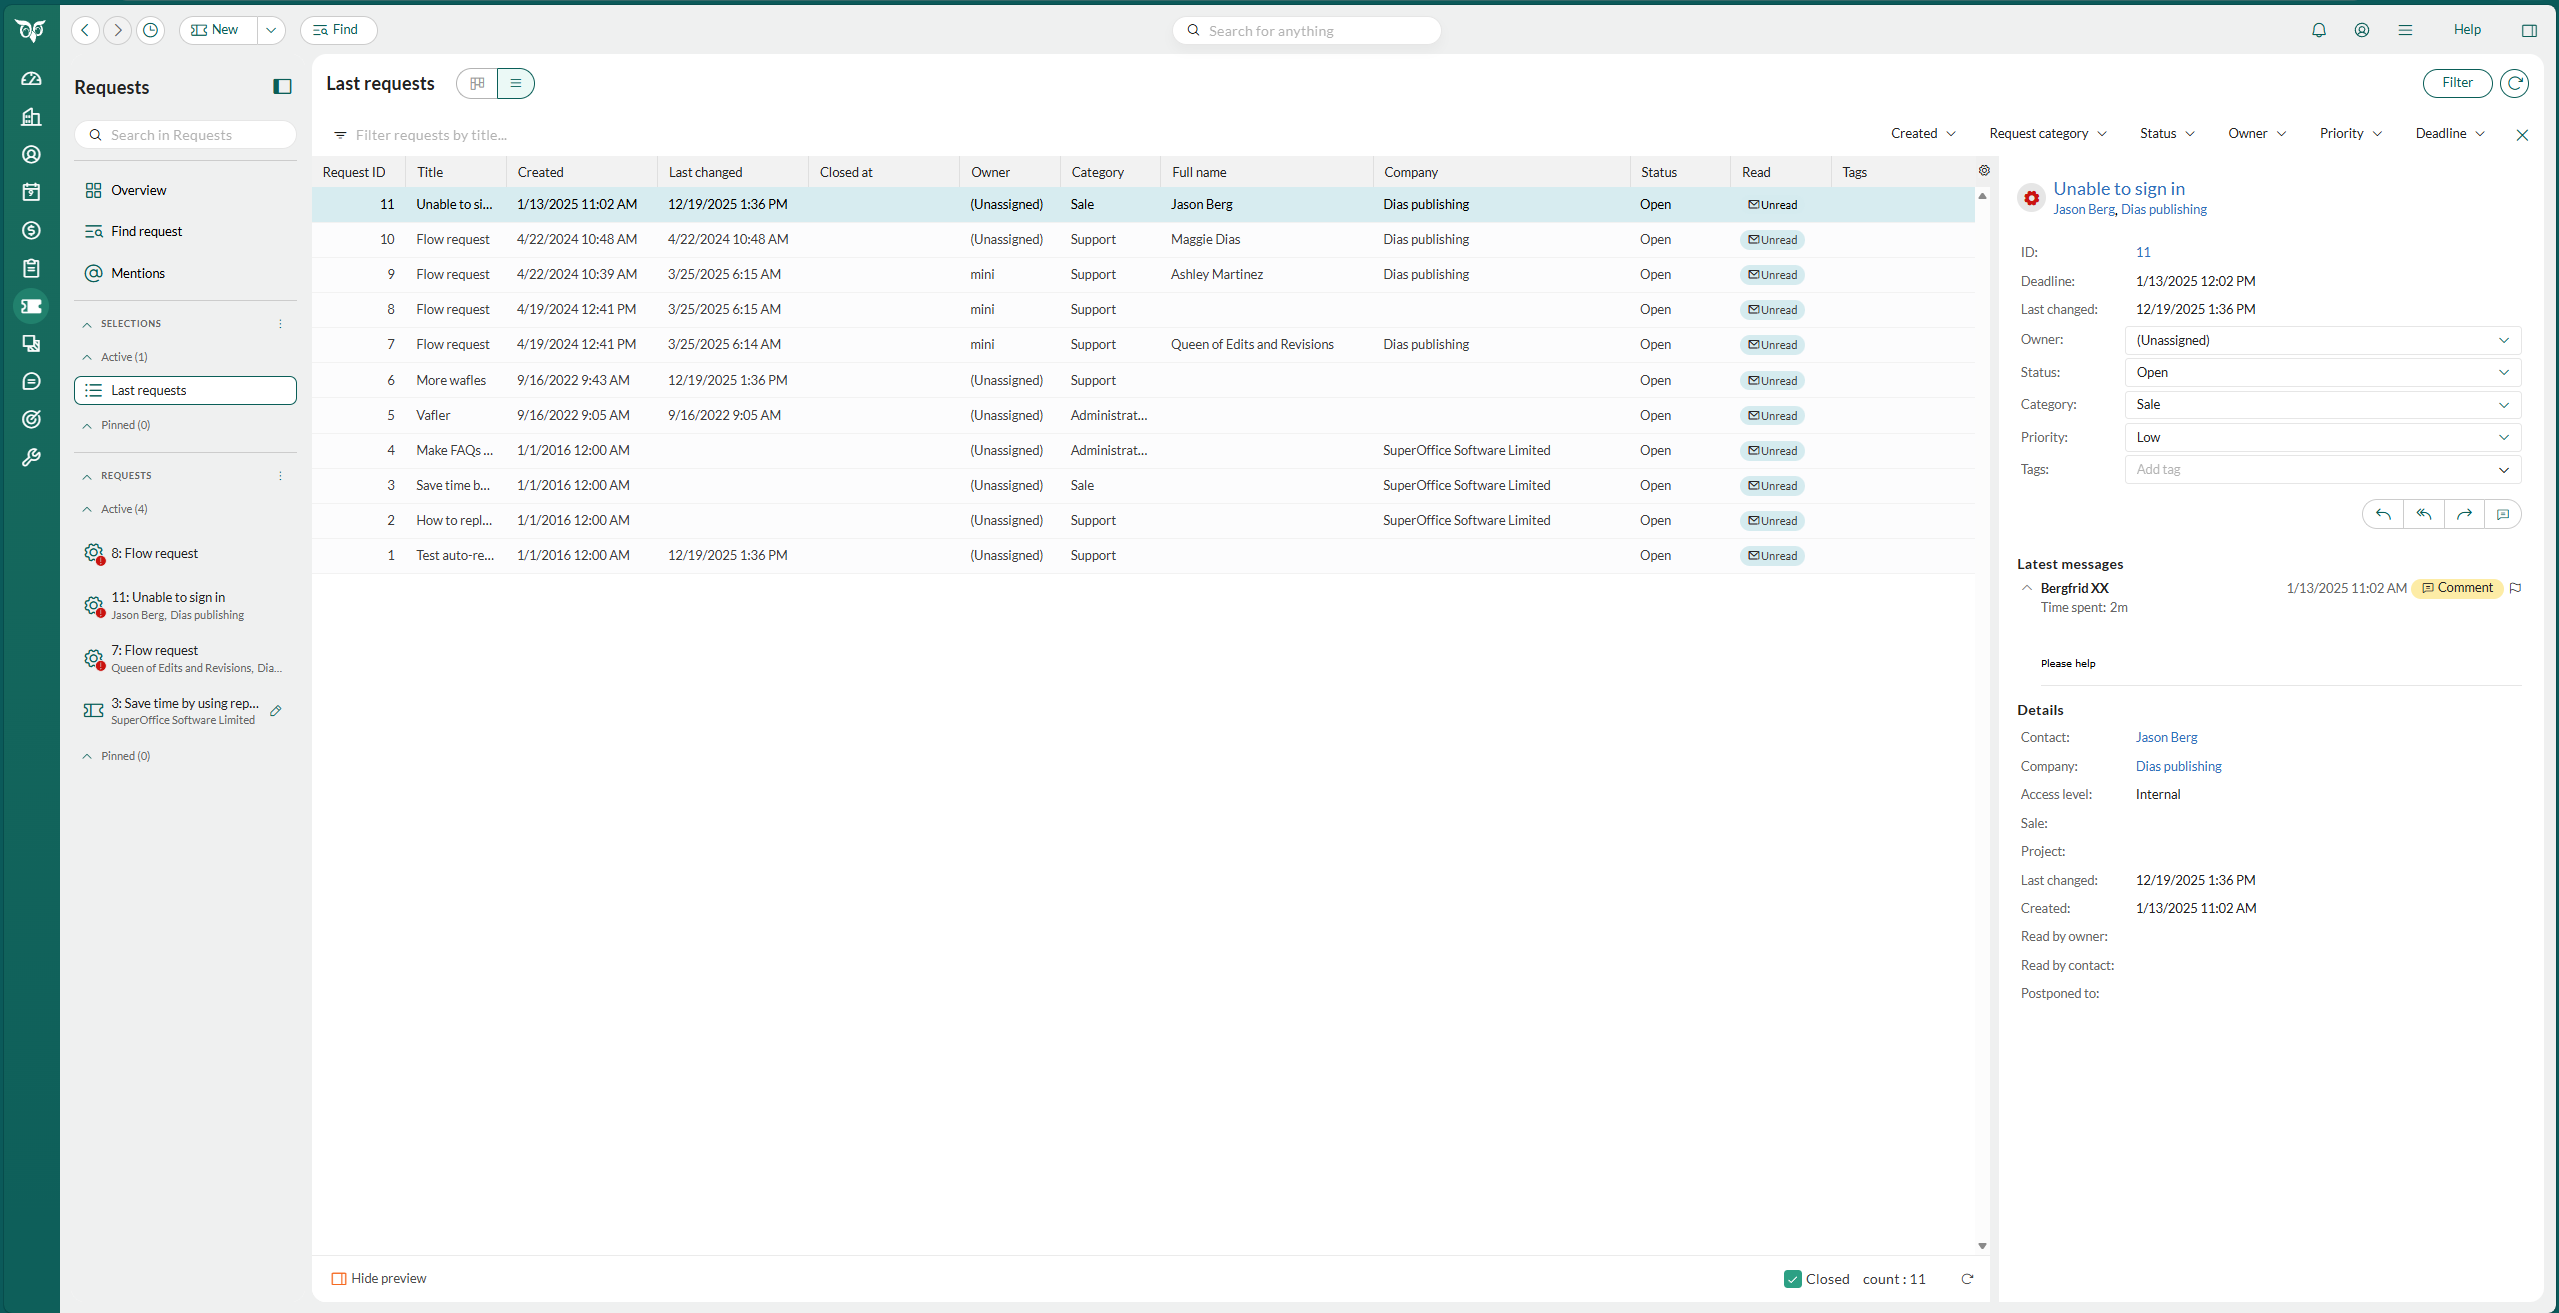
The Request screen is being introduced gradually. If you do not see it yet, you work with several requests in horizontal tabs. The left panel, the Overview tab, and Mentions are not available.
Where can I access requests?
- Section tabs in the Company, Contact, Sale, and Project screens.
- Standard lists, such as Own open requests
- Search
- Favorites
- Flagged messages
Contacts
Requests can be linked to contacts, who in turn can belong to a company. This means that requests cannot be linked directly to companies (only indirectly via contacts). When new emails are imported and saved as requests, the request is automatically linked to the correct contact via the email address. When you view a request, it is easy to see who the contact is, and if you click the contact’s name, you can see which other requests are registered for this person. This provides you with a rapid overview of previous communication with this same contact.The Request screen
The Request screen is where you work with your requests. It has three areas:- Left panel: Vertical tabs for the requests and selections you work with, and a search field for finding others. It also has the entries Overview, Find request, and Mentions. Pin the tabs you use every day. See Work with overview pages for how the left panel works.
- Main area: Shows the Overview tab, a selection or list of requests in board view or list view, or one request as a Request card.
- Side panel: The side panel on the right shows the company and contact of the request you are working on. It closes while the Overview tab is shown, and opens again when you leave the Overview tab if it was open before.
Open the Request screen
- Click the Requests icon in the Navigator. The Request screen opens with the tab you last used, or with the Overview tab if you have no open tabs.
- Open a request from anywhere in SuperOffice CRM, for example by double-clicking it in a Requests section tab. The request opens in a new tab.
- Click New > Request to create a request. The new request opens in a New request tab.
What you see the first time
The first time you open the Request screen, the horizontal tabs you had open are copied to the left panel. Pinned tabs stay pinned. The Overview tab opens if you have no active tab. Your old tabs are not changed.Get an overview of your requests
The Overview tab shows your work in up to four columns of request cards. By default, the columns are Unassigned requests, Own open requests, My favourites, and Last requests. Each card shows the request type, the request ID, the title, the company, and the status.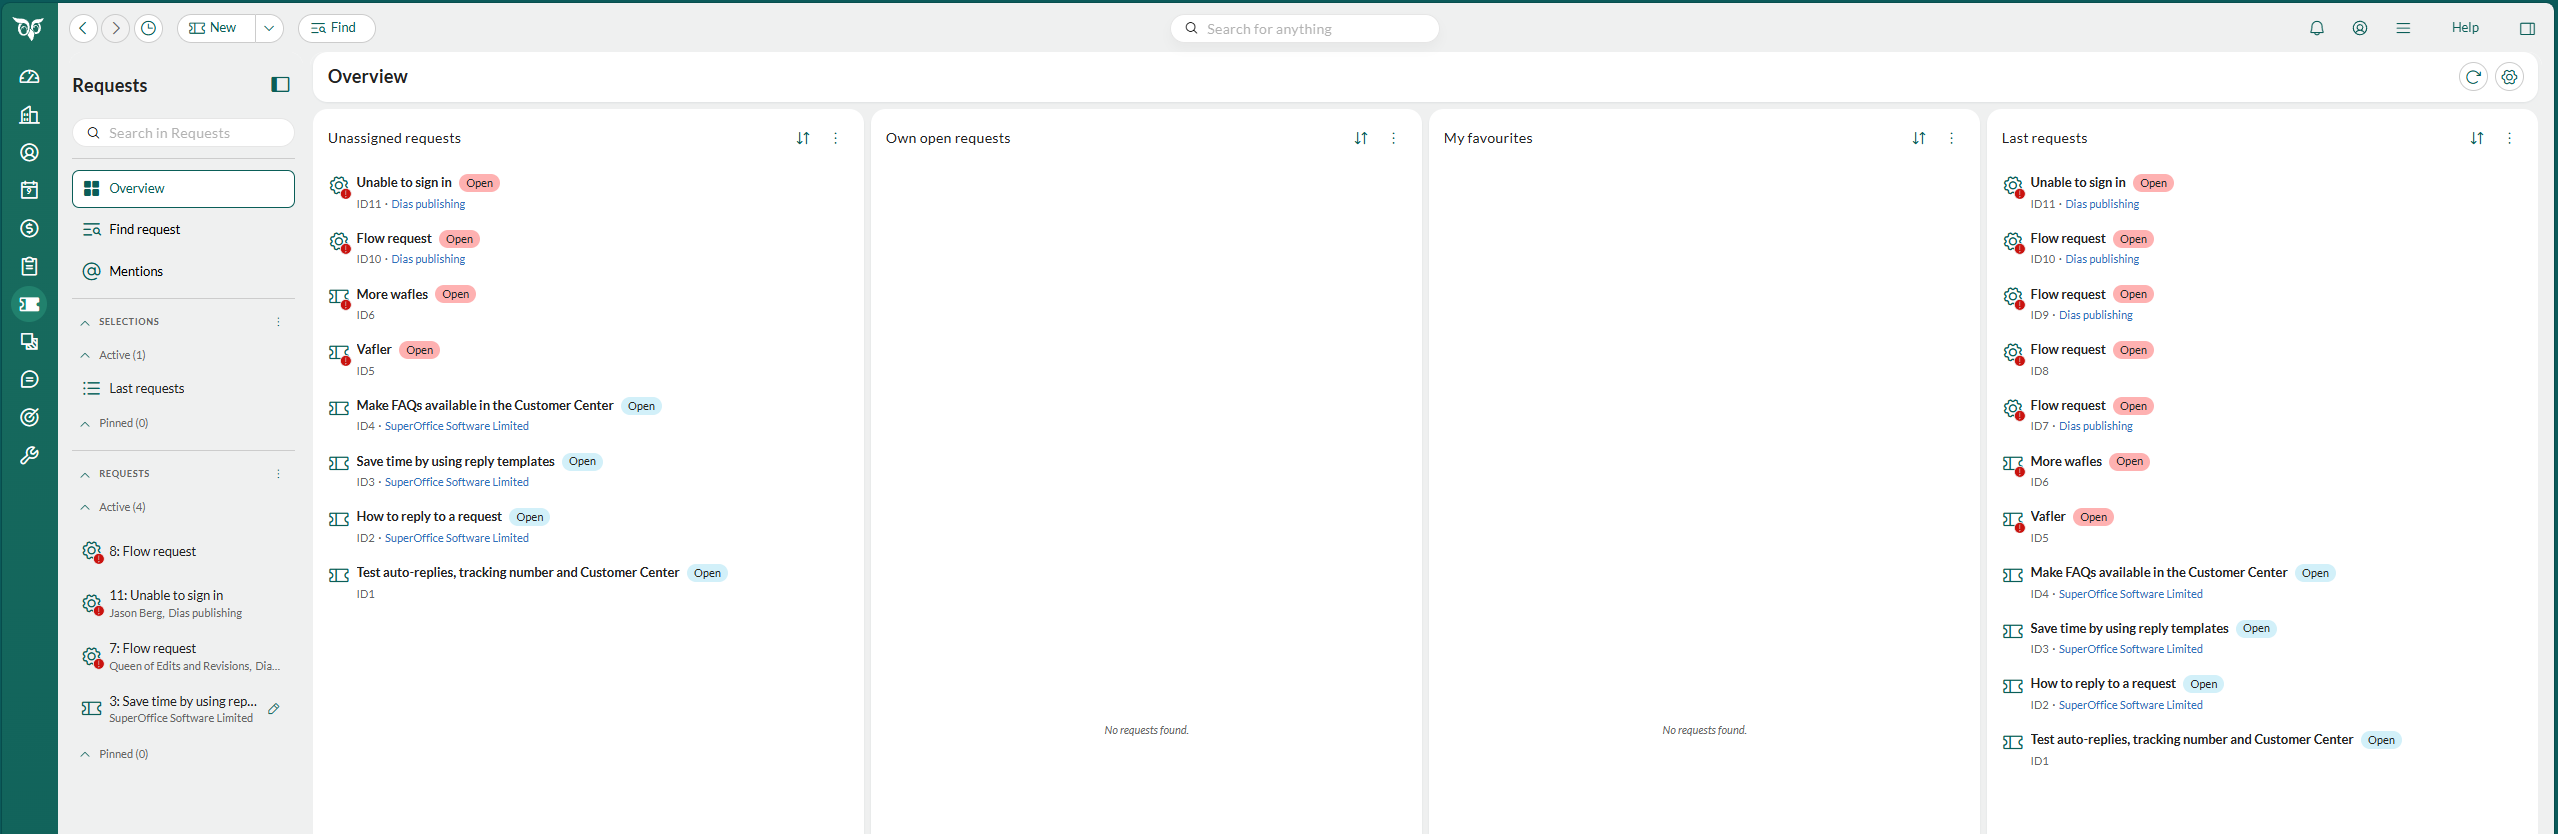
- Click Overview in the left panel.
- Use the cards to find the requests that need your attention. A colored badge on the request type icon shows the status. Red means the deadline has passed, green means closed, and gray means postponed.
- Click a card to preview and update the request, or double-click it to open it in a tab.
- See more requests: A column shows up to 20 requests. Click See all requests to open the full list or selection in a tab.
- Sort a column: Use the sort button to sort by request ID, creation date, owner, last change, or priority.
- Open a contact or company: Click the name on a card.
- Reload the Overview tab: Click the reload button. A column also reloads when you change one of its requests in the same browser. Changes made by other users do not appear until you reload.
Change the columns on the Overview tab
- Click the gear button () to open Edit overview.
- Choose how many columns you want, from one to four. With four columns, you can show them side by side or as a 2 × 2 grid.
- Choose what fills each column. Under Selections, search for a selection or a standard list, and drag it onto a column. To empty a column, click in its header.
- Check the preview, and then click Save. Click Discard to drop your changes.
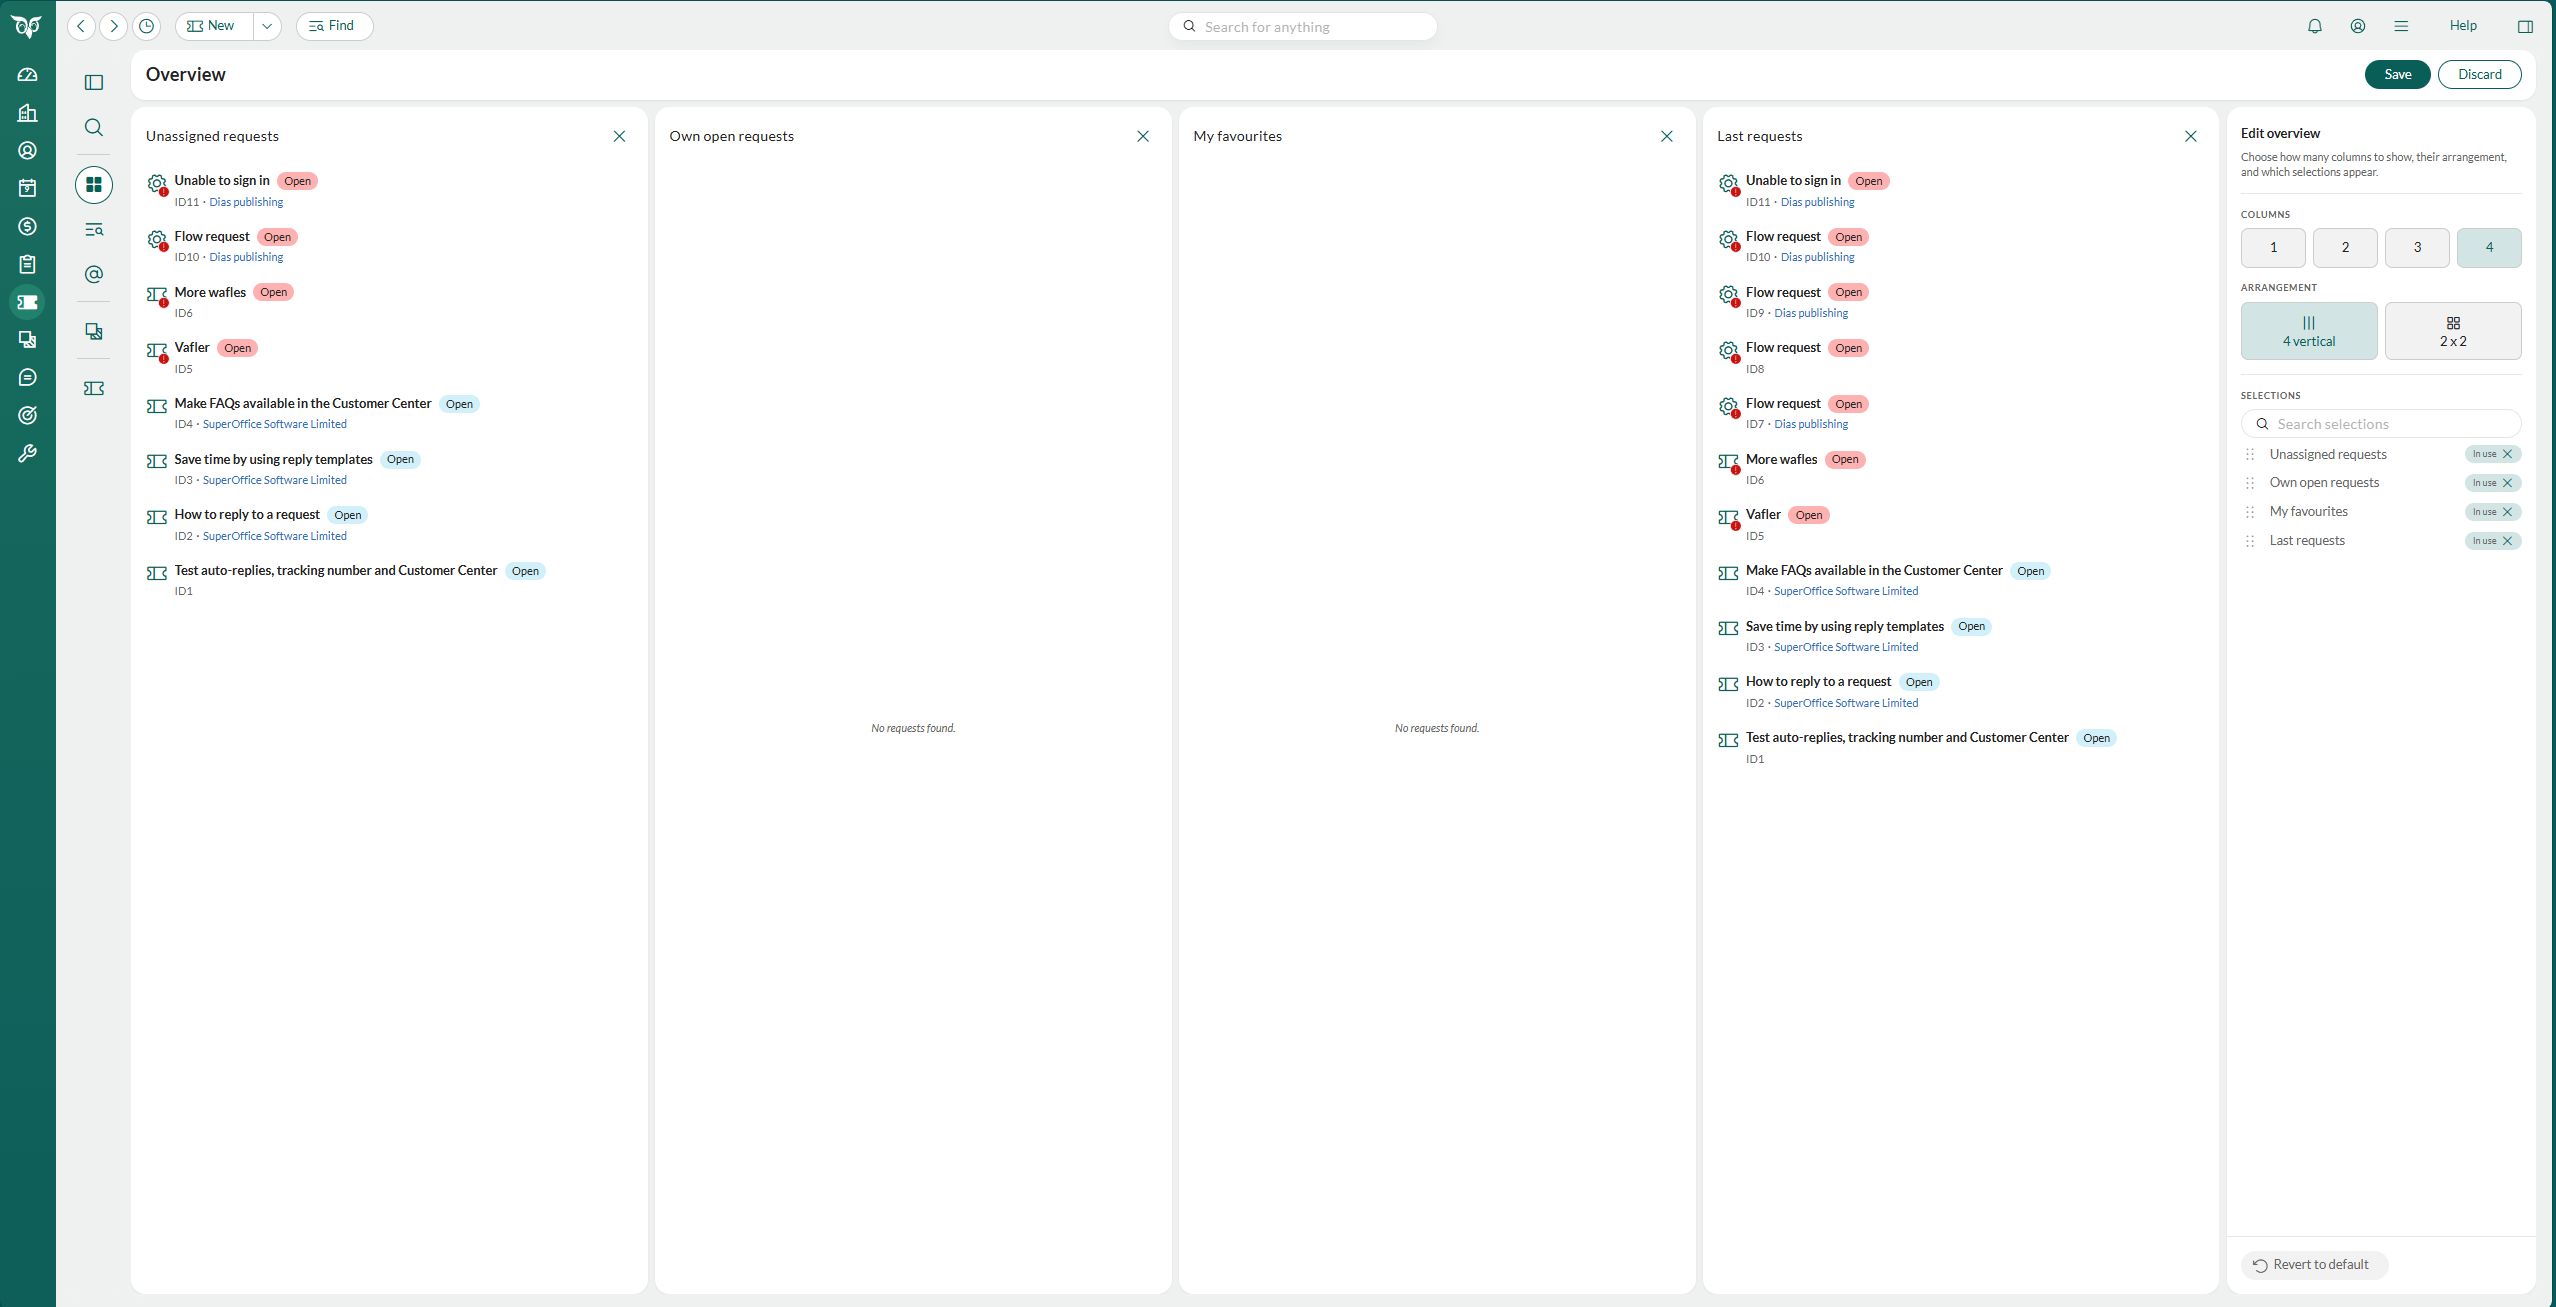
The setup of your Overview tab is saved in the browser you use. It does not follow you to another browser or device.
Change what the cards show
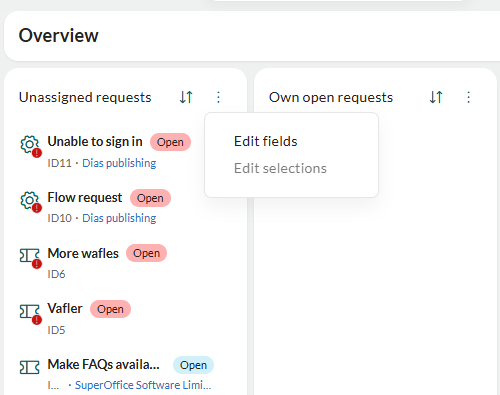
- Open the menu of the column and click Edit fields.
- Choose the heading of the card, and optionally a badge, from the list of fields. Search the list to find a field.
- Choose up to six more fields to show on the card. Drag the fields to change their order.
- Click Save. Click Revert to default to restore the fields of this column only.
Preview and update a request from the Overview tab
- Click a card. The request opens in a panel on the right, with the latest messages, the request details, and the reply buttons.
- Change the owner, status, category, priority, or tags directly in the panel.
- To keep working on the request, click (More options) and then Open in full view. Choose Pin request to add it to the Pinned group.
Work with the tabs in the left panel
Each section of the left panel has an Active group and a Pinned group. You can keep many requests and selections open in the Active group at the same time. A tab is either active or pinned, never both. Your tabs are saved, so they are there when you sign in from another browser.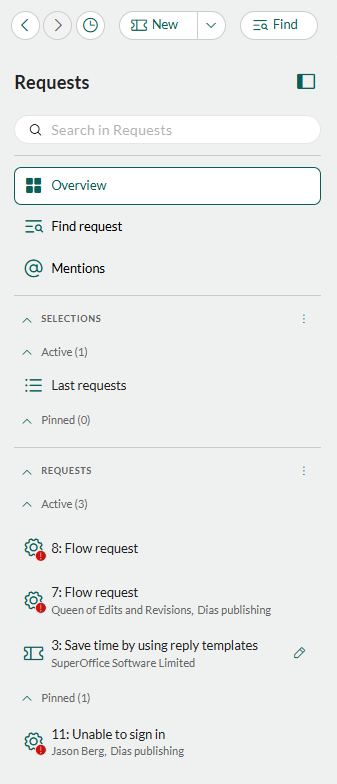
Open another tab
Open a request or a selection from the left panel, from the search dialog, or from a link in SuperOffice CRM. It opens in a new tab right after the tab you are on. The other tabs stay open, and each keeps its own unsent reply, edit mode, and scroll position.You can have up to 50 tabs open, counting active and pinned tabs. If you try to open more, the Too many tabs dialog appears and nothing is opened. Close the tabs you no longer need, and try again.
Close several tabs at once
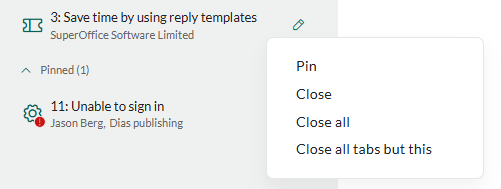
- Point to the tab and click (More options).
-
Choose an option:
- Close all: Closes all active tabs in the group.
- Close all tabs but this: Closes all active tabs in the group except this one.
Keep track of unsaved changes
A pencil () at the end of a tab means the request has unsaved changes. For example, you have an unsent reply, or you are editing the request. When you close a tab with unsaved changes, you are asked to confirm. If you confirm, the changes are discarded.Spot requests that others work on or have changed
Each request tab shows the ID and title, and the contact person and company below. If your system has Live UI turned on, you can see who else works on a request. A presence icon replaces the request type icon while another user views or edits it. When another user has changed the request since you opened it, a changed icon is shown instead. Point to the icon to see the names. If the tab of a selection or list shows the changed icon with The archive might be out of sync, reload it. The mark disappears when you reload the request or list.Close request tabs automatically
A request tab closes by itself in these situations:- The request is deleted, marked as spam, or merged into another request. The tab closes even if it is pinned. Merging from the request card opens the surviving request in its place.
- You add a message to the request, or set its status to Closed, and you have turned on the matching preference. Pinned tabs stay open.
- Click Personal settings > Preferences.
- Click the Request group.
- Set Automatically close tab when adding a message to request or Automatically close tab when changing request status to closed to Yes.
- Click Save.
The Request card
The Request card shows one request at a time, as a tab on the Request screen. It has the following sections:- At the top of the card, the request header contains basic information about the request, like id, title, contact and deadline.
- The request properties sidebar contains fields for Owner, Status, Category, Priority, Access level and Tags, all fields are editable with Save and Cancel buttons.
- Below the header is a row of buttons for performing tasks associated with requests, such as Reply, Reply all, Forward, and Add comment.
- The Messages tab displays the messages related to the request.
- The Details tab contains an overview of the data registered for the request.
- The Relations tab shows linked requests (parent, child, or related).
- The Change log tab contains the history of this request. The request log shows everything that has happened to this request since it was first registered.
Request header
The header of the request contains the properties defined when the request was created. The header consists of the request title, contact, deadline and request ID. In addition, you can click to set the request as a favorite. The request will then be accessible via My favorites on Requests in the Navigator, and in the My favorites tile on a dashboard.Messages tab
The Messages tab displays the messages related to the request. You can change how many messages are displayed, in Personal settings:- Select Personal settings > Preferences.
- Select the group for Request.
- Specify the number of messages in the No. of expanded messages field.
- Click OK.
Message types
There are three types of messages:- Enquiries from contacts or other external parties
- Replies to these enquiries, possibly asking for more details
- Internal comments about the request, such as questions to a colleague
Message tasks
Click on a message to access additional options for the message:- Change: Click here to edit or delete the message.
- Reply: Click here to reply the contact in the To field.
- Reply all: Click here to replay all contacts in the To, Cc and Bcc fields.
- Forward: Click here to forward the message.
- Email header: Click here to view the email header.
- Show: Click here to view the message in a new window/tab.
- Split message: Click here to split the message and create a new request. Useful if a message contains two issues that should be handled by different departments, for instance a technical question and an invoice question.
- Print message: Click here to print the message.
Details tab
The Details tab contains an overview of all the fields for the request.Change log
The Change log requires a Service Premium license or the Growth plan.

Request properties sidebar
The request properties sidebar contains the following options:-
Status: Shows the status of the request. You can change the status here.
- Open: The request is in progress.
- Closed: The request was fully answered.
- Postponed: Action on the request was postponed to a future date.
- Owner: The name of the request handler who is responsible for the request is given here. You can change the owner here.
- Category: The category that the request belongs to appears here. You can change the category here.
- Priority: Choose between Low, Medium, and High, or you can make the system assign the priority automatically. This can be done, for example, on the basis of escalation levels set for different contacts and companies.
-
Access level: Select one of the following options:
- External: Select this option if the contact is to have access to the request via the SuperOffice Customer Centre.
- Internal: Select this option if the contact is not to have access to the request. The request will be listed in SuperOffice Customer Centre, but the contact cannot view the request details or messages.
- Tags: In the Tags list box, select relevant tags for this request.
Task options
Task button: Click this button to access the following options:- Edit: Click here to edit the properties for this request. For example, you can assign the request to another request handler if you need to ask a colleague for advice.
- Accept: Click here to take over the request. You will then be the request’s new owner.
- Split: If a single request contains several questions, for example, if the customer first asks a technical question and then uses the opportunity to raise an invoicing query, you can split the request into two using this button.
- Merge: Click here to merge this request with one or more other requests. For example, if multiple contacts in the same company report the same technical issue (via phone, web forms and email), you can merge these requests into one request that will be processed. The oldest request becomes the primary request by default.
- Print: Click here to print the request.
- Delete: Click here to delete the request.
Request management
Incoming requests can arrive through many channels, and there is more than one way to register and reply to them. How request handling progresses will vary from request to request. A contact service system is all about providing your contacts the answers they are looking for and saving their contact information. Whenever you reply to a contact, they will receive an email from you. Which is why it is important to create your email signature.Typical tasks
- Take responsibility for requests
- Ask another request handler for help
- Reply to contact
- Edit message
- Split requests
- Forward messages or multiple requests to external parties
- Add requests to the favorites list
- Close requests
- Mark requests as spam

Scenario 1: The contact submits the request by email
- The contact writes an email to support@company.com or fills out a form in a user-support portal.
- The contact receives automatic acknowledgement of receipt of the enquiry.
- The enquiry from the contact is automatically registered as a request in SuperOffice CRM.
- The request ends up with a request handler in SuperOffice CRM. See Assign requests and Find requests.
- The request handler reads through the request.
- The request handler is unable to fulfil the request on their own and does one of the following:
- The request handler sends a response to the contact.
- The request handler closes the request and proceeds to deal with other requests.
Scenario 2: The contact calls the request handler
- The contact has a problem with a product and calls user-support.
- The request handler who answers the call registers the request.
- The request handler is unable to fulfil the request on their own and does one of the following:
- The request handler sends a response to the contact.
- The request handler closes the request and proceeds to deal with other requests.
Personal preferences
You can customize requests to suit your workflow:- Go to Personal settings > Preferences.
-
Select Request and adjust settings such as:
- Show the last message at the top.
- Use the oldest request as the main request when merging.
- Preview image attachments in messages.
- No. of expanded messages.
- Automatically quote the last message.
- Show only own categories.
- Automatically close tab when adding a message to request.
- Automatically close tab when changing request status to closed.
- Default owner, category, and status for new requests.
-
Select Notifications via e-mail and adjust settings such as:
- New requests or messages.
- Request escalated.
- Click Save to apply your changes.
Your availability status
Your availability status determines whether you receive requests through automatic assignment. It also affects the assignment of contacts. To update your status, click Personal settings in the top bar and select Your availability status.- Present: You are available for automatic assignment of requests and contacts.
- Not present: New requests will not be assigned to you. Your out-of-office message will be shown next to your name when someone manually assigns an item.
Global preferences
Administrators can customize Service for all users in Settings and maintenance.- In Settings and maintenance, select Preferences in the navigator.
- Go to the Global Preferences tab and scroll down to the SuperOffice Service system settings section.
- Anonymise users on reply
- Default From address
- Default style for outbound email
- External access level as default
- New status when accepting a request
- Send email notification of open requests